Showing posts with label Sorting. Show all posts

Wednesday, June 15, 2016

Gumball Sight Word Sort


Our six-year-old's reading skills are really coming along. But he nervously exclaimed, "Mom, I'm forgetting my sight words!" a few days ago. To keep those 100+ words he learned in kindergarten locked in his brain for good, and to especially work on those that trip him up, I cooked up a simple activity.


This word work takes hardly any time to prepare and can be used with any words your child needs to work on. For that matter, you could use the same concept to practice math facts even.

What You Need
The 1-page PDF of gumball machines
Office paper
Dot pricing stickers
Pen or marker


Download the gumball machine PDF free from Google Drive here. Print on plain 'ol office paper.

At the bottom of each machine, write one sight word. I chose four that my son sometimes confuses: them, there, here, and the. I wrote these same words in random order on the dot stickers.

When I gave him the activity, we first read the words on the machines. Then I asked him to place the stickers (aka gumballs) on the right machine, saying them as he sorted.


This simple activity works relies on repetition to reinforce learning. It's simple and whimsical. And I think my son would say fun, too.

Enjoy!


Friday, July 3, 2015

CVC Words Hunt


Those little consonant-vowel-consonant (CVC) words are a great way for kids to practice phonics, listening for beginning and ending sounds, early reading skills, and spelling.

I snapped some photos and made several cards for my son to hunt, sound out, and spell.

The words I used are:
hat
pot
pen
car
jar
box
map
can

Download the cards I made for free from Google Drive here.


How to Play
I cut the cards for four words and scattered the cards throughout our living room, using scotch tape to secure them to the tv cabinet, ottoman, fireplace mantel, etc.

Here's the instructions I gave our 5-year-old.

You'll be making four words. Each word has four cards, one of which is a photo. Find a photo first, then find the letters in the word by looking at the color on the cards.

Once you find four cards of the same color, try to put the letters in order to form the word for the object in the picture.


Listen to the beginning and ending sounds to put the letters in the correct order.

Note: The pink- and red-bordered cards may look similar, depending on how your printer ink. To avoid confusion, don't use those words together.

When my son was done, I gave him four of Trader Joe's sour gummies. Our kids rarely get candy so this was a special treat, and because the gummies come shaped like the letters T and J, they seemed to be the perfect prize for all his word work!

Wednesday, October 22, 2014

Collect, Sort, Graph, & Count Fall Leaves


The Autumn foliage colors peaked here last weekend. We soaked in the opulence during a trip to a state park, apple orchard, and CSA farm. The family fun was a springboard for several leaf activities, all of which were fun.


1. Fall Leaves Hunt
The last leaf hunt my son went on, we packed some crayons and made rubbings. This time, we left the crayons at home and just let our eyes search out eight various types of leaves. (Click the picture below to download a free PDF of the ID page I made.)


I clipped a page with the names and images as a cheat sheet onto a mini clipboard. It was up to him to make tally marks or simply X through the names or images. We tucked the leaves in a gallon-size ziploc as we walked the trail.


2. Sort by Color and Make a Life-Sized Graph
I pressed the leaves between layers of paper towels (since a few were wet) under a heavy book. The next day, they were ready for us to use. I grabbed some leftover painters tape and made a big grid on the carpet in our living room. I made red, orange, yellow, green, brown, and purple cards as well as a numbered set. I placed these on the grid to complete our empty graph.

It took the boys no time at all to deduce what they were to do. They immediately set to work. "Is this purple or brown," they would ask each other. I loved their decision-making and how well they worked as a team to complete the graph.


When it was done, there was a three-way tie between brown, yellow, and red leaves. (This idea came from Little Giraffes.)


3. Sort and Graph by Type
When we'd finished our leaf color graph. We removed the leaves and the color cards, and I placed two other cards at the bottom of the graph: maple and oak. Now they graphed which we had more of. The clear winner was maple!


4. Arrange from Smallest to Largest
As they cleared the graph of the leaves, I grabbed several and asked our 5-year-old to put them in order from smallest to largest. He was a little lost at first but I asked him to "Find the smallest leaf" and it was removed. Again, "What is the smallest leaf now?" And so it went until we had them all lined up.


5. Preserve by Laminating
Lastly, the boys picked their favorite leaves from our collection and I put them in plastic laminating sleeves, running them through my personal laminator, to save and admire for weeks and months to come. They look like stained glass in our window! (This idea came from Mama Smiles.)


Wednesday, August 6, 2014

Free Printable Vertebrates Dominoes


My fourth grader loves animals. I thought I'd make a second vertebrates game for us to play (see our vertebrates card game here). These dominoes really test players' ability to categorize animals into the five classes of vertebrates:

  • Amphibians
  • Birds
  • Fish
  • Mammals
  • Reptiles

How to Make Vertebrates Dominoes
Download the free 4-page PDF of dominoes I made from Google Drive here. Print on heavyweight cardstock. 


Glue them to 6mm craft foam sheets with Foamies glue. Using a straight edge and a craft knife, carefully cut the dominoes apart. Now you're ready to play!

How to Play
This game is played like a traditional game of dominoes. Between 2-4 people can play.

Place the dominoes in a pile upside down so the animal silhouettes are not visible. Each player should take five dominoes from the pile, keeping the images on the dominoes private. In a traditional game of dominoes, this pile is called the boneyard. Feel free to call it the vertebrates zoo, if you want.

The youngest player with a double (two animals from the same class [i.e. mammals] featured on the same domino), takes the domino and places it in the center of the table between the players.

NOTE: Doubles look different and have a light grey border around the two animals.

The next player looks at their five dominoes to see if they have a domino with an animal from the same class as the double domino played. For example if a double domino of two mammals is played first, the next player can play a domino with a human on it. The side of the domino with the matching class of animal should be placed next to the double domino perpendicular. If he/she has additional dominoes to play, they can lay them down during their turn.

Play alternates between players with the objective of getting rid of all your dominoes. The first player to play all their dominoes is the winner.


If a player cannot play when it's their turn, they must draw from the vertebrates zoo pile until they draw a domino with the needed class of animal featured.

At the end of the game, the player with unplayed dominoes is given a point for every domino in their hand. Play as many rounds as you have time for, keeping a tally of each round's score. The winner of all the rounds is the player with the lowest score.

Here's a list of the animals featured on the dominoes.

Amphibians
Frog
Salamander
Newt
Caecilian
Toad

Birds
Falcon
Cockatoo
Chicken
Flamingo
Penguin

Fish
Angelfish
Goldfish
Barracuda
Shark
Seahorse

Mammals
Dog
Human
Kangaroo
Whale
Platypus

Reptile
Alligator
Cobra
Turtle
Iguana
Tortoise

Looking for a simple, easy reader book to pair with this activity? I'd recommend Real Size Science: Animals by Rebecca Rissman. This book has a great quick reference visual of the five classes of vertebrates that we used when we weren't sure of an animal's class while playing.

Friday, July 25, 2014

5 for 5: Free Printable Vertebrates Card Game


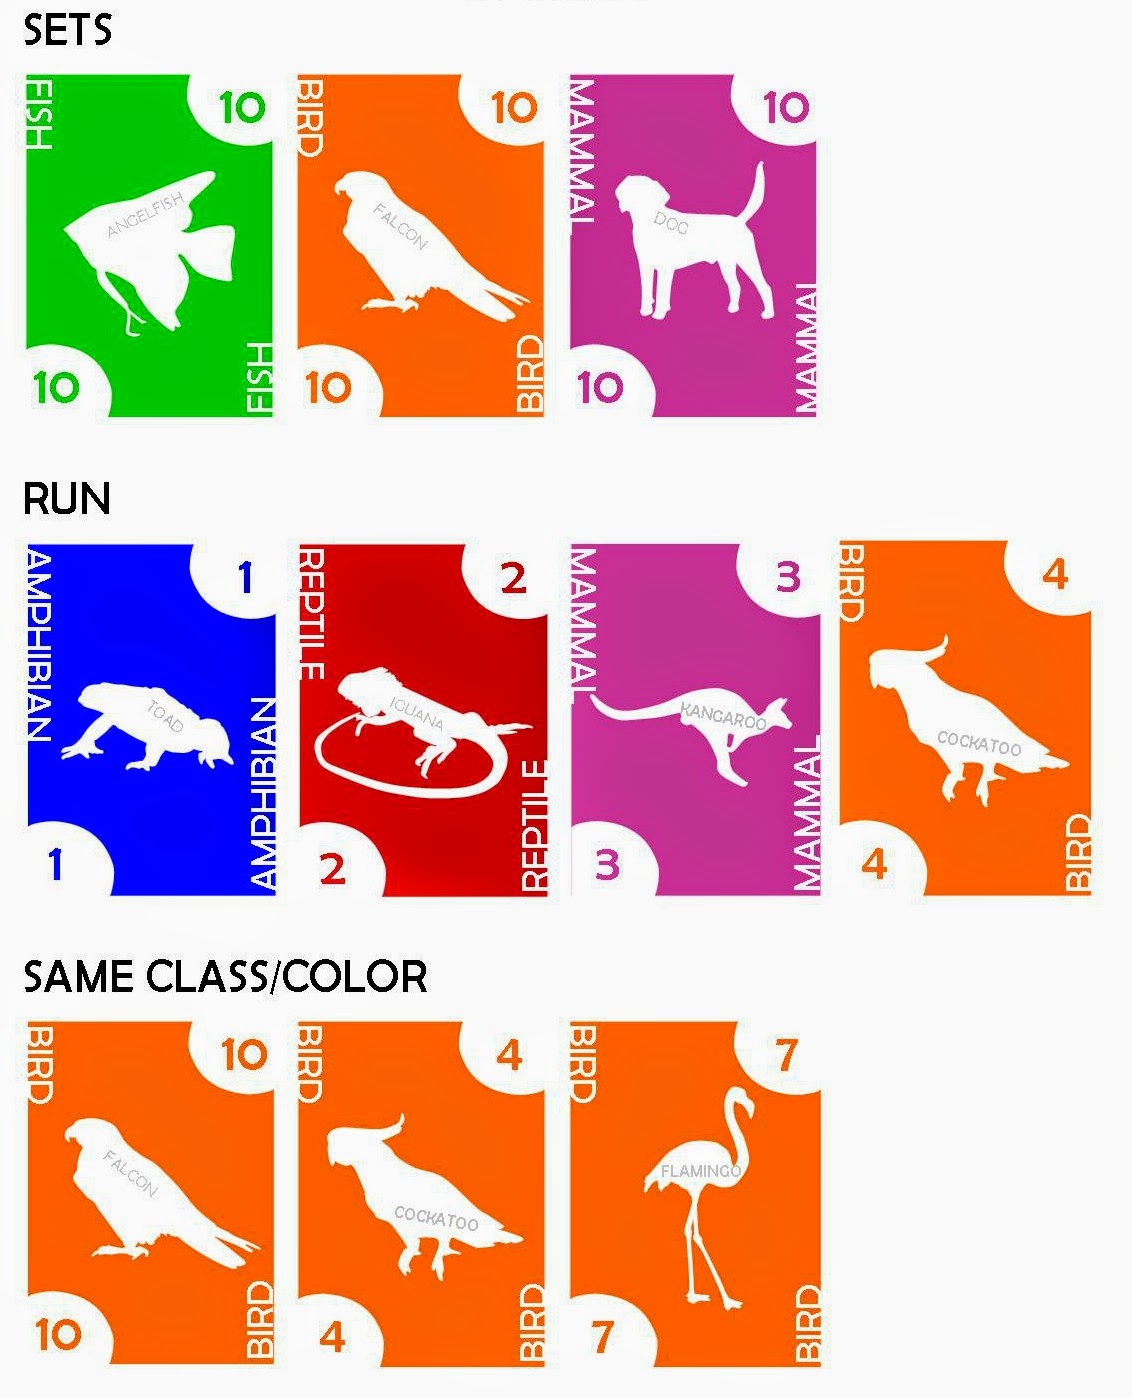
Have you ever played Phase 10? It's a rummy-type card game and it's the inspiration for this vertebrates card game that features examples from the five classes of vertebrates:
amphibians
birds
fish
mammals
reptiles


Prep
Download the free 9-page PDF from Google Drive here.
Print pages 1-8 on heavyweight white cardstock.
Print page 9 (a reference sheet) on plain office paper.
Use a paper trimmer to cut all the cards apart.
Shuffle


The Objective of the Game
Be the first player to complete all rounds of play. If all/both players complete the rounds at the same time, the player with the lowest score wins.

How to Play
Deal 10 cards to each player, who keeps their cards from opponents' view. The rest of the deck is placed in the middle of the play area and the top card is flipped over to start a discard pile.

The youngest player starts play by drawing a card either from the draw pile or the discard pile. Their turn ends when they discard one card.

Play starts with players trying to get all the cards necessary for Round 1. The rounds follow:

Round 1: 2 sets of 3
Round 2: 1 set of 3, 1 run of 4
Round 3: 7 cards of one class/color
Round 4: 1 set of 4, 1 run of 4
Round 5: 1 run of 7

Each player only makes one round per hand.

Sets are cards of all the same number. Runs are cards with consecutive numbers. And cards of one class/color are all the same type of vertebrate (e.g. all cards are reptiles).


WILD cards can be used to complete a round, in place of a missing card. For example, if a player is creating a run and has a 1, 2, and 4 card. They can use the wild card in place of a 3 card.

SKIP cards, when discarded, cause another player to lose their turn. Skip cards are never laid down as part of the round's cards.
Once a player has all the cards specified in that round, they lay them down on the table in front of them for everyone to see.  Any additional cards a player may have that go along with these cards can be added (e.g. if a player has four 3 cards, but only needs three, he/she can lay down the extra card).

The player can continue to add cards to their own displayed hand and once other players lay down their own sets/runs/all-one-color hands, opponents can play on them as well.

The goal is to get rid of all your cards, while drawing and discarding each turn.


If a player plays all their cards, opponents must tally their score based on the remaining cards in their hand.
Cards numbered 1-5 = 5 points
Cards numbered 6-10 = 10 points
Skip cards = 15 points
Wild cards = 25 points

If a player has yet to lay down all the specified cards in the round when another players goes out of cards, not only will their score be high, but the next time you shuffle and begin play again, they will need to repeat their attempt to get that round's cards again.

This means that players may be striving to make different rounds' hands.

Shuffle cards and deal 10 before each round.


Want a perfect book to go with this game? We read Animal School by Michelle Lord. It contains a description (in rhyming verse) of each of the five classes of vertebrates. It also has a great matrix toward the back of the book that identifies their characteristics (some exceptions) and species from each class. This book was the perfect complement to our activity!

Wednesday, September 4, 2013

Mean, Median, Mode, & Range Game


When I saw a few questions on my son's Everyday Math homework about median, I was psyched.

Creating a game to practice calculating mean, median, mode, and range was a snap. And, boy oh boy, was it fun to play!

Kids practice SO many skills with these calculations - ordering numbers for median, addition and division for mean, and subtraction for range!

Before we got started, we reviewed how to calculate each. He read the following rhyme that I'd found on Pinterest (genius, isn't it?!):

Hey, diddle diddle,
the median’s in the middle;
you add and divide for the mean.
The mode is the one that appears the most,
and the range is the difference between.


Prep
You can print our game here. The 4-page PDF contains 3 sets of numbered cards (1-10), a spinner to make, and a scorecard.


To make the spinner, I printed the template onto a piece of sticker paper. (Don't have any? Use a glue stick instead.) I stuck it to the brown side of a recycled cardboard cereal box. Then I cut it out, punched a hole in the middle of the spinner and the arrow, threaded a brad through both and loosely (so it spins freely) separated the prongs on the brad at the back of the spinner.

I printed 6 sets of numbered cards (2 copies of the two pages in the PDF) onto heavyweight cardstock; truthfully, I only needed five sets, but since I'd designed the layout to feature 3 sets on two pages, printing extra was inevitable.

Want to save some printer ink? Forego this download and grab a deck of cards. Use aces as 1s, and eliminate the kings, queens, jacks, and jokers. Instead of a spinner, decide which you'll calculate for each round (mean, median, etc.) and use scratch paper for score keeping!


Play
I dealt five piles of five cards each face down in front of my son and I (i.e. we both had 25 cards in front of us in five even piles).

For each round, we took turns flicking the arrow on the spinner. Next, we turned the cards on top of each of our piles over. If the arrow pointed to mean, we each figured out the mean (he used a calculator).


We checked the box on our scorecard to indicate that Round 1 was mean, wrote down our two scores (the number resulting from our calculations), and removed the cards from our piles, setting them aside, so we could prepare for Round 2.

After five rounds of play, we totaled our scores. The player with the highest number wins!

Friday, August 23, 2013

Color Hunt & Fruit Rainbow


When planning an activity for an 8- and 4-year-old, it can be hard to find an idea that will keep both stimulated. These two activities fit the bill. My boys had a blast!


Color Hunt
A local park in town has the most breathtaking display of flower beds. I spend so much time ogling the flowers as I drive by, it's surprising I haven't rear-ended someone. To share the beauty of the gardens with my family, I planned a Color Hunt.

The supplies were simple: six large paint sample strips (ours were BEHR from Home Depot) in the colors of the rainbow (i.e. reds, oranges, yellows, etc.), which I cut in two.

I punched leaves out of the hues and used a brad to hinge them all together. I gave each of the boys their color book and sent them exploring to see how many of the colors they could find in nature.


This was SUCH a simple activity. What we found was that blue was an especially difficult color to find a flower of; we had to look no further than the sky, though!


Fruit Rainbow
The next day for a snack, I prepared a plate of various fruits for the boys. In front of them I placed a Rainbow Placemat that contained boxes for each of the colors.

The boys were instructed to place fruits of the correct color on their mats in the order specified. My oldest son's placemat had the full seven colors of the rainbow (red, orange, yellow, green, blue, indigo, and violet), while the 4-year-old's contained the six basic colors (i.e. purple instead of indigo and violet).

,

Download a 4-page PDF of both placemats here. Print, tape together, and laminate for durability.

FRUIT WE USED
Red: Strawberries
Orange: Mandarin oranges
Yellow: Pineapple
Green: Kiwi
Blue: Blueberries
Indigo: Grapes
Violet: Raisins

The boys used a small pair of serving tongs to move the fruit from the platter to their placemat, which provided a little extra fine motor practice for the younger of the two of them.


Alternative: Not a fruit-eating family? Have kids collect everyday objects from around the house to add to their rainbow mat!

(This isn't the first time we've eaten a rainbow. Check out our rainbow cupcakes and word puzzle here.)


Book Recommendations
To conclude our color fun, I read a book with each of the boys. The PreK book I chose for my youngest is by Betty Schwartz. This Magic Ribbon book is such a treat to read with its colorful animals. My son never ceases to be impressed when he turns the page and a new ribbon of color has been added to the rainbow from the previous page.

My oldest son and I enjoyed E. C. Krupp's book The Rainbow and You. It taught us a ton about how ancient cultures thought of the rainbow, who Roy G. Biv is, how the eye sees color, what rainbows are made of, etc. Both of us were astonished to discover how little we actually knew about these weather wonders!


Thursday, April 4, 2013

There, Their, or They're: You Be the Judge


My son got off the bus last week with a long face. He'd failed the pre-test and came home with the easy list of spelling words. I was surprised; he's good at spelling. As soon as he handed me the list, I understood.

There. Their. And they're. That's what had happened.

Not only had his teacher expected him to spell them right, but he needed to know when to use which one in a sentence. My son had totally botched it up.

Those three words sound EXACTLY the same but are used COMPLETELY differently. How confusing!!

To help him study, I gave him a little lesson with some tips and tricks.

There
Within this word is another word: here. There usually represents a place.
Very often, if you can substitute here in place of there, you've used it correctly.

Their
This is a possessive pronoun. I reminded my son that "I" was also a pronoun, which was a hint to help him remember that this their is the only one spelled with an i.
If you can replace their with our and the sentence still makes sense, you've used it correctly.

They're
Among these three words (there, their, and they're), this is the only one that is a contraction. It's an abbreviation for they are.
If you can put they are in place of they're, you used the right word.

Now it was time to put his knowledge to the test.

Download a 1-page PDF of this worksheet here.

"You be the judge," I said. "Read the sentences on the post-it notes and decide if the correct there, their, or they're was used."


I reminded him that the scale on my DIY worksheet needed to be balanced, so an equal number of sentences should be on the incorrect side as the correct side.

This took LOADS of thought and he referenced the cheat sheet of hints I made several times. I was so proud when he caught two misplaced sentences moments before handing me the worksheet to check. He'd sorted all the sentences correctly!


I gave him eight sentences to sort. Here they are, along with some extras we'll be using for future practice:

Correct:
I put my shoes right there.
It was their team's turn to answer.
They're my favorite band!
There is the book I lost.
Their car is blue, not grey.
I asked, but they're out of town that day.
Let's go there.
Their house is the one with the picket fence.
They're too short to ride the roller coaster.

Incorrect:
Their are no cookies left!    <<should be there>>
There excited for the party.   <<should be They're>>
Why didn't they listen to they're teacher?   <<should be their>>
Are we almost they're?  <<should be there>>
Their daydreaming, instead of listening. <<should be they're>>
There project was the winner. <<should be Their>>
My favorite pizza place is right their.  <<should be there>>
I can't see them; there too many people here.  <<should be they're>>
Lots of people are stopping at there lemonade stand. <<should be their>>

Monday, October 22, 2012

Love in Many Languages Puzzles


Have you seen that commercial from Allstate? The one with the male (supposedly) French model she met on the Internet? My seven year old has been walking around the house saying “bonjour” thanks to this little marketing spot.

To springboard off his new found interest in foreign languages, I made him a series of four heart-shaped puzzles.

Each heart contains three pieces: the shape of a country, that country’s flag, and the way you say “I love you” in the language spoken there.
Download a free 2-page PDF of these puzzles here.
I printed the puzzles on cardstock, spray glued them to craft foam and cut them out. Then I jumbled them all together so my son had to really work to put them together.


He referred to his Reader’s Digest Children’s Atlas (which has each country’s flag in the back) for help.


While this wasn’t an extensive foreign language lesson, it was fun to exchange I love yous with my son in a language other than English!

Tuesday, October 9, 2012

Fraction Match (in the Grass) Card Game


They’re working on fractions in my son’s second grade class. When he told me that he thought it was kind of hard, I asked him, “Should we practice a little extra at home?”

“Yeah!” he responded. “Maybe you can make me a fraction game, Mom.”

Here it is. And here's what you need to make it.
  1. Fraction cards (download a PDF here)
  2. Heavyweight card stock to print the cards on (six sheets)
  3. Scrapbook paper imprinted with grass pattern (six sheets)
  4. Glue to adhere the scrapbook paper to the back of the card stock (I used spray glue)

Assembly
Print the cards on card stock. Glue the scrapbook paper to the back. Cut the cards out.

How to Play
Fraction Match is a modified “Go Fish” game. Deal each player six cards. Spread the remaining cards face-down (i.e. grass up) in between the players.

Each player lays their six cards face up in front of them in a row. If any of the cards represent the same fraction, they should be put together in one pile. In order for any match to be complete, the player must have THREE cards that represent the same fraction.

Every match has THREE cards.

Player 1 can either trade a singular card from their “hand” with an opponent or draw from the grass (the pile in the center). Note: Cards cannot be traded if a pile of two cards has already been started by the opponent (for example: ¾ and a pie with three of the four pieces colored in). Only single cards can be traded.


When a player has all three cards that make a fraction match, the pile is turned over to reveal the grass on the back of the cards.


Play continues back and forth between players until all the cards in front of one player have been matched, the piles have been turned over, and are therefore, all grass side face-up. This player wins!

Looking for a great book to pair with this activity? Read Loreen Leedy's Fraction Action! My son loved this book and had fun answering the word problems scattered throughout.

Monday, July 9, 2012

Word-Eating Whale [Nouns & Verbs]


Did you see? Stores are already putting school supplies out!! To keep my son from forgetting some of the valuable information he learned in first grade, I thought a recap of parts of speech was in order.

My inspiration was the amazing recycled whale I saw on Growing Up Gardner. 

Once our empty gallon-sized plastic milk carton was rinsed out and dry, I outlined the mouth on the bottom of the carton and cut it out using a craft Exacto knife. 


Then I added the eyes and fins (oops, I forgot a blowhole!!) with a permanent marker.


I took the cap off the milk carton and grabbed a stash of plastic lids I’d been saving (21 in all). I divided the lids into two (almost even) groups and, with a permanent black marker, wrote verbs on about half of the lids and nouns on the rest.

Now I filled up the bathtub with a few inches of water and threw the lids in, word-side up.


Before doing anything else we read Nouns and Verbs Have a Field Day, a playful book about what nouns and verbs are and how much they need each other to make sentences. Super fun!


After reading, my two boys headed into the bathroom, stripped off their socks, and my oldest waded in the tub (the youngest joined in the fun shortly thereafter). I explained: “The whale is hungry. He only eats verbs for lunch. If he accidentally eats a noun, he’ll spit it back out into the water in disgust.”


My son steered the whale through the water, carefully scooping up lids. He held the whale upright to drain the excess water out of the milk jug lid’s hole before putting the verbs he’d caught into a plastic bin that I'd set out.

He made a few mistakes and really had to think when I told him “baseball” was not a verb. “But I can do it, Mom!” To which I responded, “You play baseball. And play is a verb, not baseball. It’s a thing.” Now he understood and made the whale spit the lid back out.

This whale has been loads of fun. Not only have we practiced nouns and verbs, but it's a great bath toy (my toddler loves it too!).

Monday, June 25, 2012

Post-It Page Marker Math


I love Post-It® notes. So does my son. I’m not sure what either of us thinks is so special about them, but whenever our learning activities involve Post-Its, we BOTH have fun. This activity is no exception.


I bought a pack of multi-colored Post-It Page Markers at the store and designed three pages for my son to stick them to. Each page has a different number on it (i.e. 12, 25, 60).


On the Post-Its I wrote a variety of math problems (addition, subtraction, and even a few easy multiplication ones). Each pad of page markers had problems with answers that matched to different pages.


It was up to my son to answer the problem and stick the Post-It Page Marker to the right page, giving the lion a mane, the hedgehog quills, or the child hair.

My son had loads of fun with this activity, pushing himself to get each problem right. When he answered wrong, he knew it. There was no page for that marker! He recalculated, and found the marker’s home.


My son solved 33 problems doing this activity (15 for the lion page, 10 for the hedgehog, and 8 for the child)!!


Want to do this activity with only one page? Simply write a variety of problems, many with the answer that’s on the page and other problems with answers that are not. Challenge your child to match-up the right problems and reserve the ones with the wrong answers.

Download the pages I made here.

Monday, February 6, 2012

Quarter To, Quarter of, Half Past [Time Sort]


When my son’s first grade teacher sent a note home to parents telling us what we could work on with our sons and daughters, I didn’t ignore it. One of the things she suggested was a little extra practice identifying when times were “quarter to,” “quarter past,” and “half past.”

To work on this with my son, I created some clocks of these times. (Print the 2-page PDF I made here.)

I cut them out and labeled three pieces of paper “quarter to,” “quarter past,” and “half past.” It was up to my son to look at the clock cards and sort them into the right piles.

He whipped through the stack in no time. To check his work, I had him read back the times in each pile.

OOPS! He had several “quarter to” and “quarter past” times confused!


Having him read them aloud was a good reminder, too, that the “quarter to” times were one hour ahead of where the little hand was pointing.

This was a simple activity that really helped my son improve his time-telling abilities.