Showing posts with label Writing. Show all posts

Friday, January 8, 2016

Alphabet Trace Race (free printable handwriting game)


Our six-year-old son is doing a great job learning to read. His writing, though, well ... that's another story. He frequently writes letters backwards, which his teacher assures me is pretty common at his age. To give him lots of practice writing letters the RIGHT way, I wanted a game that was vastly more fun than handwriting worksheets.

Alphabet Trace Race was born.


The game is simple. To make it, simply download my free PDF from Google Drive here. 


Print all the pages on heavyweight cardstock. You'll need to print multiple copies of the Alphabet Trace Race game card, one for each player. We printed two sets of the letter cards as well.

To reuse the game again and again, either laminate the game cards or slip them into a plastic sheet protector. Dry-erase markers work wonderfully with either of these options.

Once the cards are cut and shuffled well, place them face down between players. Each player takes turns drawing a card. 


They then say the letter on the card and trace it on their game card. The opponent(s) does the same. Because some letters have more cards, it's a race to see which player will complete the race by tracing EVERY letter on their card first. 


If a player draws a card with a letter already traced, their turn is over.

You may need to reshuffle the game cards throughout play. Print more than one set to reduce the number of times you will shuffle.

Wednesday, December 16, 2015

Bs and Ds on Bumblebees (free printable worksheets)

Those darn lowercase Bs and Ds are SO tricky for kinders, my youngest included. This, of course, isn't a new problem. Our oldest boy mixed them up too when he was younger. 

It might be time to break out our B, D, P, and Q spinner again (check that out here).

To get some more practice in, I created some fun worksheets to be used in a variety of ways. We used the first of the four yesterday. 


We started with the Bs and Ds on Bumblebees activity sheet. I handed my 6-year-old son the paper and two strips of yellow dot stickers; onto half of which I'd written upper case Bs and the other half had upper case Ds. 

It was my son's job to look at the lowercase letters on the bumblebees and cover each with its uppercase counterpart. 


This required a lot of thought and concentration, but my son did great! When he stumbled, I used the "bat before the ball" and "doorknob before the door" tricks to remind him.

Download the four worksheets I made for free from Google Drive here.


Aside from matching up dot stickers, kids can color all the Bs one color and the Ds another, or trace only the Bs or Ds, cover the Bs with flattened glass baubles, etc. These can be used in so many different ways. You can even laminate or insert them in plastic sheet protectors and use with dry-erase markers over and over.

Enjoy!

Wednesday, November 5, 2014

Free Printable Cursive Dominoes


It happened. My son's fourth grade teacher asked the class to write their spelling words in cursive. (gasp) So I asked him, "How'd you do?"

"Bad."

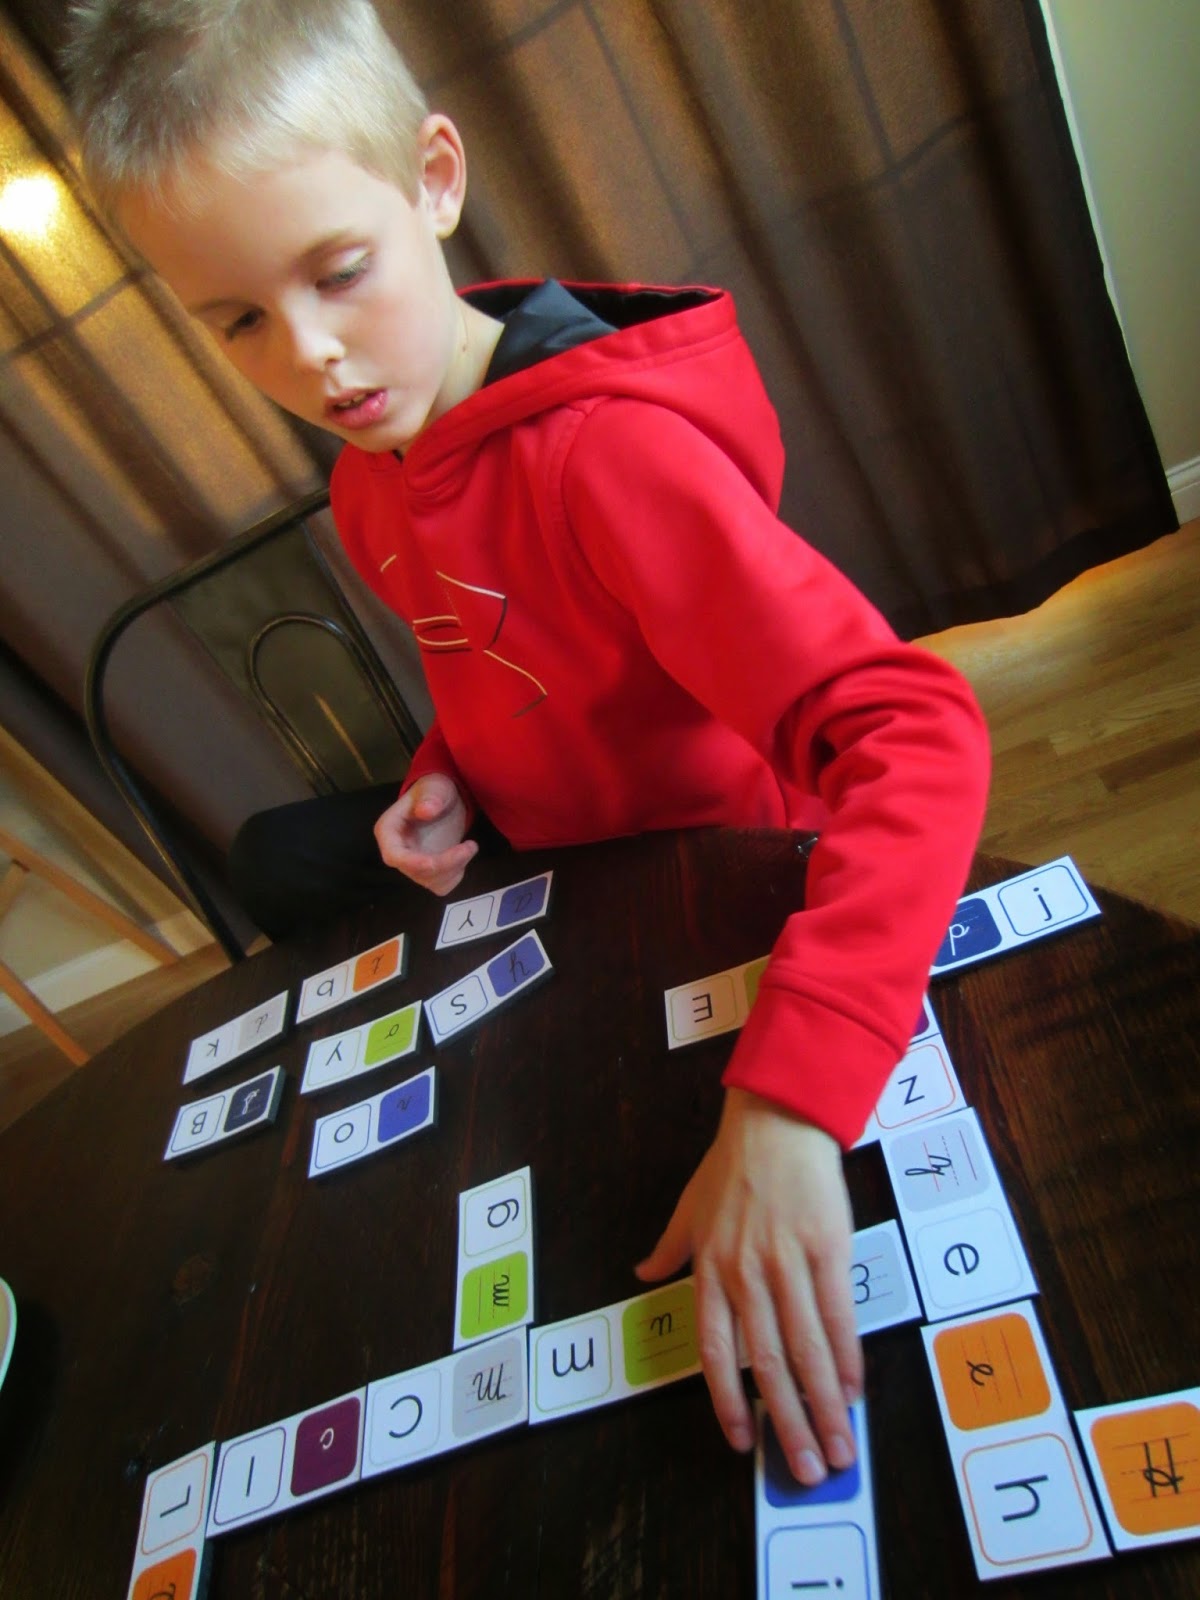
Oh boy. It seems our cursive practice has come a week or two too late. With that in mind, I cranked out these fun dominoes to help engrain the cursive letter formations in my son's brain.


He's also practicing his cursive penmanship with This Reading Mama's FREE Cursive Handwriting Worksheets.

Preparation
I like to make my dominoes nice and thick but it's unnecessary. You can always just laminate and cut apart for extra durability. If you like the look of ours, here's how I did it.

Print the 5-page PDF onto heavyweight cardstock (click here to download the file free from Google Drive).


Apply Foamies glue to the back of the cardstock pages with a foam brush and let dry for 10-15 minutes. I've tried other glues and you have to use a glue specifically for foam. Then apply each page to a sheet of 6mm craft foam.

Using a straight edge, cut the dominoes apart with a craft knife.

Play
We each drew five dominoes from a pile of the upside down dominoes. The youngest player (my 9-year-old son) placed the first domino in front of us. From there we each tried to add another, matching like letters (either manuscript/cursive or upper/lowercase) and butting them up against each other. If we didn't have domino in our hand with a letter that had been played, we kept drawing until we could play.


There were a few times when my son had to stop and ask, "what letter is this?" (I took this as proof that the game was needed.)

Read
My son read a GREAT book after our game. It's a wonderful pairing for this activity, as it's all about cursive. Its history slant makes it perfect for kids that love social studies!

>

Friday, October 31, 2014

Cursive Match-Up (Lowercase Pegboard Practice)


My 9-year-old's penmanship is not always legible. As a kid diagnosed with ADHD, the patience and fine motor required to print nicely, just aren't there. When his school teacher mentioned cursive on parent curriculum night, I cringed.


My options were watch him struggle or decide that it wasn't important. I wasn't comfortable with either. My son loves history and if he ever stands in front of the Declaration of Independence, I want him to be able to read it.

To begin working on cursive at home, I first wanted to test his familiarity with the lowercase letters. He was exposed to cursive last year, but I wondered what his recollection was. I made a set of four pages for our pegboard (find out how I made it here). Download the 4-page PDF here. This is the first of a series of activities I have planned for him.


The pages require him to match up lowercase manuscript letters with their cursive counterparts. The matches are indicated by stringing rubber bands on the nails from one to the other.

Can't be bothered to make a pegboard? Print my pages, slip them in plastic sheet protectors, and hand kids a fine-tip dry-erase marker to draw lines!


I've said it before, but what I love about these pegboard practice pages is that kids have options. It's like taking a multiple choice test. At first my son incorrectly matched the cursive r with the manuscript n, but later was able to see when the remaining letters didn't match, that he'd made an error.

We read the perfect book to pair with this activity, and for any kids who struggle with good penmanship. The message is truly outstanding - try your best, but in the end, it's what your words are saying that is more important than how beautifully they're written on the page.

Friday, September 13, 2013

Fill the Bushel Spelling (or Sight Word) Game


This week was my first time volunteering in my son's 3rd grade class. The teacher had me work one-on-one with a few students helping them learn their spelling words. It reminded me of just how boring studying spelling words can be. In brainstorming new ways to practice with my own oldest son, I came up with this idea.

This little game focuses on learning five words.

Quiz your child or look at their pretest to see which words on the list they are struggling with. Those are the five.

For this game you need to print five bushels and a special die. Download the 6-page PDF I made here. Print onto heavyweight cardstock. Cut, fold, and glue the die together.

Either laminate the five bushel pages or slip them into plastic sheet protectors. Label each on the line at the top of the page with one challenging spelling word (or use sight words if that's what you're working on). Use a fine tip-dry erase marker.


Now grab your kiddo and tell them it's time to "Fill the Bushel."

How to Play
The player rolls the die. If they roll a four, for example, they find the page with that number on it, look at the word at the top of the page, and copy it onto one of the apples in the bushel with the dry-erase marker.


If the player rolls the worm, they roll again until the die shows a number. That number tells them what bushel to erase a word from; that was a bad apple and it must be thrown out. If they roll the number that has no words yet, he/she moves on without any erasing (rolling again to see what bushel to add a word to).


Kids can either stop rolling when one of the bushels is full or keep going until ALL the bushels are full, keeping track of which were filled 1st, 2nd, 3rd, etc.

The repetition of writing the five words again and again is sure to help him remember them when it's test time.

My son got caught up in the game and forgot we were practicing spelling. That totally fills MY bucket.

UPDATE: A blog follower came up with a great adaptation for her kiddo. She plans to use this little game to help her kindergartener practice writing certain letters. (What a good idea!!) I modified the PDF so the apples have ruled guidelines to help kids. Download this variation here.

Friday, June 21, 2013

Paint Strip Ocean Depths [Read and Record]


Are your kids fans of The Cat in the Hat's Learning Library books? We are!

This activity was inspired by Bonnie Worth's Wish for a Fish: All About Sea Creatures. This phenomenal installment of the Cat in the Hat books takes readers down deep in the sea to explore the five ocean levels.


Of course it rhymes, has playful images, and teaches kids about ocean life in a way that is whimsical and fun; for example, "A shark grows its teeth in neat rows in its face. When the front row wears out, the next row takes its place." Cool, huh?

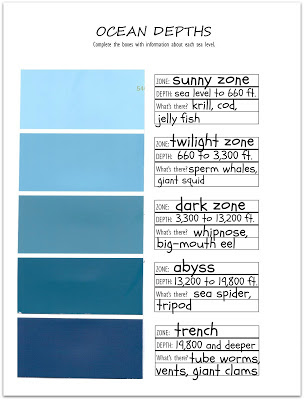
As my son and I read the book, he labeled a worksheet with a glued on paint sample strip that I got at the hardware store (it's really two glued together since each only showed four colors and I needed five). 


The ombre effect of lightest to darkest blue hues was perfect for illustrating the sunny zone all the way down to the trench!! If you've got an artistic kid, have them draw some of the plant and animal life typical to each level - or use stickers!


Download the worksheet I made here. Glue on your paint strip. And read Wish for a Fish!

Wednesday, May 8, 2013

Reluctant Writer's Story in Four Days


Writing is painful for my son. It's his Achilles heel.

During the last parent-teacher conference, his teacher told me all the things I already knew. My son's writing needed work. A LOT of work. So even though it was agonizing for him (and it was a little for me too) we forged ahead.


I created a story-in-four-days file folder. (Download a free 2-page PDF here and make your own file folder progressive story.) The idea was that the story would unfold over four days. He didn't need to know where it was going. He needed to answer questions, use descriptive words, and craft those answers and adjectives into sentences - writing a story in small pieces.

The question prompts page was glued to cover of the file folder and it was cut into four sections: 1) character & setting, 2) problem, 3) solution, and 4) conclusion.


The lined story paper was glued to the inside of the folder, directly underneath the other page.


Each day he completed a section of questions on the outside, opened the flap, and wrote three or four sentences about the details he'd just provided on the inside.


This activity reminds me of the cliché, "There's only one way to eat an elephant - one bite at a time." Writing stories is like eating an elephant for my son.

Day 1 there was crying.
Day 2 there was no crying, just whining.
Day 3 there was reluctance, but no whining.
Day 4 there was willingness and an end.

My son had written a short story. I was elated. But more importantly, he was extremely proud.

Thursday, January 24, 2013

Missing Punctuation Board Game [printable]


It's not exactly a secret; the English language is confusing. If I'm saying this after spending the last 12 years writing professionally, I can only imagine what it's like for a second grader! To help my son understand what punctuation to use when, I grabbed an amazing book and created a fun board game for us to play and practice.

Before we got our game faces on, we read Elsa Knight Bruno's book Punctuation Celebration. This book is to kids what the AP style guide is to grown-up journalists (only WAY more whimsical). This is the most interesting reference book I've ever read!


The book explains in rhyming text how 12 pieces of punctuation are used. The explanations are simple and examples are included. Illustrations are playful (Is there anything more cute than a smiling semicolon jumping rope?), making the weighty topic less intimidating. Whether your child is showing a natural talent or interest in writing or not, this book is worthy of checking out from the public library or adding it to your own shelves at home!

Once we were done reading, I got out the Missing Punctuation board game I'd made.


You can download a PDF of the 2-page game board and game cards here. You'll need to tape the game board together and cut out the cards. Find a few buttons, magnets, LEGO minifigures, or anything else that's small to use as game pieces (each player needs one to mark their progress moving around the board). NOTE: I created the game for two players. If there are more, you may need to make additional game cards.

The game cards each contain a sentence or two with missing punctuation. It's up to the player to figure out which one is missing among the following:
Period.
Exclamation Point.
Question Mark.
Comma.
Apostrophe.
Quotation Marks.
Colon.
Semicolon
Parentheses.
Hyphen.

Once they have figured out what punctuation is absent, they move their game piece to the space where that punctuation occurs on the game board. NOTE: You may need to remind players of the difference between an apostrophe and a comma. Play alternates between players.


I gave my son loads of hints (e.g. for quotation marks, I asked, "Is someone talking?" and for parentheses, I posed the question, "Is there any information in the sentence that could be removed and it would still make sense?"). We referred to Bruno's book a lot and it was slow-going but my son had lots of fun and when he got a card with the final answer of exclamation point and won the game, he was elated!

"Can we play again sometime?" I asked.

"You bet!" he answered enthusiastically.


Here are the answers:
"I would like a turn," said John.   Quotation Marks
"Pass the ball," yelled the coach.   Quotation Marks
"Thirty-six," answered Julie.   Quotation Marks
"Write your name on the paper," said the teacher.   Quotation Marks
Are you okay?   Question Mark
Do you want a cookie?   Question Mark
Dogs are furry.    Period
Ethan is sad.   Period
His t-shirt was red.   Hyphen
I am very thirsty; I need a drink of water.   Semicolon (or Period)
I can't find my hat, coat, or mittens.   Commas
I can't swim.   Apostrophe
I don't care.   Apostrophe
I have a dog, cat, and hamster.   Commas
I like blue.   Period
I went to sleep at 8:35.   Colon
If I was older, I could drive.   Comma
I'm allergic to nuts; they make me sick.   Semicolon (or Period)
In my bag are three things: a pen, pencil, and eraser.   Colon
It is cold outside; I'm shivering.   Semicolon (or Period)
It was a part-time job.   Hyphen
Katie's nose is running.   Apostrophe
My cousins are leaving; I am sad.   Semicolon (or Period)
My sister wants four things: a doll, book, crayons, and a dress.   Colon
My umbrella is broken.   Period (or Exclamation Point)
One-fourth of the pie is gone.   Hyphen
OUCH!   Exclamation Point
Pickles (that I hate) are too sour.   Parentheses
Somebody help me!   Exclamation Point
The doctor took x-rays of my finger.   Hyphen
The milk (that was sour) spilled all over.   Parentheses
The radio (that was too loud) was playing my favorite song.   Parentheses
The school is on fire!   Exclamation Point
These cupcakes (from the bakery) are yummy!   Parentheses
This is my dad's hammer.   Apostrophe
Watch out!   Exclamation Point
We didn't eat lunch until 1:00 p.m.   Colon
What's your favorite color?   Question Mark
Where were you?   Question Mark
While I was sleeping, the tooth fairy came.   Comma

Monday, November 26, 2012

DIY Newspaper [Writing and Reporting]


Writing is still a struggle for my son. Developing his ideas beyond simple sentences is agonizing for him. I cooked up a fun writing project in the hopes that we could get in some extra practice at home.

To set the stage for our project, we read a great book called Fairytale News. The book chronicles the son of Mother Hubbard as he navigates his paper route, dropping off newspapers to the Three Bears, crosses paths with Little Red Riding Hood, and befriends a newspaper-loving giant that lives at the top of magic bean stalk.


It was clever AND fun. Just the way children's fiction should be.

When we were done reading, I gave my son some background about newspapers: they share information about things that have already happened, are yet to happen, sports, area events, people in our community, weather, etc.

Now it was time for my son to make his own newspaper (well, just the front page). You can download the template I made here.

Download this blank template.
Print on two pieces of 8 1/2 x 11 paper, and tape together.

This was challenging for my son, but great writing practice that:
  • Snuck in a grammar lesson (e.g. headlines are capitalized, don’t forget punctuation, start sentences with capital letters).
  • Taught story development principles.
  • Encouraged creative illustrations. (Check out the picture of grandpa’s hand sneaking a cookie! HA!).

Extra! Extra! This project is perfect for struggling AND budding writers!

Monday, November 19, 2012

Thankful Turkey Art


Living a grateful life is important to me. And I want it to be important to my sons. Because of this, I’ve come to recognize Thanksgiving as one of the most beautiful holidays. You gather with the people you love around a bounty of food, which many people in the world are not so blessed to have.

What a beautiful occasion – a whole day devoted to family, friends, and giving thanks!

To prep my kids, we made a family turkey (who was named “Super Turkey”). The boys and I colored its body, which I printed on heavyweight cardstock. Then my husband joined us and each of us wrote things that we are thankful for on feathers that were printed and cut out of fall-colored cardstock. (I dictated for our 3-year-old son.)

Download a 2-page PDF of these templates here.

We glued them on our turkey and a snapshot of the blessings our family has received this year was preserved for eternity. Among the things we’re thankful for: good health (only six treatments of radiation and then I’m done!!), family, love, ice cream, LEGOs, and football.


Gobble! Gobble! When I count my many blessings, my blog followers are certainly among them. Happy Thanksgiving to you all!

Friday, September 7, 2012

Spelling with Mr. Potato Head


On the fourth day of second grade, my son toted home a list of 18 spelling words. Already?!?! Yikes.

While I knew they’d be coming, I wasn’t armed with any creative ideas to get my boy excited about practicing them. That first week, I resorted to the proverbial “I say it, you write it” method. How’d that go, you ask. Not well. [insert the sound of seven year old groaning]

I needed to step up my game. When sorting through all the toys we had stored during our basement remodel, I found an old friend: Mr. Potato Head.

Voila! An idea was born.

When my son came home with a new list of words, we (Mr. Potato Head and I) were ready. I told my son to put him together.


Then I gave him a pencil and paper. I had him write each word after I recited it. If there were errors, poor Mr. Potato Head would lose an accessory (hat, glasses, etc.). Keep making errors and more vital body parts (eyes, nose, etc.) would be removed.

The object was to keep our friend intact as much as possible by spelling correctly.


If only the word telephone wasn’t among this week’s challenge words; poor guy lost both arms over those spelling errors.

How do I know this was fun? My son was disappointed when he was out of spelling words to practice!

Wednesday, July 4, 2012

Straw-Blown Painted Fireworks


I asked my oldest son, “What do we celebrate on the fourth of July?”

“President’s Day?” he answered unsure.

“Uh-oh,” I thought. My son didn’t have the context behind why we celebrate Independence Day. I took some time to explain to him that on July 4, 1776, the U.S. adopted the Declaration of Independence, declaring its freedom from Great Britain.

“Oooooohhhh,” he said. I could almost hear it click.

Now I had him write down how he would celebrate Independence Day this year (apparently, we’re not just going to a parade and watching fireworks, we’re playing Wii!). When he was done writing, we got out our set of watercolor paints.


He dabbed some drops on the paper and with a drinking straw, blew air across the paint, pushing it out from the center droplet to make a fireworks shape. 

Download a PDF of the writing paper I made here.

I remember doing this little art project as a girl and how much I enjoyed it. My son liked it too.

Friday, June 22, 2012

You Be the Author & Illustrator [Ants Activity]


It’s a guarantee that any time we’re outside, we’ll stop to stare at the ants. My kids have always seemed fascinated by these tiniest of insects in our driveway.

The other day, my son and I read a great book about an ant walking along a railroad track and the switchman determined to save him from a seemingly inevitable head-on crash with an approaching train.

Its rhyming text has a rhythm, its ending is comical, and the book’s illustrations are wildly expressive and imaginative. If you’re looking for a fun fiction picture book about an adventuresome ant, this certainly fits the bill.

Download this PDF here.
Print pages 1 and 2 and flip over.
Print pages 3 and 4 on the back.
Fold and staple.

When we’d finished reading, I flipped back a few pages and asked my son to show me the rhyming words, pointing out that they were the last words in each line. Now it was time for my son to write his own rhyming ant story!

I gave him a book I’d created, printed on cardstock, folded, and stapled in the middle.

We started with the “illustrations” first. My son used an ink pad and his fingerprint to make ants on each page of the book (i.e. one ant on the first page, two on the second, etc.). He simply lined three fingerprints up and drew on antennae and legs. Voila, ants!

Now that the ants were added, it was time for some creative writing. Each page of the book I made has a beginning line that ends in the number of ants on that page. It was up to my son to think of a word that rhymed with those numbers and write a sentence where the rhyming word would fall at the end.


My son can easily match rhyming words into pairs, but coming up with them on his own was a challenge. I had to help him a little with clues. As we worked on the pages, I reminded him that the story was a progression. For example, he couldn’t say the ants saw something blue on page two and never tell readers what blue thing they saw on future pages; the reader would be left wondering.


This was a lot of brainstorming and more writing than son would normally do, but he stayed at it and was so proud of the finished book that he called a “meeting” at bedtime to read it aloud to the entire family. Success!

To reward my son for all his writing, we also made one of the characters from his book – Bob the Ant out of spray-painted plastic spoons, black pipe cleaners, and two googly eyes.


You can find the complete directions for this craft on Danielle's Place of Crafts and Activities on the Bug and Insect Crafts for Kids page. (Variation: We didn’t cut our spoons, but rather just layered one on top of the other.)

Friday, June 15, 2012

Wearing Lincoln’s Hat


When my son started his presidential dollar coin collection, an interest in the presidents was ignited. At a recent trip to an area presidential museum, his grandmother bought him a deck of cards with all the presidents. Of all the trinkets he could have picked out, that’s what he wanted. I love that about him.

To take his interest beyond just their names and order in the lineage of presidents, I checked out a book on my absolute favorite president: Abraham Lincoln. Looking at Lincoln isn’t just another boring book, it’s a journey of discovery.


A child spots a man while on a walk that reminds her of someone but she can’t recall just who until she pays for breakfast with a five-dollar bill. Eureka! The man she saw looked like our 16th president, Abraham Lincoln! Curious, she heads to the library to do a little research. The book reveals all her discoveries about his life, his contribution to the history of the United States, his death, and the Washington, D. C. Lincoln Memorial.

The book pushed us into lots of heavy discussions about things like what it means to be poor, what slavery was, and what the civil war was about. I didn’t try to overwhelm him with detailed explanations, remembering that he’s only almost-seven years old. I could tell my son was really listening and thinking when he said, “People don’t have slaves today, do they?” We could have stopped our learning there and I would have chalked this whole activity up as a success.

But we didn’t. Instead we made a hat like Lincoln used to wear.

It’s amazing what you can do with two pieces of black posterboard, some gray ribbon, and a low-temp glue gun. Here’s how we did it!


Cut a rectangle of black posterboard (1) so it’s slightly larger than the circumference of your child’s head.

Draw two lines roughly an inch and a half away from the edge of each long side of the rectangle. Make several cuts straight in up to the line on each side, approximately ¾-inch apart. If you’ve done it right, your rectangle will have fringe (2).

Roll your rectangle into a tube and glue together (3). Gently trace the circle formed by the tube onto another piece of black posterboard. Set that aside for later.

On one end of the tube, fold the fringe back (4); this is the base of the hat. On the other end, fold the fringe flaps in for the top of your hat (5).


Now cut out the circle you drew earlier. Then trace that circle again inside a larger circle (we traced a dinner plate to make our outer circle [6]). Now cut both out. The small circle is the top of your hat. The donut-shaped circle is the base (or brim of your hat).

Then slide the donut-shaped circle down the hat (7). You may need to re-trim the inside circle to make it bigger. It should be snug.

Tip the hat over and add dots of glue to the flaps (8). An adult should carefully press down onto the donut brim (even though it's a low-temp glue gun, it's still hot!). If your flaps stick out past the brim, trim the excess away.

Add glue to the fringe flaps at the top of your hat (9) and attach the small circle.

Now add a wide gray ribbon around the base of the hat, above the brim.

Before our learning time ended, I gave my son some small business card-sized “Abraham Lincoln …” slips of paper.

Download a PDF of the Abraham Lincoln Fact Recording Cards here.

It was up to him to complete the sentence. He wrote out six sentences. Abraham Lincoln …
was tall.
liked reading.
was kicked by a mule.
was 16th president.
was shot.


Because Maira Kalman’s book shared that Abe used to write notes and stuff them inside his hat, we glued our fact slips onto the bottom side of our hat’s brim.


When his father came home, my son put on the hat to show him (it may be just a wee bit taller than Lincoln’s). Then he promptly took off his hat and read the facts to share what he’d learned. He was so excited!