Wednesday, June 6, 2012

Miniature Multiplication Ring Toss


I’m not sure if I could even pass one of those elementary school math timed tests today. Math is just something my brain processes slowly. Thankfully, I’ve outgrown caring. Unfortunately, I still remember the feeling of anxiety and panic that those tests brought on. I hope my sons never feel that in school.

Even though my oldest son is a long way from mastering multiplication (he just finished first grade), anything I can do to simply expose him to the concept serves the purpose of easing the intimidation that he could otherwise feel later. Out of that desire, this game was born.

Before we played, we read If You Were a Times Sign, which is an ideal book for kids who have just been introduced to multiplication.


Multiplication is a fast way to add the same number over again and again.
The answer is the product.
The order of the numbers being multiplied can be reversed and the product is the same.
Multiplication is the opposite of division.
All of these little nuggets of math knowledge were playfully explained in Trisha Speed Shaskan’s book. It’s awesome!

Now my son was ready to practice his multiplication facts.

What You Need
2 plastic bottle-cap rings
1 square of thick Styrofoam
Wooden popsicle-like sticks (I used nine)
Number scrapbooking stickers (I used the numbers one through nine.)
Hot glue/glue gun


Push the wooden sticks into the styrofoam, evenly spacing them. Pull each one out and add a big glob of hot glue in the hole; replace the stick and hold in place until the glue dries and its secure. Add number stickers at the base of each stick on the styrofoam.

How to Play
Each player tosses the bottle-cap rings one at a time at the board, which is placed about two to three feet away. If the rings don’t land around a stick, they try again. If it encircles two sticks, the ring is removed and tossed again. 


Once two rings have been ensnared around the sticks, the player records the numbers and multiplies them for their Round 1 score.


My son used a multiplication table I made (download it here). 

The next player does the same. Who won Round 1? Play continues for four more rounds (five total), when each players’ rounds are added together.


The number will be high so have a calculator ready. Whoever has the highest number wins!

Monday, June 4, 2012

Clay Leaf Imprints (a Fossils Lesson)


You can’t talk about dinosaurs, without talking about fossils. Those prehistoric beasts sure get a lot of attention in books and on TV. While fossils of plants aren’t quite as impressive, they are just as important, giving scientists clues about what life was like millions of years ago.

our clay leaf imprints

To help my son understand fossils, we hit the nature trail. He collected leaves that had dropped from the trees. He was amazed at how many different kinds there were!


When the rain clouds moved in, we headed home with our bag of leaves. I grabbed a big box of white Sculpey clay. We rolled it into eight balls a little smaller than golf balls.


Then he smashed and rolled it between two sheets of waxed paper.


Next, he peeled off the top layer of waxed paper, added a leaf atop the clay, and then using a rolling pin, pressed the leaf into the clay.


Lastly, he peeled off the leaf and poked a hole using a drinking straw.


Now the only thing left to do was bake the leaf impressions, per the Sculpey instructions.


While they were hardening in the oven, we read about how fossils are formed in a book by Megan Lappi.


It’s true, we didn’t really make fossils; afterall, this activity took about an hour, not thousands of years it takes for fossils to form. But it sure was fun to preserve our leaves for future enjoyment!


Credit: These clay leaf imprints weren't my idea and despite combing my Pinterest boards, I can't find the original source to credit. If you've seen these online elsewhere, let me know so I can give proper credit.

Friday, June 1, 2012

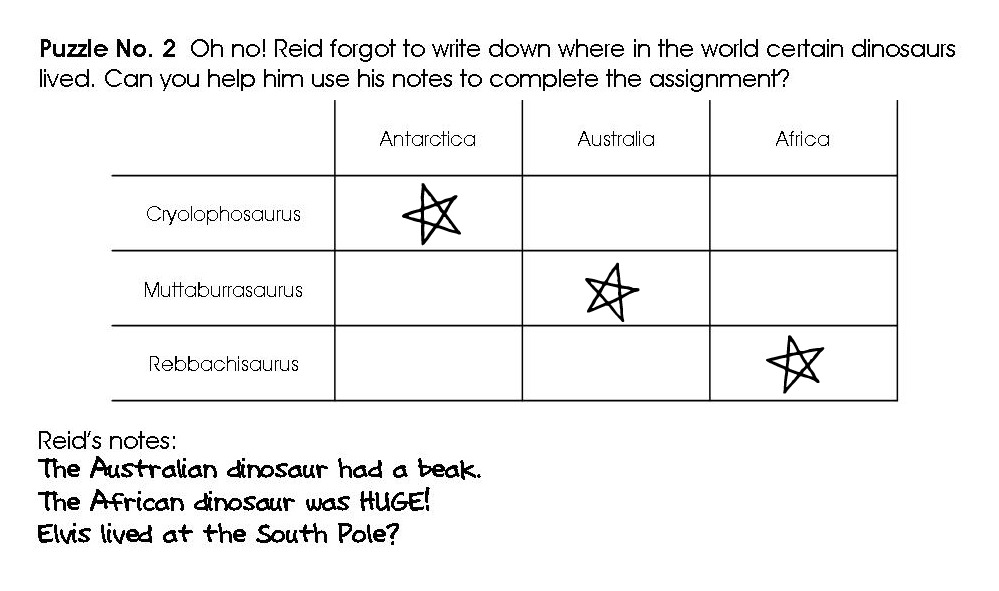
Dinosaur-themed Logic Puzzles


Now, even though my hatred of math started at a very young age, I always enjoyed doing logic puzzles. I remember “playing” them with my Mom as a young girl. (How's that for proof that my desire to trick my child into learning is hereditary?!?)

Banking on my son enjoying them as much as I did, I made some dinosaur-themed puzzles for him.

I used his National Geographic Dino-pedia to get some of the info.


My son knew a lot of the facts he needed to solve these puzzles, but when he got hung up, he used the book. All the boxes with possibilities that were eliminated were crossed out. This helped him narrow down the right answer (he colored these boxes yellow) for each question in the puzzle.


He matched dinosaurs to the right diet (carnivore, omnivore, or herbivore), figured out what countries different dinos lived in, and helped locate lost kids in the dinosaur museum! (Download the puzzles and answer sheet here.)


These three logic puzzles are a great precursor to higher level deductive thinking. And even those kiddos who struggle with math will enjoy them!


For more great logic puzzles (in loads of themes), visit
EnchantedLearning.com.

Wednesday, May 30, 2012

Boppin’ on DIY Bongo Drums


Our musical instrument projects have been a HUGE hit. Just the other day, my sons put on a music concert for me. The toddler played the rainstick, while my oldest treated me to the musical stylings of his pan flute and palm pipes. It was one of those moments as a mother you hope you never forget.

At the library I found a fun book about children who form a band of drummers, using all sorts of unconventional materials to drum on. Drum City was a real treat!


When my son had finished reading, I gave him:
Two sturdy empty canisters of the same width but different height
Two medium-sized balloons (not inflated)
Fun duct tape
Scissors
A long rubberband

He cut the “necks” off of the two balloons and with a little bit of effort, we stretched them over the open end of our canisters. Then we used some fun duct tape to wrap around the cans and the excess balloon, sealing it in place.


I barely stretched a long rubberband around the two drums, before my son had begun tapping on them. He immediately noticed that because of their height differences, one had a lower sound; no doubt a hypothesis he formed from experiences with his other homemade instruments.

Bum. Bum. Bum. Bum. Now that’s the sound of fun!

Monday, May 28, 2012

Moving Decimal (A Money Exercise)


In the process of brainstorming a place value activity, this little exercise was born. It’s simple and fun and takes next to no prep.

Just find the following:
A small black button, pom-pom, or a magnet (what we used)
Funny money (download some here if you don’t have any)
A bunch of coins
A deck of cards with only the face cards (just two through nine)
(I made some zero cards, although they’re not necessary.)

How to play
The child draws two cards.


Put the ‘decimal’ in front of him/her. How much money is that? Have the child use the coins to count it out.


The child draws another card. It is placed behind the other two and the decimal is moved behind the first card. Now how much money is that? Let the child use coins and funny money bills to show you.


The activity continues until five cards are on the table. Then you’re done or you’re starting over. You choose!