Wednesday, May 2, 2012

Graph My Room (Area and Perimeter)


What is it about the measuring tape? My sons both think it’s the best toy ever, never mind that it’s not a toy at all. To capitalize on this fascination, I thought I’d have my son put the measuring tape to good use measuring his room.

I made some large-scale graph paper, printed two sheets, and gave my son the measuring tape.  I explained how 12 inches equals 1 foot. Then I showed him how the feet were marked on the measuring tape.

Step 1: Measure.
Now he measured the length and width of his room, from wall to wall.  We rounded up or down to the nearest foot.


Step 2: Cut the graph paper to represent the room.
I explained that one square on the graph paper was equal to one foot. Then, he counted the number of squares horizontally and vertically on the large graph paper and cut it to represent the space in his room.

Step 3: Measure the furniture. Cut the paper to size. Color it in.
Next, he measured his bed, bedside table, bookshelf, and LEGO table. Each time, cutting the representative sizes from the graph paper. He colored these.


Step 4: Measure and locate the furniture on the room graph.
Now, we measured the distance from the walls to each object. This provided the information my son needed to determine exactly where to locate the various items on the graph paper representation of his bedroom.

Step 5: Figure the perimeter and area of each object and the room.
Before I had my son figure the perimeter and area of his room, I gave him a little background in what the two terms meant.
Since learning by listening isn’t my son’s thing, I found a great online game to help him practice figuring perimeter and area.


When I pulled him away from the game, he did the calculations for his room and its furniture. To figure the area of his entire room, I gave him a calculator (his early multiplication skills are not advanced enough to arrive at an answer without help).


This took a lot of patience, measuring, and math. My son was up for the challenge, though, and even spent time tracing over the calculations he’d made in pencil with pen so he’d have a permanent record in his notebook!

Monday, April 30, 2012

Sharing Cookies (Division by Grouping)


My son’s teacher sent out an email to parents that kids were struggling with dividing numbers equally on a recent math assessment. A little at-home practice was just what my son needed!

Forever ago, a blog follower recommended Pat Hutchins’ book The Doorbell Rang. Let’s just say, I am so glad she did! It was the perfect inspiration for this activity.


In Hutchins’ story, two children end up sharing a plate of 12 cookies with groups of children that continually ring the doorbell. Each time more kids come over, the plate of cookies is divided into equal parts to share with all the friends.

I printed a graphic of 12 oreo cookies to go along with the story. Download them here.
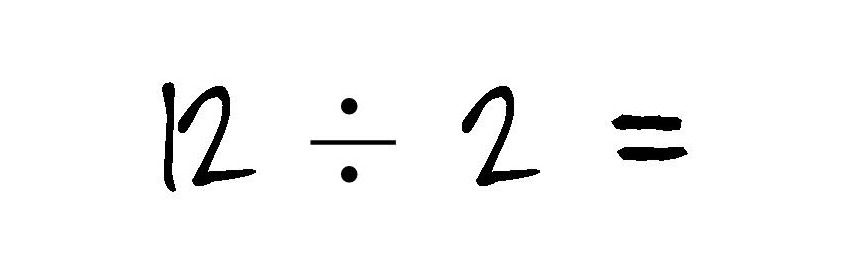
I put them on a platter and asked my son to count them. Then we read the first few pages of the book. When Sam and Victoria split the cookies among themselves, I wrote on a small whiteboard:
My son took the oreos and split them, placing six on the disposable plates I gave him. Then we turned the page to see that he had, in fact, divided the cookies right. (YAHOO!) When Hannah and Tom come over, the cookies must be divided up among four kids. I wrote on the whiteboard:
He split the cookies evenly and figured out 12 cookies shared by four children, meant that each would eat 3.


The story continued like this until each child at the house only gets 1 cookie. When it was done we tried a few more division problems with the cookies (12 divided by 3, 10 divided by 5, 10 divided by 2, and 9 divided by 3).

Then I put the cookies away and told him he’d have to figure out the problems without using the cookies I’d made for him. This was no easy task. I asked him how many cookies 4 children would get if the tray had 20 cookies. To help him, I wrote "1, 2, 3, and 4" on the whiteboard and had him draw cookies underneath each until all 20 cookies were represented. Ah-ha! “The answer is 5, Mom!” he exclaimed excitedly.


Now I gave him a super challenge – 35 cookies divided among 5 children. Instead of drawing circles for cookies, he made tally marks.


“Seven, Mom. Seven cookies each!!!” he yelled. I was so proud of him … almost as proud as he was of himself!

Friday, April 27, 2012

Spelling with LEGO Minifigures


My son has been begging me to create another LEGO activity. Since the last one (our Under Construction Greater Than/Less Than game) was way back in August, I couldn’t say no. With the end-of-the-week spelling test looming, I thought it would be a good time to practice.

To make our “I say it, you spell it” lesson more exciting, I grabbed the drawer from my son’s LEGO organizer with all the minifigures (aka “people parts”).

Empty egg carton and spelling list in hand, I wrote the letters of his first spelling word inside two strips of paper with six boxes in each strip. I scrambled the letters and added extra letters so each box was filled. Then I put one strip above the egg carton and one below. I added specific minifigure parts to the egg carton compartments that had the letters in his spelling word and then tossed extra parts into the empty compartments.

I made strips for eight words. Now it was time to test his spelling abilities. I told him the word and he wrote it down.


Then he looked for the letters on the strips and grabbed the corresponding LEGO minifigure piece from the egg carton.


Spelling Word: might

If he spelled the word right, he had the correct body parts to make a figure (e.g. he had the knight’s torso and knights pants, not two heads and a pair of pants).


When he was done with this word, I moved the carton out of his view, swapped the strips of paper, and reloaded the egg carton with new minifigure pieces.

This was tons of fun for my son, even though the week’s spelling words were easy for him (he even got the challenge word – frightening – spelled right; it was so many letters long, I had to have him make two figures for that one!).


When the activity was over, there was no grumbling that he still wanted more “playtime” with Mom. After all, he had nine minifigures beckoning!

Wednesday, April 25, 2012

DIY Shuffleboard Showdown


My son and I went head to head for two games of Shuffleboard on our kitchen hardwood floor the other day. He obliterated me the first game, but I came back and won the second. Both of us were pleased!

Like most games, scorekeeping is required. Shuffleboard’s “10 OFF” box means that players won’t just have to add the points from each round, but they’ll have to subtract too! This was loads of fun and a subtle way to slip in some addition and subtraction practice.

I made the shuffleboard court with blue painters tape. 

The pucks (or biscuits) were large metal closet door pulls (they were being clearanced out at our local hardware store). To distinguish which pucks where whose, I cut some circles of craft foam and placed them inside the pulls, attaching them with a piece of double-sided tape.

Don’t want to buy your pucks? Start saving lids (e.g. spaghetti sauce jar lids, peanut butter jar lids, etc.). You just need six of the same size.
For our paddle, I used the swiffer mop. It worked like a charm.

I put a line on the floor five feet back from the point of the board for my son and I to stand behind. A homemade scorecard helped to keep track of the points. (Download it here.)


Rules of play (for our variation of Shuffleboard)
Play alternates between two players. Each player stands behind a line and pushes the puck with the swiffer toward the shuffleboard. If the puck is inside any part of the board’s triangle, points are earned.


If the puck lands at the end of the board in the “10 OFF” area, the player must subtract 10 points from their score. The opponent can knock a player’s puck off the board with their own.


The first player to get to 45 points is the winner! (The traditional game is played until 75 points are earned; the scorecard I made has lots of rounds to account for extended play.)

Monday, April 23, 2012

Dicey Fractions


What is it about rolling dice that kids love so much? I don’t know, but every dice roll activity I come up with my son loves. This dice roll was made to work on fractions, but incorporates so much more – counting, tallying, animals (i.e. mammals vs. non-mammals), and geometry (shape names, polygons, etc.)!

First we read Working with Fractions, a book by David A. Adler (who also wrote the wonderful book that taught my son all about roman numerals).


Then, I gave my son a fun die with six different colors, animals, and shapes. (I printed this on heavyweight cardstock, cut out, scored the lines with a straight edge and butter knife, folded, and glued the flaps.) 


With a special recording sheet in hand and the timer on our microwave set for 2 minutes, my son was ready to get rolling!

Download a PDF of the die and recording sheet I made here.

He rolled the dice for the entire time, making a tally mark in the boxes under the square that showed up on top of the dice with each roll. I reminded him “One, two, three, four, and five shuts the door” to help him organize his tallies in groups of five.


When the time was up, my son counted the tally marks in each box and added all of the numbers together (I helped). The total was the denominator (the bottom number) on the fraction answers at the bottom of the recording sheet.


To complete the fractions, he had to figure out the numerators (the top number). Several of the fractions required that he add number of rolls from different squares together.


This was good practice to understand what the numbers on a fraction represent and reminded my son about what makes an animal a mammal, which shapes are polygons, and the reinforced geometry vocabulary too!