Friday, June 22, 2012

You Be the Author & Illustrator [Ants Activity]


It’s a guarantee that any time we’re outside, we’ll stop to stare at the ants. My kids have always seemed fascinated by these tiniest of insects in our driveway.

The other day, my son and I read a great book about an ant walking along a railroad track and the switchman determined to save him from a seemingly inevitable head-on crash with an approaching train.

Its rhyming text has a rhythm, its ending is comical, and the book’s illustrations are wildly expressive and imaginative. If you’re looking for a fun fiction picture book about an adventuresome ant, this certainly fits the bill.

Download this PDF here.
Print pages 1 and 2 and flip over.
Print pages 3 and 4 on the back.
Fold and staple.

When we’d finished reading, I flipped back a few pages and asked my son to show me the rhyming words, pointing out that they were the last words in each line. Now it was time for my son to write his own rhyming ant story!

I gave him a book I’d created, printed on cardstock, folded, and stapled in the middle.

We started with the “illustrations” first. My son used an ink pad and his fingerprint to make ants on each page of the book (i.e. one ant on the first page, two on the second, etc.). He simply lined three fingerprints up and drew on antennae and legs. Voila, ants!

Now that the ants were added, it was time for some creative writing. Each page of the book I made has a beginning line that ends in the number of ants on that page. It was up to my son to think of a word that rhymed with those numbers and write a sentence where the rhyming word would fall at the end.


My son can easily match rhyming words into pairs, but coming up with them on his own was a challenge. I had to help him a little with clues. As we worked on the pages, I reminded him that the story was a progression. For example, he couldn’t say the ants saw something blue on page two and never tell readers what blue thing they saw on future pages; the reader would be left wondering.


This was a lot of brainstorming and more writing than son would normally do, but he stayed at it and was so proud of the finished book that he called a “meeting” at bedtime to read it aloud to the entire family. Success!

To reward my son for all his writing, we also made one of the characters from his book – Bob the Ant out of spray-painted plastic spoons, black pipe cleaners, and two googly eyes.


You can find the complete directions for this craft on Danielle's Place of Crafts and Activities on the Bug and Insect Crafts for Kids page. (Variation: We didn’t cut our spoons, but rather just layered one on top of the other.)

Wednesday, June 20, 2012

Making Waves ... in a bottle


We are totally land-locked here in the Midwest. To say that the ripples of water on the surface of lake water are waves is downright ridiculous; but that's the closest thing we've got to them. Perhaps this is why my son has a fascination with the ocean, because it’s a complete mystery to him.

To teach him about ocean waves, first we read a great non-fiction book. This is the second time we’ve read a book from the Tell Me Why, Tell Me How series (the last time was when we learned about the seasons changing). Wil Mara’s book has LOADS of great information, perhaps a little more than we needed! We only read the first 15 pages.


My favorite light-bulb moment was when I read aloud “A wave does not really start in the water, but in the sky!” and my son burst out with a “what?!?” We read more. Wind energy makes waves!

Mara’s book also taught us the names for a wave’s highest and lowest points.


Now it was time to make some waves!

What you need
A clear, thin-necked bottle with a cap (I used a bottle of sparkling lemonade.)
Corn Syrup
Vegetable oil
Blue food coloring

What to do
Pour corn syrup into the bottle until it’s about 1/5th full. Add a drop of blue food coloring. Swirl the bottle to mix the food coloring into the syrup. Then, add the same amount of vegetable oil to the bottle.


Now put the cap on.


Turn the bottle on its side and slowly lower the neck. Watch the bottom blue syrup layer as a small wave builds and crests in the neck (which is your pretend beach) of the bottle. Now slowly lower it back down, sending the wave back out to the ocean.

Oh yeah. This was fun!

CREDIT: The “Breakers in a Bottle” idea came from Cindy A. Littlefield’s book Awesome Ocean Science! Investigating the Secrets of the Underwater World. This book is 113 pages of hands-on activities all about the ocean. There's no telling how much fun you can have with your kids, thanks to this book!

Monday, June 18, 2012

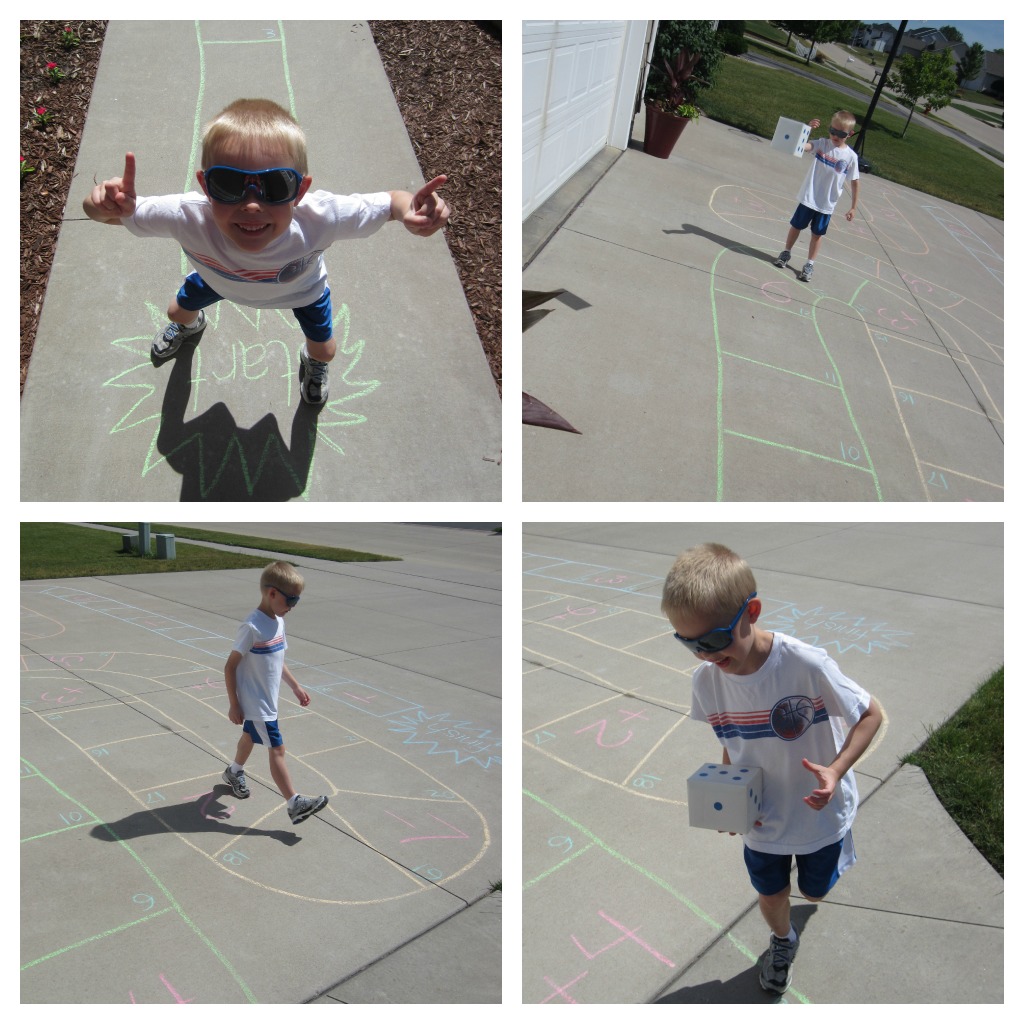
Driveway Dice Roll Board Game


It’s summer. What are we doing inside, right?!? This little activity takes our math lesson outdoors. Put on the sunscreen and get ready for some subtraction and addition fun!

Prep
Take an empty cube-shaped tissue box and cover it with posterboard. Attach dot label stickers to the sides to mimic a die (I had some left over from our Noun Clown activity). Don't have dot stickers? Color some dots with a magic marker! Now cover the box with clear household contact paper for added durability and to keep the die somewhat clean.


Draw a game board on your driveway with sidewalk chalk. Mark the start and finish clearly. For older kids, make lots of spaces (ours had 47); for younger kids with shorter attention spans or early addition/subtraction skills, keep the board shorter.


Add small numbers in one corner of each space. Then, at random, add “-3, +4, -6, +2,” etc. in some of the board's spaces.

Now you’re ready to play.

How to Play
Players stand at the start and roll the die. Whatever number is on top when the die lands, is the number of spaces the player moves. In the player lands on a space with a plus or minus, they must move the number of spaces noted (i.e. if a player rolls a six, moves six space, and the sixth space says “-2,” they must move back two spaces).

The player can only move forward or backward once per roll. In other words, in the example above, if the player moved back two and that space read “+4,” they would not move again.


As the player moves they should speak the problem created out loud before or as they’re moving. So if a player is on space 14 and they roll a six, they should say, “14 + 6 = 20.”

Players take turns rolling the die and moving forward and backwards on the driveway game board (it helps if you have a person willing to fetch the die for players; little brother LOVED doing this!).


The first player to the finish wins!


Friday, June 15, 2012

Wearing Lincoln’s Hat


When my son started his presidential dollar coin collection, an interest in the presidents was ignited. At a recent trip to an area presidential museum, his grandmother bought him a deck of cards with all the presidents. Of all the trinkets he could have picked out, that’s what he wanted. I love that about him.

To take his interest beyond just their names and order in the lineage of presidents, I checked out a book on my absolute favorite president: Abraham Lincoln. Looking at Lincoln isn’t just another boring book, it’s a journey of discovery.


A child spots a man while on a walk that reminds her of someone but she can’t recall just who until she pays for breakfast with a five-dollar bill. Eureka! The man she saw looked like our 16th president, Abraham Lincoln! Curious, she heads to the library to do a little research. The book reveals all her discoveries about his life, his contribution to the history of the United States, his death, and the Washington, D. C. Lincoln Memorial.

The book pushed us into lots of heavy discussions about things like what it means to be poor, what slavery was, and what the civil war was about. I didn’t try to overwhelm him with detailed explanations, remembering that he’s only almost-seven years old. I could tell my son was really listening and thinking when he said, “People don’t have slaves today, do they?” We could have stopped our learning there and I would have chalked this whole activity up as a success.

But we didn’t. Instead we made a hat like Lincoln used to wear.

It’s amazing what you can do with two pieces of black posterboard, some gray ribbon, and a low-temp glue gun. Here’s how we did it!


Cut a rectangle of black posterboard (1) so it’s slightly larger than the circumference of your child’s head.

Draw two lines roughly an inch and a half away from the edge of each long side of the rectangle. Make several cuts straight in up to the line on each side, approximately ¾-inch apart. If you’ve done it right, your rectangle will have fringe (2).

Roll your rectangle into a tube and glue together (3). Gently trace the circle formed by the tube onto another piece of black posterboard. Set that aside for later.

On one end of the tube, fold the fringe back (4); this is the base of the hat. On the other end, fold the fringe flaps in for the top of your hat (5).


Now cut out the circle you drew earlier. Then trace that circle again inside a larger circle (we traced a dinner plate to make our outer circle [6]). Now cut both out. The small circle is the top of your hat. The donut-shaped circle is the base (or brim of your hat).

Then slide the donut-shaped circle down the hat (7). You may need to re-trim the inside circle to make it bigger. It should be snug.

Tip the hat over and add dots of glue to the flaps (8). An adult should carefully press down onto the donut brim (even though it's a low-temp glue gun, it's still hot!). If your flaps stick out past the brim, trim the excess away.

Add glue to the fringe flaps at the top of your hat (9) and attach the small circle.

Now add a wide gray ribbon around the base of the hat, above the brim.

Before our learning time ended, I gave my son some small business card-sized “Abraham Lincoln …” slips of paper.

Download a PDF of the Abraham Lincoln Fact Recording Cards here.

It was up to him to complete the sentence. He wrote out six sentences. Abraham Lincoln …
was tall.
liked reading.
was kicked by a mule.
was 16th president.
was shot.


Because Maira Kalman’s book shared that Abe used to write notes and stuff them inside his hat, we glued our fact slips onto the bottom side of our hat’s brim.


When his father came home, my son put on the hat to show him (it may be just a wee bit taller than Lincoln’s). Then he promptly took off his hat and read the facts to share what he’d learned. He was so excited!


Wednesday, June 13, 2012

Moths and Butterflies - Another Lesson in Differences


Just last week, my son spotted a winged insect flitting across our lawn. “Look, Mom, a butterfly!” he announced. “Actually, I think it’s a moth,” I said. He looked at me with his eyes all filled with mystery and said, “How do you know?” Hmmmm … how DID I know?

Luckily, our library had the answer. I checked out What’s the Difference Between a Butterfly and a Moth? written by Robin Michal Koontz and illustrated by Bandelin-Dacey.

This wasn’t the first time we’d checked out one of the books in this “What’s the Difference…?” series (check out our
frogs and toads activity), so our expectations were high. We weren’t disappointed.


The book provides a concise comparison of butterflies and moths, highlighting both their similarities and differences. We learned a ton and both oogled over the breathtaking painted illustrations in the book. Even my youngest son (a toddler) pointed and exclaimed, “Look it!” every time we turned a page.


When we were done reading, I gave my oldest son a venn diagram and pencil. I’m not going to lie. After two weeks of no school, igniting the ambition to write was a bit of a challenge.

Download a PDF of the moths and butterflies venn diagram I made here.

The good news, though, is that he remembered much of what we’d read and could fill most of it out from memory, only needing to refer to the book for spelling terms like diurnal (awake and active during the day) and nocturnal (awake and active at night).


Under “both” in the diagram, he wrote “fly, have wings and proboscis.” In each of the wings he recorded the different types of casings they form before transforming from a caterpillar (i.e. butterflies make a chrysalis, moths make a cocoon), their different coloring, when they are active, and the position of their wings when they land.

We both loved learning about these amazing creatures. Next time someone asks my son what the difference is, he can refer back to his venn diagram ... and I can too!