Monday, September 26, 2011

Milk Chocolate Multiplication


Can a first-grader really do multiplication? I thought I’d find out. My son loves math, candy, and books so this activity was right up his alley.

If you recreate this activity with your child, you need three things:


#1 The Hershey’s Milk Chocolate Multiplication Book by Jerry Pallotta.


#2 A Hershey’s bar or two.

#3 The “Draw it, Count it, Multiply it” worksheet I made (download it here).


Pallotta’s book served as a great way to expose my son to an entirely new kind of math sentence, using rows of the candy bar’s sections to illustrate multiplication. After we’d finished the book, I opened our candy bar and asked my son what the multiplication problem would be: 3 (rows) x 4 (columns). Then he counted the sections for the answer: 12. I broke off some rows and we continued to identify the multiplication problem our now smaller candy bar provided us.


I’m not going to lie, we both ate a fair amount of chocolate doing this activity (MMMMmmmm).

After doing this for awhile, we flipped over the laminated worksheet I’d made. I used a fine-tip dry-erase marker to fill in the boxes at the top and asked him to make that number of squares across and down and complete all the boxes in between. When he’d done this I asked him to complete the multiplication sentence at the bottom of the page and reminded him about what he’d drawn (e.g. 3 rows of 5 squares equals how many squares altogether?). We did about 5 problems before quitting for the day.


TIP:  Avoid using a black dry-erase marker. Ours made it difficult to distinguish where the dots were and make the squares. After discovering this, we switched to a lighter color marker.

Even if it was a little advanced for a six-year-old, my son loved this introduction to multiplication (it wasn’t just the chocolate he enjoyed, I swear!). This is a skill we can easily build on and, by laminating the worksheet, we can just wipe it clean to practice over and over!

In the future, I think I'll use a die to help us decide which numbers to multiply. Since this is new to my son, keeping both numbers below six will work great.

Friday, September 23, 2011

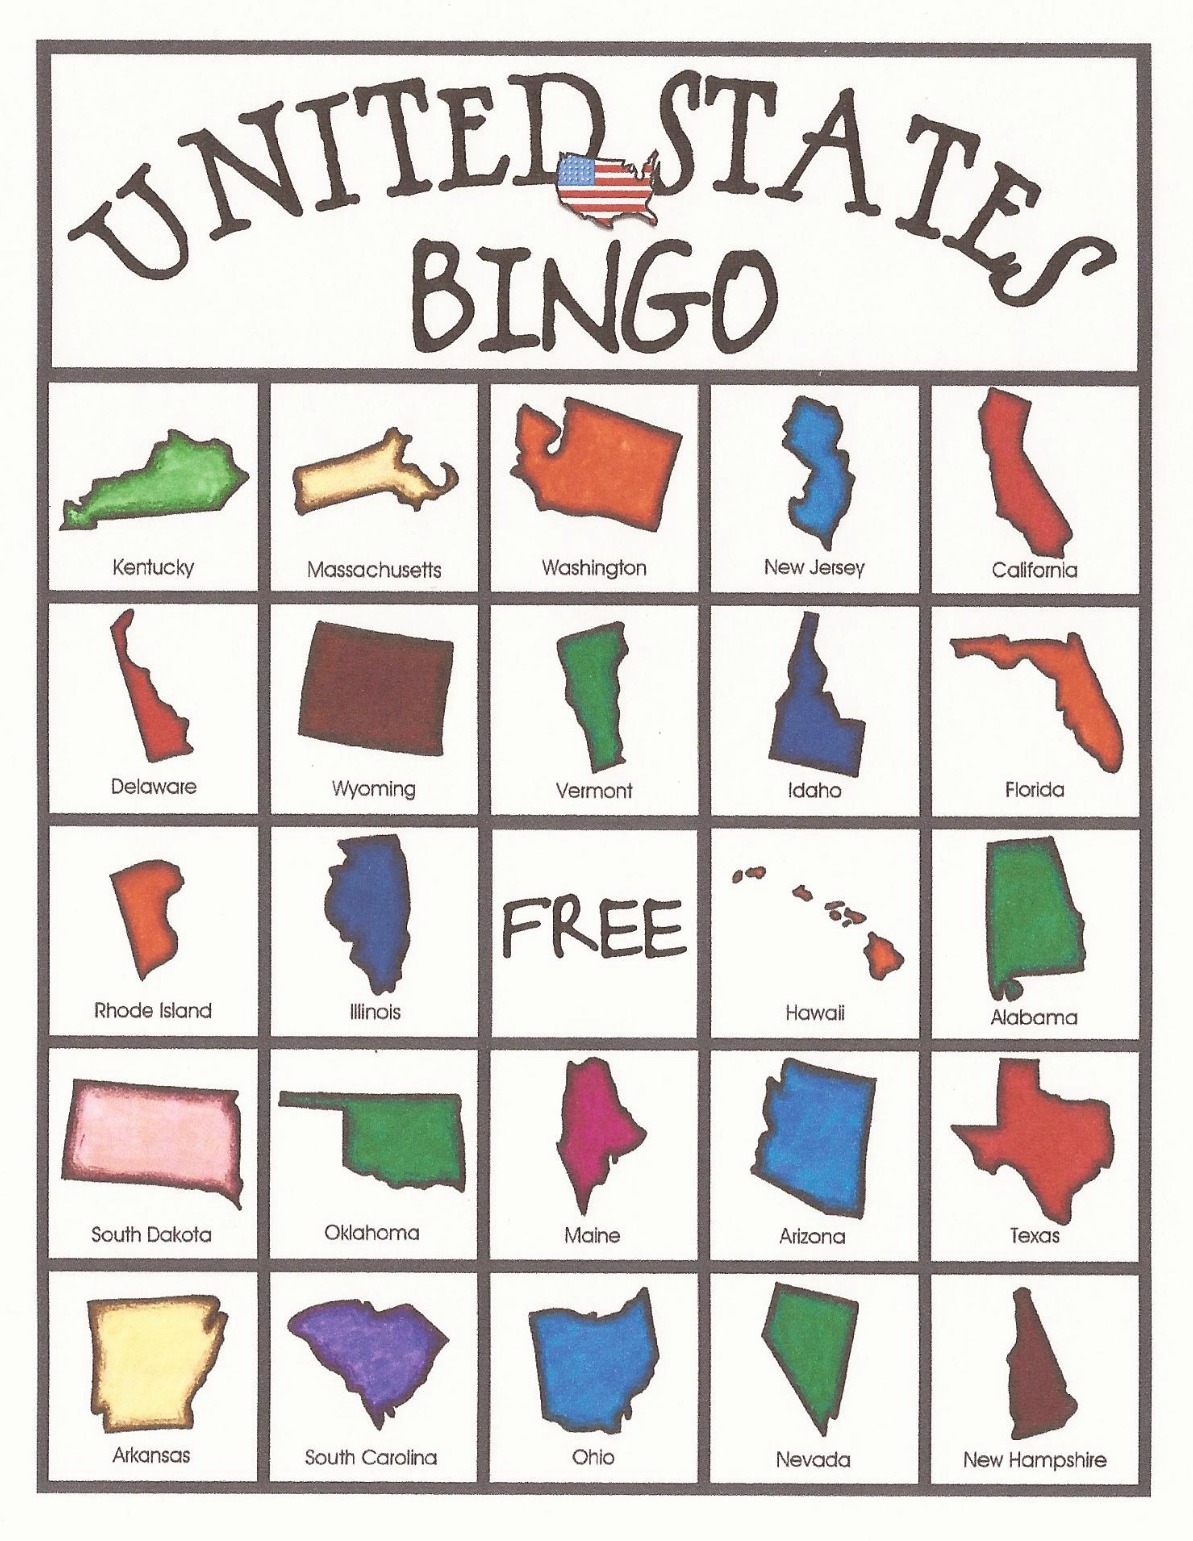
United States BINGO Game

Just last week my son said to me, “Mom, I know all the news.” Before I could ask him what he was talking about, he rattled off, “New Hamster, New York, New Jersey, and New Mexico.” These kind of unsolicited comments make me smile. Why? 1) Because of his mispronunciation of New Hampshire. 2) Because he’s obviously interested in (and learning about) the states of our great country.

It’s been awhile since we pulled out our Scrambled States Memory Game and although I love it, I wanted to do something new with the states shapes I’d made. Since my son loves playing any BINGO game that I throw at him, I thought it was time to make a version with the states.

Before we got to playing, though, we read Loreen Leedy’s book, Celebrate the 50 States! I was lucky to snag this book at a yard sale and consider it one of the gems of our home library.


I let my son pick his BINGO card and cover the FREE space in the center. Then, one by one I selected a state from a pile of cut-up call cards. I called out the states, he searched his card, and, if he found it, covered it with a coin. Like typical BINGO games, when he had five in a row (across, down, or diagonal), he called out "BINGO!" rather excitedly. FUN! 


Until my son learns the states better, I’ll show him the call cards so he can see the color and shape of the state. Using coins as BINGO markers worked perfectly. Download a set of six game cards here and a PDF of all 50 states to cut up as call cards here. Enjoy!

Update: Want more than six game cards? Click here for my teacher's edition!

Wednesday, September 21, 2011

Making Bird & Butterfly Masks


Lately my 6-year-old son can’t get enough of the Kratt brothers’ animal adventures on the PBS show Wild Kratts. This animated show has taught my son a bounty of facts about animals such as the Draco Lizard, Kangaroo, and Large-Mouth Bass. His favorite episodes, though, have got to be the two that focused on the Monarch Butterfly and Peregrine Falcon.

To capitalize on my son’s interest in these two amazing creatures, I created some eye-mask templates for him to decorate. I printed these on white cardstock. To create holes for the eyes, I used my Martha Stewart Punch All Over the Page™ 1 ½-inch circle punch. If you don’t have a punch, the circles can simply be cut with scissors.

Download the following eye-mask templates here:


I bought an assortment of feathers at our local craft store (I couldn’t resist buying some bright ones as well as the more typical brown/grey/white packages). My son applied white school glue all over the mask and placed feathers atop the glue, being careful not to cover the eye holes. Then we glued a 1 ¼-inch strip of cardstock to the middle of the back of the mask above the eye holes; about a two-inch long line of glue will do.

Once the glue was dry, I trimmed excess feathers around the eye holes and nose area (my son said it kept tickling him) and stapled another 1 ¼-inch strip of cardstock to the other strip, measuring the distance around my son’s forehead to make the headband fit properly.

Little brother was dying to get in on the action when he saw his brother’s falcon mask. I folded the printed butterfly template in half and taped it down. I gave my 2-year-old some fingerpaints and encouraged him to unleash his inner artist. 


When he was done, I removed the tape, and folded the paper back in on itself so the mirror image of his painting would appear on the other wing of the butterfly. Then we let it dry.

Both boys then used watered-down craft acrylics to paint the monarch butterfly templates I printed. 

When the paint was dry, I used the generic butterfly template to draw circles on the back so I knew where to punch the eye holes out at. Then we attached the butterfly bodies, which were either painted in alternate colors or cut from construction paper. The googly eyes, pipecleaner antennae, and smile are optional. Let your child decide!

Simply glue on a 1 ¼-inch cardstock strip, stapling another strip to it once dried for added length and fit to your child’s head.


And then let your bird and butterfly girls and boys fly free!

Monday, September 19, 2011

GO NUTS! (Mixed Nuts Sort, Tally, & Taste)


This activity is near and dear to my heart. My grandfather was a nut grower. I remember playing in the basement of his home with a variety of small metal nut-cracking devices of various sizes; I was in awe of their mechanical inner-workings.

There were always nuts at my grandma and grandpa’s house. Now that I’m grown up, nuts are a pantry staple at my house too. Both my sons (and husband) love them. To make snack time into math time, I created an activity with a can of Planter’s mixed nuts.

1. Alphabetize names of nuts.
First, I gave my son six identification cards with photos and pictures of each variety of nut from the mix. I asked him to put the cards in order, alphabetizing them by the names of the nuts. (Download the nut ID cards I made here.)

2. Sort nuts.
Then I put a ½ cup of mixed nuts on a plate and told my son to sort the nuts, putting each nut in the little bowls I’d placed on top of the ID cards.


3. Tally each kind of nut. Skip count the tally marks.
Next, I poured each type of nut out and then dropped it back into its bowl, while my son made tally marks on his worksheet. To help him I counted, “I, 2, 3, 4, cross through on 5.” When done making tally marks, he skip counted by 5s to determine how many nuts of that kind there were and recorded the number on his worksheet, answering “how many?” for each type of nut.

4. Write the names of nuts in order from greatest to least number of nuts.

5. Taste each. Write the names of nuts in order from yummiest to yuckiest.
My son took his time tasting each and judged their flavor critically; I was shocked at how insistent he was in getting the order right (NOTE: at this point I was thinking, "oh goody, all the brazil nuts are mine, mine, mine!").


When he had completed the activity, he looked at me matter-of-factly and told me that when his little brother got old enough, I should do this activity with him; it was THAT cool!

Download the answer sheet I made here and watch your kid(s) GO NUTS!

WARNING: Obviously, if you child has a nut allergy, this activity should be avoided.

Friday, September 16, 2011

Learning About Nouns with Noun Clown

My son brought home worksheets from his reading/writing summer camp on the parts of speech. I must admit, his grasp of nouns, verbs, and adjectives made this Mama-With-An-English-Degree cringe a bit. I quickly reminded myself that he’s only six and until someone TEACHES him the differences, he’s not libel to just figure it out. This activity is my attempt at making learning about nouns fun.

To start, we read Brian P. Cleary’s hilarious book, A Mink, a Fink, a Skating Rink: What is a Noun? If you’re exploring parts of speech with your child, I highly recommend putting his "Words are CATegorical" series in your library cue.


This book had me after its first three sentences: “Hill is a noun. Mill is a noun. Even Uncle Bill is a noun.” Not only does the cadence of the rhyming text beg to be read aloud, but the illustrations are whimsical and silly.

After reading, I wrote four words on a post-it note:
Person
Animal
Place
Thing

Then I gave my son the laminated Noun Clown. Covering all the polka dots and juggling balls were ¾-inch sticker dots with words on them. Six contained nouns; the rest were adjectives. The noun stickers covered circles with stars in them. The other circles (with adjectives written on the stickers covering them) were empty.

My son’s task was to read the words and determine if the word was a person, animal, place, or thing (i.e., a noun). If he thought it was, he peeled the sticker back. If a star was revealed, he’d guessed right and could place the sticker at the bottom of the page under the “Nouns I Found” heading.

My son had a few wrong guesses but overall did great and loved peeling back the stickers to look for stars. The more we work with Noun Clown, the better he'll get; I'm sure of it.

I made six templates, moving the stars around so we could practice this multiple times. Download the Noun Clowns here.
NOTE: This is not an activity to do just after you’ve trimmed your child’s fingernails. Avery Color Coding Labels (¾-inch diameter) pulled away much easier than Target’s UP & UP brand and the darker dots work best since the stars don’t show through.