Monday, April 30, 2012

Sharing Cookies (Division by Grouping)


My son’s teacher sent out an email to parents that kids were struggling with dividing numbers equally on a recent math assessment. A little at-home practice was just what my son needed!

Forever ago, a blog follower recommended Pat Hutchins’ book The Doorbell Rang. Let’s just say, I am so glad she did! It was the perfect inspiration for this activity.


In Hutchins’ story, two children end up sharing a plate of 12 cookies with groups of children that continually ring the doorbell. Each time more kids come over, the plate of cookies is divided into equal parts to share with all the friends.

I printed a graphic of 12 oreo cookies to go along with the story. Download them here.
I put them on a platter and asked my son to count them. Then we read the first few pages of the book. When Sam and Victoria split the cookies among themselves, I wrote on a small whiteboard:
My son took the oreos and split them, placing six on the disposable plates I gave him. Then we turned the page to see that he had, in fact, divided the cookies right. (YAHOO!) When Hannah and Tom come over, the cookies must be divided up among four kids. I wrote on the whiteboard:
He split the cookies evenly and figured out 12 cookies shared by four children, meant that each would eat 3.


The story continued like this until each child at the house only gets 1 cookie. When it was done we tried a few more division problems with the cookies (12 divided by 3, 10 divided by 5, 10 divided by 2, and 9 divided by 3).

Then I put the cookies away and told him he’d have to figure out the problems without using the cookies I’d made for him. This was no easy task. I asked him how many cookies 4 children would get if the tray had 20 cookies. To help him, I wrote "1, 2, 3, and 4" on the whiteboard and had him draw cookies underneath each until all 20 cookies were represented. Ah-ha! “The answer is 5, Mom!” he exclaimed excitedly.


Now I gave him a super challenge – 35 cookies divided among 5 children. Instead of drawing circles for cookies, he made tally marks.


“Seven, Mom. Seven cookies each!!!” he yelled. I was so proud of him … almost as proud as he was of himself!

Friday, April 27, 2012

Spelling with LEGO Minifigures


My son has been begging me to create another LEGO activity. Since the last one (our Under Construction Greater Than/Less Than game) was way back in August, I couldn’t say no. With the end-of-the-week spelling test looming, I thought it would be a good time to practice.

To make our “I say it, you spell it” lesson more exciting, I grabbed the drawer from my son’s LEGO organizer with all the minifigures (aka “people parts”).

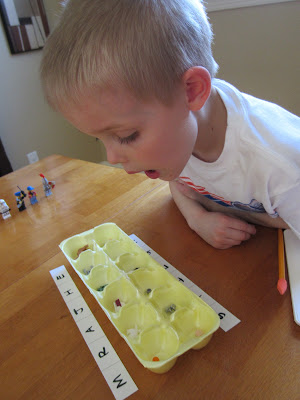
Empty egg carton and spelling list in hand, I wrote the letters of his first spelling word inside two strips of paper with six boxes in each strip. I scrambled the letters and added extra letters so each box was filled. Then I put one strip above the egg carton and one below. I added specific minifigure parts to the egg carton compartments that had the letters in his spelling word and then tossed extra parts into the empty compartments.

I made strips for eight words. Now it was time to test his spelling abilities. I told him the word and he wrote it down.


Then he looked for the letters on the strips and grabbed the corresponding LEGO minifigure piece from the egg carton.


Spelling Word: might

If he spelled the word right, he had the correct body parts to make a figure (e.g. he had the knight’s torso and knights pants, not two heads and a pair of pants).


When he was done with this word, I moved the carton out of his view, swapped the strips of paper, and reloaded the egg carton with new minifigure pieces.

This was tons of fun for my son, even though the week’s spelling words were easy for him (he even got the challenge word – frightening – spelled right; it was so many letters long, I had to have him make two figures for that one!).


When the activity was over, there was no grumbling that he still wanted more “playtime” with Mom. After all, he had nine minifigures beckoning!

Wednesday, April 25, 2012

DIY Shuffleboard Showdown


My son and I went head to head for two games of Shuffleboard on our kitchen hardwood floor the other day. He obliterated me the first game, but I came back and won the second. Both of us were pleased!

Like most games, scorekeeping is required. Shuffleboard’s “10 OFF” box means that players won’t just have to add the points from each round, but they’ll have to subtract too! This was loads of fun and a subtle way to slip in some addition and subtraction practice.

I made the shuffleboard court with blue painters tape. 

The pucks (or biscuits) were large metal closet door pulls (they were being clearanced out at our local hardware store). To distinguish which pucks where whose, I cut some circles of craft foam and placed them inside the pulls, attaching them with a piece of double-sided tape.

Don’t want to buy your pucks? Start saving lids (e.g. spaghetti sauce jar lids, peanut butter jar lids, etc.). You just need six of the same size.
For our paddle, I used the swiffer mop. It worked like a charm.

I put a line on the floor five feet back from the point of the board for my son and I to stand behind. A homemade scorecard helped to keep track of the points. (Download it here.)


Rules of play (for our variation of Shuffleboard)
Play alternates between two players. Each player stands behind a line and pushes the puck with the swiffer toward the shuffleboard. If the puck is inside any part of the board’s triangle, points are earned.


If the puck lands at the end of the board in the “10 OFF” area, the player must subtract 10 points from their score. The opponent can knock a player’s puck off the board with their own.


The first player to get to 45 points is the winner! (The traditional game is played until 75 points are earned; the scorecard I made has lots of rounds to account for extended play.)

Monday, April 23, 2012

Dicey Fractions


What is it about rolling dice that kids love so much? I don’t know, but every dice roll activity I come up with my son loves. This dice roll was made to work on fractions, but incorporates so much more – counting, tallying, animals (i.e. mammals vs. non-mammals), and geometry (shape names, polygons, etc.)!

First we read Working with Fractions, a book by David A. Adler (who also wrote the wonderful book that taught my son all about roman numerals).


Then, I gave my son a fun die with six different colors, animals, and shapes. (I printed this on heavyweight cardstock, cut out, scored the lines with a straight edge and butter knife, folded, and glued the flaps.) 


With a special recording sheet in hand and the timer on our microwave set for 2 minutes, my son was ready to get rolling!

Download a PDF of the die and recording sheet I made here.

He rolled the dice for the entire time, making a tally mark in the boxes under the square that showed up on top of the dice with each roll. I reminded him “One, two, three, four, and five shuts the door” to help him organize his tallies in groups of five.


When the time was up, my son counted the tally marks in each box and added all of the numbers together (I helped). The total was the denominator (the bottom number) on the fraction answers at the bottom of the recording sheet.


To complete the fractions, he had to figure out the numerators (the top number). Several of the fractions required that he add number of rolls from different squares together.


This was good practice to understand what the numbers on a fraction represent and reminded my son about what makes an animal a mammal, which shapes are polygons, and the reinforced geometry vocabulary too!

Friday, April 20, 2012

Pronoun Practice to the Moon and Back


Our Roy Orbison pronoun practice was great fun, but I could tell at the end my son was still a little foggy on how pronouns are used. This activity is meant to clear up the confusion.

It uses my son’s interest in space to excite him about learning pronouns!

First, we read the Grammar Tales book The Planet Without Pronouns by Justin McCory Martin. This book was EXACTLY what I needed to explain just how helpful and useful pronouns are.


The main character, Stanley, notices when talking to the residents of planet Krimular that they don’t use pronouns! He gives his buddy Zik a lesson explaining, “Pronouns are small words such as I, you, me, her, or him. … They are used in place of nouns to make sentences simpler. Think of them as ‘shortcut’ words.” Ah, yes, shortcut words, why hadn’t I thought to explain them that way? This was something my son could relate to!

When my son finished reading (He’s a level K reader so I helped him with some of the more challenging words), I gave him some folded practice cards and a “to the moon and back” scorecard.


His job was to pick a card, read the front, and either replace the highlighted word(s) or add the pronoun if it was absent.


Once he’d done this, he opened the flap on the card and if he got it right, he could move the rocket ship one line closer to the moon. When he got to the moon, he rotated the rocket ship around, kept practicing, and headed back to Earth
.

He loved this activity and wanted to continue practicing with the leftover cards once his space journey had ended. Success!


Directions to Make it Yourself
Download my PDF of the pronoun practice cards and “to the moon and back” scorecard. The pages in the file are ordered so you need to print page 1, flip it over and print page 2, and so on. Once printed on heavyweight cardstock, cut the cards, fold on the dotted line, and use a Exacto craft blade to cut the "V". Tuck the folded flap under the point on the V for each card.

To make the scorecard, cut out the rocket ship and tab. Use an Exacto craft blade to cut out the rectangle for your rocket ship slider. Then poke holes in the rocket ship and tab with a brad. Put the tab behind the “to the moon and back” scorecard lining up the whole you punched inside the open slit you cut out.


Put the brad in the rocket ship, place on top of the scorecard and thread it through the tab that’s behind the scorecard. Spread the brad apart tightly. Now you’re ready to blast off!

Wednesday, April 18, 2012

Making a Magic (Drinking Straw) Flute


Maybe my kids are weird but both of them love using drinking straws. So we had all the supplies we needed on hand for this little craft – nine straws and some clear tape.

When I told my son we were making a flute, he was super excited. His classroom teacher is getting married and has been sharing details of the ceremony. “You know what the only instrument being played at her wedding is, Mom?” my son asked. “The flute!”

Before we got crafty, we read a wonderful book. Kyra Teis has done a beautiful job adapting Mozart’s opera The Magic Flute into a children’s story. I bought this off Amazon and am SO glad I did.


Before we got into the story, we went through the cast of characters on the opening few pages. My son was already hooked – after all, there’s a wise and powerful sorcerer and an evil queen. Right there, he’d made up his mind that the story was going to be good. And it was! There’s a whimsy and wonder to the story that my son and I both loved. This book would be a winner for boys and girls alike.

With the book read, I asked my son to grab his ruler, scissors, nine straws, and some clear tape. It was time to make a pan flute! (I got the idea here.)

The first straw was set aside; it required no cutting. The second straw was lined up against the ruler and 2 centimeters were cut off the bottom. It was laid next to the uncut straw. The next straw, 2 more centimeter (i.e. 4 centimeters) was cut off. This process continued until 8 straws had been cut.


Now my son laid a long piece of clear tape sticky side up on the table and lined the straws up longest to shortest, with the tops of each even with one another. Then he wrapped the tape around them.


It was time to play our ‘magical’ flute! He blew over the tops of the straws! It truly DID seem like magic. The shortest straw made the highest note and the longest straw made the lowest.


After what seemed like an eternity, I was finally able to pull the flute away from my son long enough for him to write a little. (Click on the picture to download this PDF.)


I gave him some writing paper and asked him to draw a picture of himself playing the flute and tell me what he’d do if his flute truly WAS magical.


“I would play it for my brother to make him fall asleep,” he wrote. Since our youngest son has all but given up naps, I have to say, I think I’d play it if it could do that!


Before we both moved on to other activities, my son and I watched a little bit of a performance of The Magic Flute on YouTube. We had fun trying to figure out which singers were what cast members.

Monday, April 16, 2012

Geometry Jump!


It’s time to move beyond squares, rectangles, and triangles. With my son toting home worksheets about polygons, I decided to create a fun activity to work on some of the harder shapes – parallelogram, octagon, hexagon, pentagon, and trapezoid.

I took inspiration from a game we played often when my son was younger: Cranium Hullabaloo. If you’ve played this before, you’ll see the similarities.


I made 15 cards with numbers on them (three of each of the five different shapes). I printed them on 15 pages of cardstock in five different colors. (Download them here. Don't forget to shuffle the colored papers before printing!) Then I made a wacky die with things like walk like a chicken, hop, and dance on it. I printed the die on heavyweight cardstock, cut everything out, and glued the die together. Click the picture below to download the die template.


When my son came home from school, we read Shapes in Transportation. This book was perfect to remind my son about the names of the shapes we’d be working with and showed just how common they are.


Having read the book, it was time to get moving. I had my son help me spread the shapes out all over the floor. Then I set the timer on our microwave for three minutes. I told my son that he needed to move to the shape, number, or color I called out as quickly as possible in the way the die dictated.

Ideas for call-outs:
Give an addition and subtraction problem equal to the number on the shape.
Ask that the child move to a particular shape (e.g. hexagon or trapezoid).
Tell him/her to find an odd (or even) number.
Pick one of the colors and call it out.
Instruct the child to move to a shape with a certain number of sides.

When the timer went off, I named one of the above again and if my son was standing on that particular color, shape, or number he was a winner. We played over and over!


Oh, my word, did he have fun!?! This was great math practice that had my son dancing, hopping, crawling, and “swimming” across our living room.

Friday, April 13, 2012

Practicing Pronouns with Roy Orbison


As I was leaving my son’s classroom the other day after volunteering, I heard the teacher talking to the kids about pronouns. Uh oh, I thought. Knowing how the other parts of speech have been hard for my son to distinguish, I immediately began brainstorming … and Googling.

Using a song to identify pronouns wasn’t my idea; it originated from a Prentice Hall series of worksheets I found here.

When my son came home, we watched a Schoolhouse Rocks video to jog his memory about what words are pronouns and when/how they’re used.


Then I gave him some small pronoun cards, which he put in alphabetical order.


Now I played the Roy Orbison song “Running Scared.” (I found it on YouTube. He didn’t watch, but rather just listened.)


It was my son’s job to pull out the cards with pronouns he heard in the song. He listened twice to be sure he’d found them all.


Then I gave him the lyrics I’d typed up. He circled every occurrence of the pronouns in the song.


Lastly, he graphed the pronouns to see which Orbison sang the most. My son LOVES graphing and always treats it like a contest to see which word, number, or object will win. It was a tie!


Download a PDF of the pronoun cards and graph here. Click on the lyrics to download them.

Wednesday, April 11, 2012

Spelling Practice Balloon Pop


The typical approach to practicing spelling words is to recite them and have your child write them. This activity does those two things but in a slightly more exciting way.

WARNING! Do not conduct this activity if:
  1. Loud noises bother you, your child, pets, or others in the vicinity.
  2. You or your child is allergic to latex.
  3. Or you are not full of hot air.

The supply list is simple: light-colored latex balloons, several small pieces of paper (one for each spelling word), a safety pin, a black permanent marker, and some small candies like Smarties or Spree (optional).

Prep
I wrote each of my son’s eight spelling words on a small slip of paper, folded it up tiny, shoved each into a balloon, and blew them all up. IMPORTANT: Remember to number your balloons so that you know which words are inside.


Practice
Give your child the marker and ask him/her to find the balloon labeled with a number 1. Say the spelling word and ask them to write it on the outside of the balloon. Check their spelling. Then hand them the safety pin (remind them to be careful, it’s sharp!). BANG! Pop the balloon. The slip of paper inside will come flinging out. Ask your child to open it and spell the word aloud. Did they spell it right? If so, they’ve earned a sweet treat!


My son loved this, which made the light-headed feeling I got blowing up the balloons and the deafening noise of him popping them entirely worth it!

Monday, April 9, 2012

Solar System with Button Planets


My son thinks anything space-related is cool. I have to agree. We BOTH learned a lot and had a blast with this science craft.

While shopping at our local craft store, I found this plastic canvas PVC circle in the needlework section. I knew right away what to do with it. Make a solar system model!

Supplies:
9.5 inch plastic canvas needlework circle (cost = less than $2)

Spray paint (blue or black)

White paint pen

9 buttons

Embroidery thread the same color as your spray paint

Sticker paper (or paper and glue)

Needle

The day before we got started, I spray painted the needlework circle with black spray paint.


I grabbed Seymour Simon’s Planets Around the Sun book and asked my son to tag along to the fabric store. 


Simon’s book has a matrix in the back showing the order of the planets in our solar system as they orbit the sun. It shows the relative size and color of the planets.

Oops! Our Venus and Earth buttons are in the wrong order in this photo.

At the store, I pulled out the book and showed my son the matrix. We picked out buttons that looked like each of the planets, paying attention to size and color. (The store was running a phenomenal sale on buttons, which is good because my spare buttons are boxed up in the basement as we remodel it.)

The following day, we read Going Around the Sun: Some Planetary Fun by Marianne Berkes and got started making our solar system model. Each planet has a rhyme of its own that incorporates the planet's order in our solar system. It's super fun and beautifully illustrated.


To start, I gave my son a page of concentric circles I’d made and printed on cardstock. Click on the picture below to download a PDF of this page.

Each of these circles represented the planets’ orbits. (There is no circle for Neptune, as that planet’s orbit would be the outer rim of our needlework circle.)


He cut the largest circle on the line, positioned it on and in the center of the needlework circle, and traced the outer edge with a white paint pen. When done, he cut the next largest circle, placed it in the center of the needlework circle, and traced around it too. This continued until the orbit of all the planets were represented on the needlework circle.


Now he got the buttons out and starting with the sun, used the needle and thread to attach them to the hoop. We made knots and clipped the excess thread after sewing each button.


When they were all attached, I printed a page of labels on sticker paper, cut each, and he attached them next to the respective planet (or the sun).