Wednesday, February 26, 2014

Paper Polyhedron


This is the coolest paper craft we've ever done. Cut paper and add a little patience and a lot of determination and you've made yourself a paper polyhedron ball.

Here's what you need for this project:
10 pieces of cardstock paper
Template to print on cardstock
Scissors

If your child's cutting skills lack precision, you may need to cut the pieces from the template for them (they'll need 30 pieces). My son is eight years old and not only struggles to cut along the lines, but lacks the patience to cut 30 pieces.

So I admit, I did all the cutting.

And it took awhile.

Before my son got home from school, I played with the pieces. I'm not going to lie. It took me a little while of fiddling and a few moments of intense staring at the pieces to figure out how to assemble them.


Here are some tips to (hopefully) make this project easier for you and your child.
  1. Start by making a star, hooking five different pieces together around one hook/joint (see the top right photo in the collage below).
  2. Every joint will connect either three or five pieces.
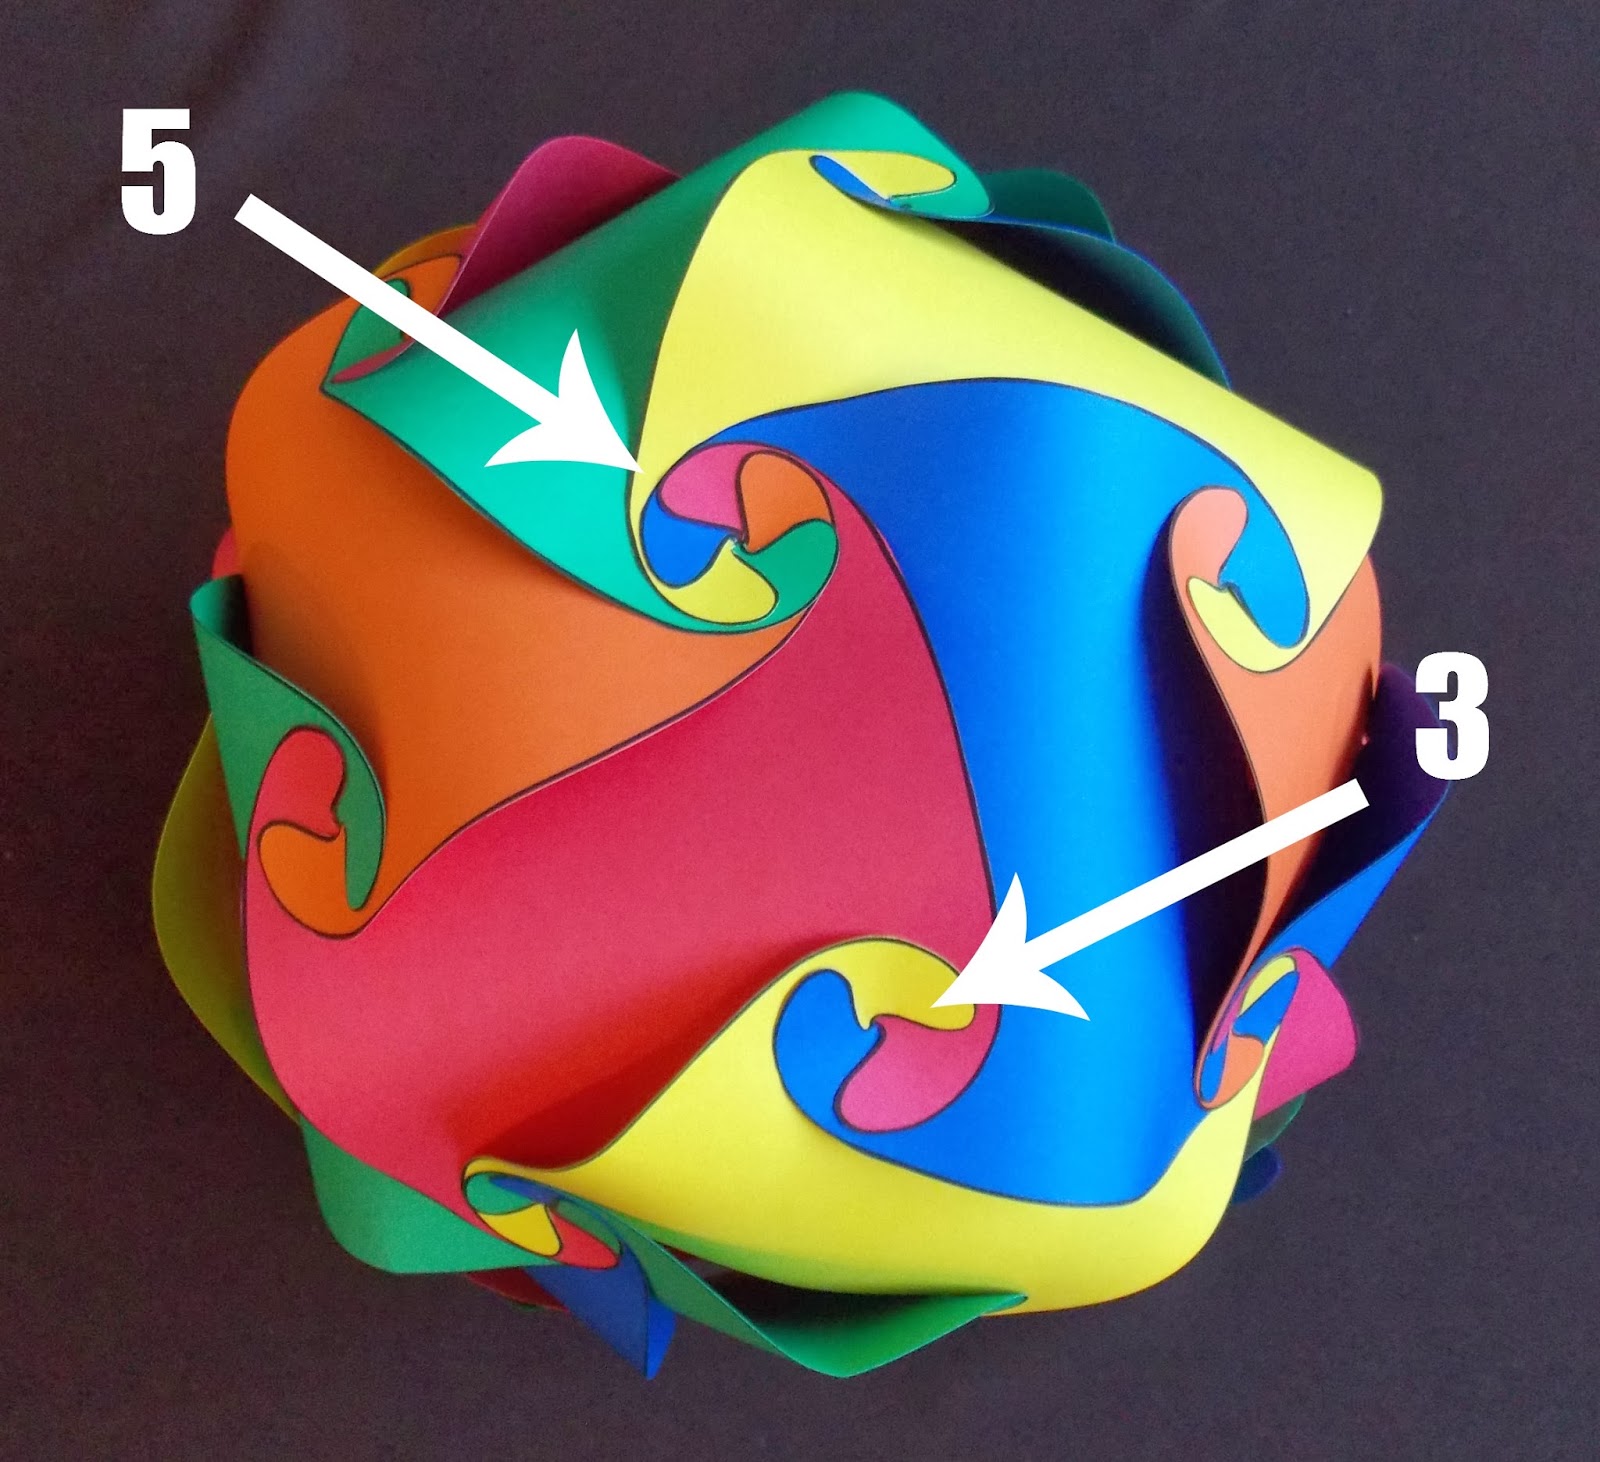
  3. When you add new pieces, you will have to tuck the new piece under existing hooks when you attach it.
  4. The pieces are NOT flat. Each piece (when attached) billows out in the middle.
  5. If it doesn't seem like there's a logical way to connect pieces together, look at the joint. Whenever we got stumped, we realized there were four pieces connected at the joint and another piece needed to be attached there.
  6. The last two pieces will be awkward to attach because space is limited. You may have to bend the paper slightly.


Remember, that this is a collaborative project for you and your child. Two minds are better than one. And the project will be more fun - and less frustrating - when you work together.

My oldest son was intrigued but nervous. The more he attached, the more his confidence grew. And when we were done, he was ecstatic!


I don't blame him. The result was sure impressive!

Monday, February 24, 2014

After School Linky Party (2-24)

Welcome to the After School Linky Party!


It feels great to be back online after my vacation. Thanks to all the bloggers that linked up great ideas
and activities last week. It's such a treat to see what y'all share.

Here are some of the highlights.


 DIY Number Line at Fantastic Fun and Learning


 Newton's Laws of Motion … Simplified at Half-a-Hundred Acre Wood


 Color Mixing Icicles from Life with Moore Babies


 Hockey Game Using Money Skills at Learning is Messy


 Post-It Notes Sudoku at School Time Snippets


Watercolor Resist Silhouettes at Enchanted Homeschooling Mom


Free Printables
Bible Fun for Kids: Solomon's Wisdom, Run the Race
School Time Snippets: Race to 10 Scoops Math Game


We would love to have you link up your School-Age Post (Ages 5 and up) about your learning week after school including Crafts, Activities, Playtime and Adventures that you are doing to enrich your children's lives after their day at school, homeschool, or on the weekend! When linking up, please take a moment to comment on at least one post linked up before yours and grab our after school button to include a link on your post or site! By linking up you're giving permission for us to share on our After School Pinterest Board or Feature on our After School Party next week! Don't forget to follow along and join our After School Enrichment Community.

Friday, February 21, 2014

DIY Mini Hockey Game


Have you been watching all the amazing Olympic hockey games our U.S. teams have played? It's awesome!

I decided that there's no better way to teach my boys about the sport, than to have them play. Of course, they don't know how to ice skate, don't have all the necessary pads, and there's no kids team here in our town. Not to be discouraged by these obstacles, I created a paper rink and plastic sticks and puck.

Our miniature hockey game was a blast!


To make the sticks and puck, I printed a page with them pictured, and traced them onto shrink film using a permanent marker. When I baked the film to shrink it, I laid a piece of parchment under AND over it, to keep the thin sticks from curling up.


The rink is made from three pieces of heavyweight cardstock, taped together. 


To make the goals, I printed two homemade templates on more cardstock and with a few cuts, more than a few folds, and about four pieces of clear tape, they were ready to mount on the rink (simply use glue or tape to attach).


To download the 5-page PDF of this game from Google Drive, click here.
(Don't have shrink film? Use two spoons for sticks and a button as a puck!)

We read some amazing books to supplement our play time.


Face Off by Nick Fauchald provided simple instructions on how hockey played and the basic rules of the game.

How Hockey Works by Keltie Thomas was a fact-filled book containing information such as the history of the sport, explanation of the rules, legends, etc. My oldest son (age 8) was in heaven. He was fascinated by the rubber puck and how it was once made of two pieces, which separated during a game, half going into the goal.

Rick Maloney and Felicia Zekauskas' The Magic Hockey Stick, is a fiction book, about how Wayne Gretsky's stick lit one young girl's hockey skills on fire. It's a heart-warming story that even my preschooler loved.

Wednesday, February 19, 2014

FUN FROM FOLLOWERS: Multiplication (or Addition) Practice with Battleship


I know a good idea when someone shares one. A homeschooling mom mentioned playing this game with her kids on my Facebook page. I was intrigued. She graciously agreed to write this guest post to describe it for y'all. This mom of two sons, ages 5 and 7 years old, loves to be crafty and play learning games with her boys. Her philosophy fits perfectly with my deceptively educational mission. Enjoy!


Math is not only my oldest sons’ favorite subject but he seems to have a natural ability to understand numbers. However, even with his love for numbers he likes to play games to practice his skills every now and then. Coming up with games for him are not as easy as they are for my younger son. My younger son loves to read not do math, and so I am always making games for him.

I had the idea of a strategy game floating around in my head for a bit before I came up with battleship. Of course my first instinct was to search the internet for a freebie, and I came up empty. So I figured it out on my own, with some grid paper and my label machine.

I knew I needed the grid to cover the multiplication tables 0 – 12. And the ships needed to fit nicely inside that grid. I just cut the graph paper out to match my grid needs and also a couple rows for ships. I used my label maker to name all of the ships. After gluing the grid paper down and labeling my ships I had a game board ready to be tested.


Now the fun begins.

The Objective
The purpose of battleship is to sink your opponent's ships by sending missiles to specific grid coordinates each turn.

How to Play
For this game, the grid coordinates are multiplication equations. Each player gets their own sheet of paper with the two grids (top and bottom) and the list of ships on the left. Place your ships on the top grid, ships must be placed vertical or horizontal and they may not overlap. When calling out your missile coordinates you must first read the top across and then down. You must also say the entire equation, such as “6 x 2 = 12.”


If the equation is said correctly your opponent tells you if your missile is a “hit” or “miss.” We did a few practice “calls for fire” before playing. We used an orange highlighter to mark where our ships were located on the top grid. On the bottom grid, we used blue highlighters to mark where our missiles missed and then pink to mark where our missiles had hits. On my sheet, I also used the top grid to mark the calls for fire my son said. (An extra tip I learned after the first game was to write the answers for each square on my bottom grid, just for less thinking on my part.)


The game was so much fun, my oldest son wanted to play again and my youngest wanted a turn as well. My youngest is working on subtraction not multiplication, but I knew there had to be a way. And then I realized I didn’t need to change anything, just print out two more sheets and use it for addition. That worked out wonderfully, two different levels of game play with just one game board!


We played the game almost every day for a week. However, it didn’t take him long to figure out that Mom kept placing her ships in the rows or columns he needed the most practice with. Since first making the game I have also laminated the sheet inside a file folder. Now we can use dry-erase markers and not print so many sheets of paper. I hope that you have as much fun with this game as we did and that it is helpful with practicing math skills. 

Monday, February 17, 2014

After School Linky Party (2-17)


Welcome to the After School Linky Party!


Fortunately for me, but unfortunately for you, they'll be no features here from last week.
I'm making precious memories on our family get-away.


We would love to have you link up your School-Age Post (Ages 5 and up) about your learning week after school including Crafts, Activities, Playtime and Adventures that you are doing to enrich your children's lives after their day at school, homeschool, or on the weekend! When linking up, please take a moment to comment on at least one post linked up before yours and grab our after school button to include a link on your post or site! By linking up you're giving permission for us to share on our After School Pinterest Board or Feature on our After School Party next week! Don't forget to follow along and join our After School Enrichment Community.