Wednesday, June 29, 2011

Slide-A-Story

The Star Wars Story Dice activity was such a hit with my son that I figured it was time to create a new story starter activity to get him writing more. I designed the Slide-A-Story activity and manipulated one of two dice to read either “UP” or “DOWN.”

The Slide-A-Story board contains four questions: who, what, when, and where. Pull tabs are threaded through the board, each with 12 different answers.

Give your son or daughter some blank handwriting paper or print some from DonnaYoung.com. Hand over the dice and get ready for a silly story to unfold.
Your child will roll the two dice four times. If the die read “UP” and “4” the child moves the tab up four times to reveal a person, thing, time, or place. Each of these answers will be incorporated into the story.


My son rolled “Astronaut,” “Tractor,” “Bed time,” and “At a museum.” What was almost more fun than creating the story was discussing the why and how behind the answers he’d ended up with (e.g. why would an astronaut be riding a tractor? How did he get in the museum? What was he doing there?).

Make Your Own
Download and print the UP/DOWN page onto sticker paper to manipulate one of your dice. The Slide-A-Story board and slides are available for download as well. Simply print on cardstock, glue to a thicker piece of paper for added sturdiness (I used a colored file folder), use an Exacto knife to cut the slits for the slides, and thread them through.

Want to make your own Slide-A-Story board and slides? A blank Slide-A-Story board is available for download (perhaps your child would love to decorate this themselves) and empty slide templates can be downloaded, too. Simply click on the red text.

Monday, June 27, 2011

Let’s Go Fishing (Snacktime Subtraction)

What can you make with colored Goldfish crackers, peanut butter, and pretzels sticks? A snack AND a math game, that’s what.

First I had my son cut out a pond from blue construction paper. Then I gave him a small bowl of colored Goldfish crackers and asked him to put some fish in his lake.

Then he started reading and answering questions on a custom-made worksheet, counting the total number of fish in the pond, as well as the number of red, orange, yellow, and green fish.

Then the real fun began.
Dowload this worksheet here.

I asked my son to dip his fishing rod (a pretzel stick) in peanut butter and "catch" the number of fish specified in the next question. After these fish were caught, how many remained in the pond? What about after you throw some back in?


This was the yummiest math activity we’ve ever done. I know this because my son said, “I like to eat the fishing poles, Mom.” HA!

Wondering what to do with all those leftover pretzels? Have your child make pretzel letters!

Friday, June 24, 2011

How to Make a Rainstick

If you’re teaching your son/daughter about rain or the rainforest, making a rain stick is a great craft to complement the lesson.

I’d seen this project ages ago and thought it would be fun but my son’s fine motor skills simply weren’t up to the task. Now that he’s older, I figured we’d give it a go. I’m glad I did.

What you need:
A bare paper towel tube
40-50 wooden toothpicks
School glue
Posterboard or heavy construction paper (trace the opening and cut 2 circles ¼ bigger than the tube; make several snips all around the circle from the outer edge in to the traced line)
1-2 tbsp. of rice, lentils, or other small beans
Push pin
Hot glue gun
Paint/markers
Nippers or cutters to cut off the toothpick ends

Directions:
Use a push pin to make holes in the paper towel tube about a ¼-inch apart. I used the seams on the paper towel tube as a guide and added another row of holes between these seams. Then I gave my son the box of toothpicks to feed through one hole and out a hole on the other side. You’ll end up with a downward spiral of toothpicks on the inside of your tube.

If your rainstick looks something like a medieval torture device, you’re on the right track. Once about 40-50 toothpicks are stuck in the tube, put a dot of school glue on each of the holes where the toothpicks are sticking out (this will prevent the toothpicks from falling out).

When the glue dries, snip off the ends of the toothpicks (be careful, they could go flying). Run a bead of hot glue around one of the ends and fold down the flaps you cut on one of the posterboard circles until the end of the tube is capped.

Have your child measure the beans/rice/lentils and pour into the tube. Hot glue the other circle of posterboard around the open end. Give your child paints, markers, or strips of paper to glue over the tube to decorate it. Now, slowly turn the rainstick and listen to the sound of falling rain!

I practically had to beg my son to decorate his rainstick. All he wanted to do was play with it!

After we were done with this craft we read two great books about rainforests: “Amazon River Rescue,” an Adventures of Riley book by Amanda Lumry and Bonnie Worth’s “If I Ran the Rainforest” from the Cat in the Hat’s Learning Library.

To read the original directions for this activity, visit FreeKidsCrafts.com. 

Wednesday, June 22, 2011

Crayola Colors Word Roll

Give a kid a grid of 36 words and two dice – one manipulated with the letters A through F – and let the fun begin! That’s what Melissa over at Wishes Dream Love did with her son and it seemed like such an amazing idea, I thought we’d try it at my house.

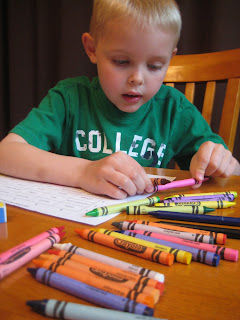
Instead of practicing sight words, I used the color names printed on the crayons in a box of 24 Crayola crayons. (We had a brand new box leftover from the school year.) I used sticker paper to print A, B, C, D, E, and F stickers to alter one die and Microsoft® Excel to create the grid. All that was left to do was to hand it over to my son.

When he rolled an A and a 2, he found the box on the grid, read the color words, looked through his crayons, and colored that rectangle with “carnation pink.”


He caught on immediately and didn’t stop until every square was colored – even the white ones!

This was a fun activity that got my son reading and taught him a few things about color (e.g. violet is purple so “blue violet” must be a bluish purple color, “apricot” is peach, etc.). Click on the red words above to download the Crayola Colors Word Roll grid or download a blank template here to make your own.

Monday, June 20, 2011

Swimming Lessons + Math Lessons = FUN!

We waited forever to put our son in swimming lessons, so long that I worried his fears would stifle his progress. Thankfully, that wasn’t the case. My son loved his swimming lessons this summer. (Whew!)

To piggyback on this interest, I designed a fun math activity around swimming. First, he read “Swimming” by Cynthia Klingel and Robert B. Noyed. This level one reader was easy enough for my son to read on his own and echoed many of the things he experienced over the last few weeks in swimming lessons (e.g., wearing goggles, floating, pushing off, etc.).


After he finished reading, I gave him three small cut-outs of swimmers of varying sizes and a large worksheet picturing the profile of a swimming pool. Answering the questions meant that my son had to move the swimmers across the pool and down to the bottom, counting their strokes.

If they swam two laps, how many strokes was that (while this introduced the idea of multiplication, my son is hardly ready for that so we stuck with 8 + 8 + 8 = what)? This could easily be adapted for older kids to introduce (or practice) multiplication.

The activity was a success. How do I know? He asked to keep the swimmers so they could hit the pool again another day.

Just before we headed out for my son’s last lesson at the pool, we read Jonathan London’s “Froggy Learns to Swim.” I could tell from his recitation of the book’s “bubble bubble, toot toot” in the car that the story had struck a chord.

Download Bill, Kate, and Alex (the swimmers we used) and the pool profile here. Simply print, trim, overlap the two pages, and tape together to make your own indoor “swimming pool.” Click on the red phrases in the previous sentence to access the PDFs.

Friday, June 17, 2011

Jellyfish Tunnel Book

When I asked my son what he wanted to learn about, I don’t know what I was expecting him to say. But “jellyfish” certainly wasn’t it.

Our local library was equipped with tons of books, but the real conundrum was what to do other than just read them. That’s when I stumbled on Teach Kids Art, a wonderful resource written by a California blogger whose tunnel books were the ideal way to take learning about jellyfish beyond books. Check out the original post here.

Before my son dug out his art supplies, though, we read two great books, both titled “Jellyfish” by authors Martha E.H. Rustad and Carol K. Lindeen. These books feature amazingly beautiful pictures of jellyfish both big and small and are ideal for early readers like my son.

Once we’d learned a thing or two, I gave my son three pieces of cardstock which had a rectangle cut out in the center (the “cover” also included a scuba diver) and another piece with no cut-out that included a jellyfish graphic. Download a PDF of the front and back pages of our jellyfish book and/or blank pages by clicking on the red words in this sentence.

On the top of each of the four cards, he wrote a short fact he’d learned about jellyfish. Then he colored the jellyfish and scuba diver as well as some graphics of fish which he glued to the edges of the window on the second and third pages.

Next, I cut two 8 ½ x 11-inch pieces of cardstock in fourths. He folded six pieces in half and then folded the edges back to meet the folds again. Lastly, he glued these between the pages of his tunnel book.

When it was complete, he could look down on his book and read his jellyfish facts or look through his book to see the fish and jellyfish scene.


To say that my son loved this activity is an understatement. He was enamored with the finished product and couldn’t wait to show off his creation.

Thanks Teach Kids Art for helping me teach my son about jellyfish!

Wednesday, June 15, 2011

Dinosaur Counting and Measuring

In the second book of the Dinosaur Cove series, author Rex Stone’s main characters, Jamie and Tom venture back to Dino World on a mission to make a map; it was their quest in “Charge of the Triceratops” that inspired this activity.


I created a worksheet mapping out some of the landmarks mentioned in the story and in order to answer a series of questions, my son would need to count the steps from one to another.
Download this worksheet here. 

After counting his way around Dino World, I gave him two large dinosaur footprints I’d cut from posterboard; I used the theropod footprint on Nestlé Family’s website as a guide. The finished footprints were approximately 20 inches in height and 15 1/2 inches wide (I estimated the size based on a photo I found of a person standing with one foot inside a theropod footprint).

We talked about how the T-Rex was a theropod, how big their feet were, and how large their stride must have been.


Lastly, he answered some questions I’d prepared, estimating how many of his own feet would fit inside a theropod footprint and measuring with the “footprints” how many steps it would take a T-Rex to get around our house.

Download this worksheet here.

This was a fun activity to get my son counting and measuring and helped us both realize just how big dinosaurs really were.

Monday, June 13, 2011

Planets Winding Word Puzzle

This activity was inspired by a game on the back of a kid’s meal menu. No joke. 


I used a book my son picked out earlier this year at the school book fair on the 8 planets in our solar system, to produce a series of word clues.

Before we started the puzzle, we read "8 Spinning Planets" by Brian James. Then, I explained the activity and gave my son his markers to get started. He needed to begin at the START square and count spaces down, right or left following each line of the directions, and write down the words he landed on as he wound his way around the puzzle page. The words formed a complete sentence – a clue – about one of the planets in our solar system. An example follows:
Right 4 spaces.
Down 3 spaces.
Left 4 spaces.
Down 3 spaces.
Right 6 spaces.
CLUE: You call this planet home.
ANSWER: Earth

When my son landed on the correct space, he colored it using a different color for each clue. He crossed off each line of the directions after it was completed. After he wrote all the words from the clue down, he answered, "What planet am I?" When he wasn't absolutely sure of the answer, we looked back at the book.


I wrote clues for all 8 planets, although our time was limited and we only completed the first three. The clues and answers follow:

#1  Icy rocks make up my rings. ANSWER: SATURN
#2  I am made of gas and spin on my side. ANSWER: URANUS
#3  I am the red planet with two moons. ANSWER: MARS
#4  I spin fast and am the biggest planet. ANSWER: JUPITER
#5  It is hot and dry here every day. ANSWER: VENUS
#6  I am the closest planet to the sun. ANSWER: MERCURY
#7  You call this planet home. ANSWER: EARTH
#8  It is cold here since I am so far from the sun. ANSWER: NEPTUNE

Download your own Planets Winding Word Puzzle Grid and Directions today. This was a fun activity that combined counting, reading, learning about space, right/left practice and writing.

You can do this activity on virtually any topic, using any short sentences that you’d like. A blank winding word puzzle grid is available for download here.

Friday, June 10, 2011

Ice Cream Party Math (a SMMARTidea)


Hello! I’m Lisa and I share learning activities for kids on my SMMARTideas blog (Science, Math, Music, Art, Reading and Time-out for Tidbits). I’m excited to share this SMMART Math learning activity with Relentlessly Fun, Deceptively Educational readers!

Ice cream can be a great motivator for your child to demonstrate his/her math skills.  You’ll need some ice cream and little candies, marshmallows, chocolate chips … whatever you have in your pantry.

Display all the fixins in fun glasses and jars out on the table. Then, BRING OUT THE ICE CREAM!


Okay, now for the math. Have your kiddos answer math questions to earn candies and add-ins.

"4 + 6 = the number of chocolate chips you can add into your ice cream."
"50% of 12 is the number of gummy bears you can add to your ice cream."
"Count 7 lemonheads and put them into your ice cream ... good counting!"

Put the add-ins right into a large ceramic bowl and mix it up with two large spoons, then dish into waffle cones. 

I suppose you could even touch on a little geometry ... the cone shape of the ice cream cone, sphere shape of the malted milk balls, or oval jellybeans.

Cool summer fun!
- Lisa at SMMARTideas

Wednesday, June 8, 2011

Word Scramble with Letter Magnets

Unscrambling words is a fun activity for kids of any age. To make it easy for my son to move the letters around and try different sequences until he unscrambled the word, I made letter magnets. These were simple and affordable.

I used Microsoft Excel® to create a grid with letters in each square (download my template here). I printed the page on cardstock and using a glue stick, attached it to a recycled cereal box for sturdiness. Then I cut the squares out and attached a small piece of magnet tape to the back of each. For the magnet board, I used a cookie sheet.

The words he unscrambled were:
Zip
Rat
Kid
Hot
Cry
Jam
Play
Fish
Gold
Quit
Race (letters can also be reconfigured to spell ‘care’)
Run
Web
Fan
Nest (letters can also be reconfigured to spell ‘nets’)
Jet
Milk
Bump

I scrambled each of the words on the cookie sheet in groupings of six words, starting with three-letter consonant-vowel-consonant (CVC) words.


My son did great and only needed hints to get the words ‘gold’ and ‘milk’ unscrambled!

Monday, June 6, 2011

Erupting With Fun

Volcanoes are one of the coolest natural wonders; just ask any 5-year old. My son knew a little about their eruptions, but when I started to ask him more detailed questions like, “What is lava and where does it come from?” a blank stare was his response. To give him a better understanding, I figured we’d read a few books, make an eruption of our own, and journal about what he learned.

I got the recipe for making our “volcano” from Linda Hetzer’s book “Rainy Days & Saturdays.” Here are the steps:
  1. Stir 1 tablespoon of baking soda into ¼ cup of water.
  2. Using a funnel, pour the mixture into a plastic bottle; I used a 16.9 oz. water bottle, but a shorter bottle would work better.
  3. Add a few drops of liquid dish soap.
  4. Put the bottle in your kitchen sink.
  5. Carefully add ¼ cup distilled vinegar to the bottle; keep your face away from the bottle top.
  6. Watch the eruption!
We had all the ingredients on hand and making the eruption was a snap. My son was thrilled that our afterschool activity took us somewhere other than the table.


Our eruption was an impressive (yet slow) bubbly overflow.

Dowload this worksheet here.

After our eruption, my son cut out the scrambled instructions I’d typed up, read each step, put them in order, and glued them in his new journal. Then, we read Dana Meachen Rau’s book, “Volcanoes: Wonders of Nature.”


To wrap up our “science class,” I asked my son to write about a few of the things he’d learned in his journal. At the top of the page I wrote “What we learned about volcanoes …” He added two sentences about the things that surprised him the most: that lava is really melted rock and that volcanoes are mountains.

For another great book to read with your child about volcanoes, check out Gail Herman’s “The Magic School Bus Blows Its Top: A Book About Volcanoes.”

Friday, June 3, 2011

B D P Q Practice

Curse those darn lower case letters that look similar; they’re always tripping my son up. He’s mastered ‘p’ and ‘q,’ but ‘b’ and ‘d’ are a different story. To do some drills with him, I made a spinner featuring all four of these letters (download the template here).


I printed the first page of the spinner on heavy-duty colored construction paper, the second on regular office paper. Then I glued both to a recycled cereal box for sturdiness, cut them out, made a hole in the center, and threaded a brad through the center.


When he came home from school, I gave him the spinner and quizzed him asking:


What does (one of the words listed below) start with?
Quail
Dab
Pop
Dog
Bad
Quick
Play
Dunk
Ball
Door

What does (one of the words listed below) end with?
Map
Mad
Scab
Stop
Dab
Bad
Bob
Sob
Said
Lap

I randomly switched between the starts with/ends with questions so my son would have to listen carefully. To answer the questions, he turned the spinner to the appropriate letter.

I’d like to thank the I Can Teach My Child blog that inspired this idea.

Wednesday, June 1, 2011

Will it Float or Sink?

When I picked up Melissa Stewart's "Will it Float or Sink?" at a yard sale, I knew the book would be the springboard for a fun afterschool activity. I was right.

To prepare for our experiment, I gathered some things from around the house and a big bowl from the kitchen. I made two columns in my son's journal with the words "Floats" and "Sinks" at the top. All that was left to do was wait for school to get out.

When my son got home, I explained the experiment and invited him to add a few things to the pile of items we were going to dunk. Then I asked him to explain to me what "float" and "sink" mean and to predict what things would sink. He told me that the bigger stuff would sink. To his reply I said, "Let's find out."

One by one he tested each thing (action figures, a ball, plastic and metal spoons, a marker, screw, etc.), pausing afterwards to write the item down in the proper column of his journal. When we'd finished, he drew his own conclusion: "All the metal things sink!"


We read the Rookie Read-About Science book together to find out why and learned about matter. After reading the book, he turned the page of his journal where I'd written "Things that float ..." He completed the sentence by recapping what he'd learned: Things that float 1) are lighter than water or 2) filled with air.

This was an easy activity that my son really enjoyed. The only advice I can give to those who replicate this is to make sure to roll up your child's sleeves first and have some towels ready. Happy experimenting!