Showing posts with label Geography. Show all posts

Friday, March 13, 2015

Southeast States Trivia Treasure Hunt


The fourth grade social studies curriculum at my son's school covers the regions of the United States. He recently learned all about the southeastern states and the class is now moving on to the southwest. 

My son's memory is pretty good and his ability to ID the states is equally as strong. Since he's been begging me for a new deceptively educational after school game, I thought I'd test his knowledge with a fun trivia-based treasure hunt of the southeastern states.


You should have seen him when he realized it was finally time to play the game I'd been working on for so many nights (thank you, Internet, for all the great info!). He was pumped!

What You Need to Play
Heavyweight cardstock (7 sheets)
Scissors or paper cutter
Tape
Glue (optional)

Prep
Download the PDF from Google Drive here. Print on heavyweight cardstock. 


Cut the cards apart and fold in half so one side is the state and the other trivia. Tape or glue shut. The START card is the only card that can be cut in half (i.e. it doesn't require folding). Take all the other folded cards and tape them in various places around the room(s).

Play
Hand your child the START card with trivia on it. Based on the facts, can they determine which state is being described? Once they've figured it out, they must race around the room to find the card with that state pictured. They'll then flip the card over and read the next set of state facts, then try to locate the card with that state's shape. Play continues like this until kids have found the final card. Their tour of the southeastern United States is complete!


Note: The cards are labeled on the back corner with a number from 1-12. This will help kids know if they've found the right state (i.e. if a child reads facts on card number 8 and flips over a state with a 5 on the back, they've incorrectly identified the state that the facts were about. The numbers will go in chronological order if the child identifies the states correctly).

The order of the hunt is as follows:
Alabama
Georgia
Mississippi
Louisiana
Florida
Arkansas
North Carolina
Virginia
South Carolina
West Virginia
Tennessee
Maryland

Variation No. 1
 If your child doesn't recognize the state shapes yet, label the cards with the state names.

Variation No. 2
Want to simplify things? Cut the cards apart and write the capitals on the back of the cards so the hunt is just about ID'ing the state capitals correctly.

FYI: I was rushing to get this activity put together. If you see any inaccuracies, typos, etc. please let me know! It isn't likely my 9-year-old would point them out to me, so I'd appreciate if you did!


Friday, February 6, 2015

Climbing Mountain Climbers (Learning about Everest)


What could be better than learning about friction and landforms while crafting a fun hands-on toy? Not much if you're a 9- or 5-year old boy. I speak from experience.

My sons had a blast with this.


Here's how we made our mountain climbers … that actually climb!

For each mountain climber, you'll need:
Mountain climber template (download my free PDF from Google Drive here)
Heavyweight cardstock paper
Scissors
Yarn
Plastic drinking straw
Penny
2 pony beads
clear tape
Markers, colored pencils, crayons, etc.
Profile picture of your child's head (optional)

How to Make a Climbing Mountain Climber
1. Print the mountain climber onto cardstock and cut out. If desired, cut out the face and glue your child's photo in its place to personalize.

2. Color the climber.


3. Cut two short lengths of plastic drinking straw and tape each vertically (parallel from each other) onto the back of your climber's body.

4. Under them, tape the penny for weight.


5. Now cut a long length of yarn. Thread it through one length of the straw and down through the other.


6. Tie a pony bean on each end of the yarn. This will prevent the yarn from slipping back through the straws.


7. Now place the loop above the head of the climber over a door handle.


8. With each end of the yarn in one hand, pull the yarn apart and watch your climber travel up toward the door handle. That's the summit!


9. Bring your hands and the yarn strands back toward each other and watch the climber descend the "mountain" now that you've reduced friction.

Read Up on Mount Everest
To explain the massive feat of climbing Mount Everest, we turned to some great authors and books. My sons enjoyed these and we learned a ton … like how incredibly dangerous the trek really is, how long it takes, and how trying it is on the human body. Count us out!


Want to extend the learning? Have kids use register tape or post-it notes to tack up along the wall with milestones a climber would encounter on their journey up the mountain - from basecamp, to tree line, to snow line, to ice falls, and the summit. Kids will have fun slowly working their climber up to each. 

Wednesday, October 29, 2014

United States BINGO (Teacher's Edition)


Three years ago, I made a United States BINGO game for my oldest son. It used some hand-colored states graphics I drew that vanished with the death of an old laptop.


But since that time, numerous teachers have asked me to create more game cards. Having made new states graphics (this time digitally) for our states and capitals pegboard, creating a 30-card set was finally possible.

This new printable is free for download on Google Drive here. Enjoy!


Both my son and I tried to check each card to make sure none had duplicate states, but it's possible we missed one. Please let me know if you find an error.

Wednesday, October 1, 2014

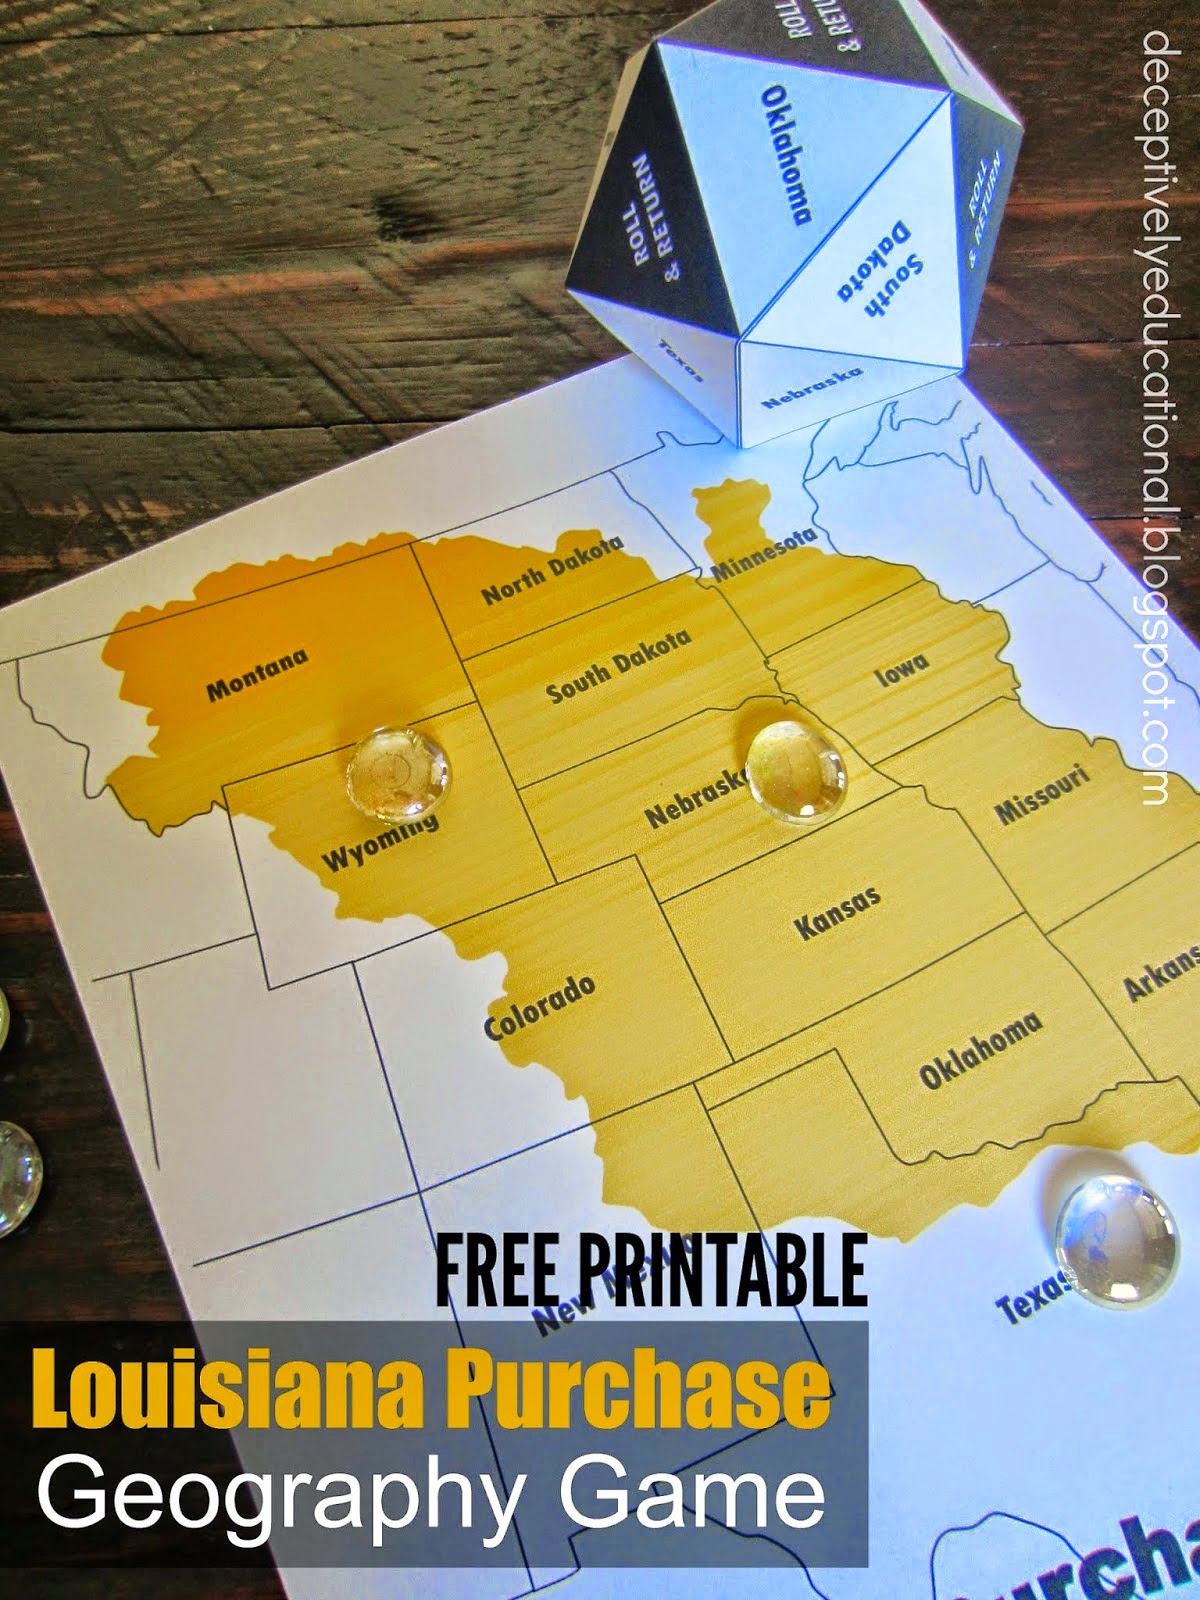
Louisiana Purchase Geography Game


My 9-year-old son asked me if our state was part of the Louisiana Purchase. "Um … well … that's a good question, son," was my response. Yeah, I admit it. 

I didn't know.

So this little game was as much about helping him learn the states in the Louisiana Purchase, as it was about familiarizing me … and having fun doing it, of course.


All you need to make this game is a the 2-page PDF I made (download it free here), cardstock, some scissors and glue, and 15 game pieces per player (we used small glass baubles).

Print a map game board (page 1) for each player.


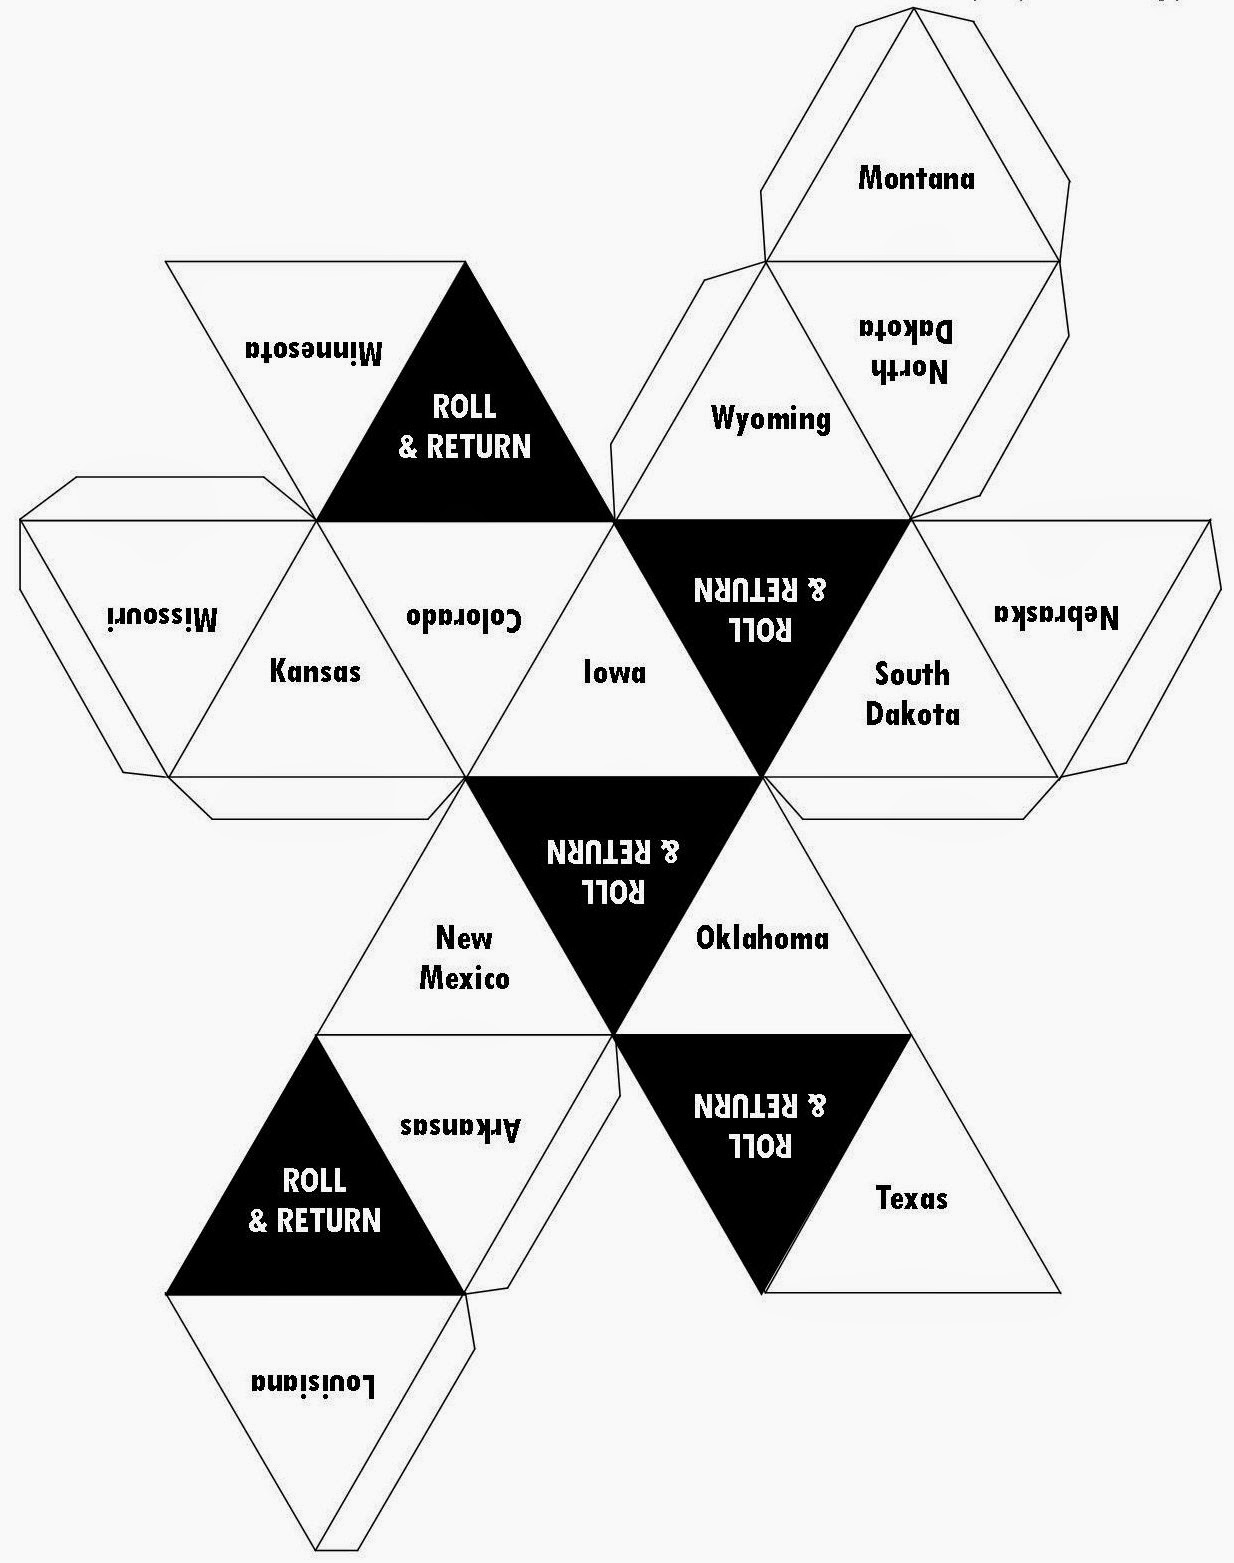
Print, cut, fold, and glue the icosahedron die. It contains the 15 states that have land in
the Louisiana Purchase. It also have five "Roll & Return" sides.


Now gather your game pieces and get ready to play.

It's simple. The youngest player rolls first and places a game piece on the state rolled. Each player takes a turn.

If a player rolls and "Roll & Return" is on the top of the die when it stops, they must roll again and remove the game piece from the state they roll, returning it to their pile of game pieces. If they roll another "Roll & Return," they continue to roll until a state appears. If they do not have a game piece on the state, their turn is over.


The game goes fast at first, but I can assure you, getting all states covered takes time. If you expect your child's interest to wane, set a timer for 10 minutes and see who has the most states covered when it goes off.

Playing is a great way to memorize the geography of the Louisiana Purchase and helps kids fine tune their ability to locate those 15 states on a map.

Want a good book to go with this activity? My son read Expanding a Nation: Causes and Effects of the Louisiana Purchase by Elizabeth Raum. This 32-page book is loaded with facts but written in easy two- to four-paragraph chunks, keeping kids from the fatigue that sometimes comes with non-fiction.

Wednesday, July 2, 2014

Pegboard Practice {States & Capitals}


To help my son practice capital cities for our great 50 states, I made him a fun pegboard to practice. Here's how I did it (and you can too).


Cut a piece of plywood to 8 1/2 x 11. If you don't have the tools at home, ask a helpful associate for assistance at the hardware store. They're usually able to cut wood to your dimensions upon request. Lightly sand with sandpaper to prevent splinters.

Now print the PDF of states and capitals. The PDF is available for free download from Google Drive here. (You may have to log in to a Google account, though, to access it).


I printed the pages on heavyweight cardstock.

You'll need a special hole punch that can punch holes anywhere on the page. A normal paper punch won't work. I use this one, along with a rubber mallet.


Martha Stewart also has a screw punch that would work. Using your special punch, punch out the holes individually on all seven pages. Make sure to protect your work surface (I usually put the pages on a cutting board). Yes, this is tedious, but totally worth it.

Now set one of the pages on top of your wood. Center 1-inch brad nails in each hole and pound down with a hammer. You will need 16 nails. Leave the nails sticking up about a 1/2 inch or so. With all the nails pounded in, your pegboard is ready. Note: You can do this in your pajama pants if you want. Just sayin'.


Grab eight rubberbands and the pages you printed. Stack the pages, put them onto the board, and hand your child the rubberbands to string from the state to the correct (hopefully) capital.

The PDF includes a 2-page answer sheet, so you can double check your child's work. When my son finished a page, I removed the incorrect rubberbands and he tried again. It was great practice and loads more fun than flipping flashcards.


The pegboard can be used to practice virtually any skill. Print a blank template to practice rhyming words, a foreign language, math facts, etc. Simply laminate before punching the holes and use a dry-erase marker to fill in the practice "questions and answers."

This idea was adapted from FamilyFun magazine.

Friday, June 27, 2014

Printable Underground Railroad Quilt Code Game


This idea has been stuck in my head for awhile, ever since I heard about how quilts were used to communicate to runaway slaves on the Underground Railroad. Their patterns and blocks were a code, providing direction, signifying safety, and issuing warnings (according to some historians).


Before my son and I played the game I made, we read the perfect book to pair with this activity - The Patchwork Path: A Quilt Map to Freedom by Bettye Stroud.


Having already read a biography on Harriet Tubman, my son had a basic foundation of knowledge on the Underground Railroad. Stroud's book filled in the rest - explaining how quilt blocks held messages for Hannah and her father on their journey from a Georgia plantation to freedom in Canada.


What You Need to Play the Game
Cardstock to print the 10-page PDF on
Tape to piece the game board together
Pictures of slaves who found freedom on the Railroad (I printed
   images of Henry Bibb, Frederick Douglass, Josiah Henson, and
   Harriet Tubman on cardstock and laminated)*
Medium-sized binder clips
Paper cutter to cut the game cards


Prep
Cut the pictures so that when they are inserted into a binder clip, the faces are visible. These are your game pieces.

If necessary trim the white border (this depends on how your printer prints full-bleed pages) on your game board pages so that the map image butts up against each other. Affix the pages with tape on the back.

Cut the game cards apart and shuffle.


The Objective
Be the first to move your game piece along to Cleveland, OH (the Underground Railroad station nicknamed "Hope").


How to Play
Each player picks their game piece and places it on the start star. Everyone should be dealt three cards, which they turn over on the table to look at. (Secrecy is not important.)

Before a player can move to the first space on the game board and leave the plantation to begin their journey on the Underground Railroad, they must play the Monkey Wrench card. If it is not in their hand, they draw and discard either the card drawn or another card in their hand. Play continues this way until they draw the Monkey Wrench card and can start their journey. The same is true for the next quilt block space (Tumbling Blocks).

It may take awhile to get these cards. If you suspect that your child will grow impatient quickly, print more of page 5 and 6 on the PDF so there are more Monkey Wrench and Tumbling Block cards in the deck. Likewise, if you have more than two players, additional cards will be necessary.

Anytime a space along the railroad has a quilt block next to it, the player must play that very same quilt block card in order to move there (and beyond it).


A player can move to any space not designated with a quilt square by playing either a Log Cabin or Flying Geese card.

If a player has multiple Flying Geese or Log Cabin cards, they can all be played on his/her turn (e.g. if two Log Cabin cards are played, the player can advance two spaces). The player must always draw more cards to maintain three cards in their hand.


BEWARE! If you draw the Drunkard's Path card, you must move back 1 space. You cannot play any other cards during this turn. NOTE: if you move back to a space before a quilt square space, you do not have to replay that same quilt block card again to move forward. A Log Cabin or Flying Geese card grants you passage forward.

If you run through the entire deck of cards, simply grab the pile of cards already discarded or played and turn them over to reuse.

VARIATION: Use colored binder clips so each player has multiple game pieces (i.e. all the game pieces for Bobby have blue binder clips, while Sarah has game pieces with red clips). Every time a Monkey Wrench card is drawn, the player can begin moving a new game piece on the journey. Decide to play for 45 minutes (or so) and when the time is up, see how many game pieces for each player made it to Cleveland. The player to free the most slaves is the winner.

This is a great strategy game that piques kids' interest in history, codes, and folk art.


Got a kiddo that's interested in quilts? Or looking for a math extension of this game? What about our Quilt Square Fractions?


*Due to copyright protection, I'm not providing you with printable game pieces. A Google search should result in MANY choices, though.

Wednesday, May 28, 2014

Battle of the States {free printable game}


My oldest son (8 1/2 years old) has always had a fascination with U.S. geography and the history of the states. This game combines both.


To make your own deck of states cards, download the 7-page PDF I made here. Print on cardstock.

If you're worried the cards will be see-through, spritz the back of the printed pages with spray glue (in a well-ventilated area) and adhere a lightweight piece of scrapbook paper to the glued side before cutting out.


Now grab your kid and get ready to play.

Shuffle the deck and divide it in half with the cards face down. Each player turns over the top card on their deck, keeping it to themselves. Then, the youngest player names a category (e.g. population, number of counties, electoral votes, etc.). 

The opponent reads the number from that category on their card and the youngest player does the same. For all categories but one, the player with the largest number is the winner and takes the opponent's card, setting both their card and their opponent's card in a pile in front of them face up.

If a player selects the "statehood" category, the winner is the player with the card containing the earliest statehood year.


The player that wins the round selects the category for the next one.

If the category called results in both players announcing the same number from their cards (e.g. both states have the same number of electoral votes), two more cards are drawn and compared. The player to win, takes all four cards.


When the decks are out of cards, players compare the number of collected cards from their wins. You can count them or straighten and set the decks side-by-side. The player with the most cards wins.


Wednesday, October 16, 2013

Westward Bound! {A Lewis & Clark Board Game}


Our oldest son loves all things history-related. I wanted to teach him about the Lewis & Clark expedition and the group of adventurers (the Corps of Discovery) that explored the lands acquired in the Louisiana Purchase and the Oregon Territory.

It took a little more work and research than I'd planned, but at long last, the board game I made to retrace their steps and learn expedition facts was complete. It was time to play!

What you need is a die and small game pieces. We used two different colored glass babbles. Small buttons would work great as well.

I'll supply the rest. Well, except for the paper. You'll need paper. Eleven pieces to be exact.

With your printer fired up, download and print this free PDF. The first five pages are the game board. If you anticipate giving this lots of play, print on heavyweight cardstock for added durability.


The last six pages are the game cards. I printed mine on colored office paper, punched a hole in one corner, and threaded them through a metal ring. This kept them in order, but isn't a necessity.


Before my son and I played Westward Bound!, we read a phenomenal book by David A. Adler. This provided precisely the background my son needed to understand how truly phenomenal exploration of the western United States was in the early 1800s.


To play the game, we put both game pieces on the black circle near St. Louis, Missouri. We took turns rolling the die and moving our game pieces forward (westward) the number of spaces rolled. The number we landed on, determined the card we read (for example, if we rolled a six, we moved six spaces, landed on 33, and read the 33 card).

Encourage players to read the cards aloud so that all players learn more facts and milestones.


At the bottom of each card are instructions to either stay put or move forward or backwards. The player must move their game pieces if the card dictates. The player will not read the card for whatever number they eventually land on during their turn, though.

Play alternates between players until one player reaches Fort Clatsop in Oregon first. This player is the winner (which unfortunately, was not me). The good news, though, is that my son has already asked to play again!


DISCLAIMER: Is this board game perfect? No. Some of the dates and events don't match with the geographic location noted on the board. I did my best to match them up when possible, but in order to pace a child's progress along the westward route, and not have all the stops grouped together, sometimes it just wasn't possible. So while the events are historically accurate, the geography isn't always.

Thursday, January 17, 2013

Racin' Across the United States [a Geography game]


Want a clever way to help your child learn the 50 states and their whereabouts? This game is perfect!

Before my son and I started playing though, we did some reading. Lynne Cheney's book accompanied this activity perfectly. The book was inspired by the author imagining what a family trip across the United States would be like and even features a fold-out map charting the course for anyone adventuresome enough to travel all 50 states in one big road trip. The pages that follow have details about each of the states' history, fun facts, famous former inhabitants, state flowers/bird, etc.


Robin Preiss Glasser's illustrations in Our 50 States: A Family Adventure Across America are playful and the pages are littered with tons of interesting nuggets of information. Since we didn't have time to read the whole book, my son choose a few of his favorite states to read up on. You could spend hours with this book!

Once we put the book away, I got out two maps I'd printed off the internet (I got ours from Make and Takes here). NOTE: To make the game more challenging, find a map without the states' names.

With a map in front of each of us, I grabbed two bowls that contained slips of paper printed with each state's name. Each of us would draw a slip of paper from our bowl and color the state it identified. (Download a 2-page PDF of the state names here. Remember to print a copy for EACH player.)


The winner of our "Racin' Across the United States" game was the first player to get states colored in a path from one coast to the other or from the Atlantic to Pacific Ocean (or vice versa). It doesn't matter which states you "visited" along the way or in what order, so long as the states touched one another. Unfortunately, drawing Hawaii and Alaska from the bowl isn't much help.

NOTE: Make sure all players are drawing the states out of their bowls at the same time, so that each is "visiting" the same number of states during the game.


My son narrowly beat me (all I needed was Arkansas!). He enthusiastically shared the states he'd traveled on his virtually coast-to-coast vacation, while I drew a line from one to the next. Geography CAN be so fun!

Monday, October 22, 2012

Love in Many Languages Puzzles


Have you seen that commercial from Allstate? The one with the male (supposedly) French model she met on the Internet? My seven year old has been walking around the house saying “bonjour” thanks to this little marketing spot.

To springboard off his new found interest in foreign languages, I made him a series of four heart-shaped puzzles.

Each heart contains three pieces: the shape of a country, that country’s flag, and the way you say “I love you” in the language spoken there.
Download a free 2-page PDF of these puzzles here.
I printed the puzzles on cardstock, spray glued them to craft foam and cut them out. Then I jumbled them all together so my son had to really work to put them together.


He referred to his Reader’s Digest Children’s Atlas (which has each country’s flag in the back) for help.


While this wasn’t an extensive foreign language lesson, it was fun to exchange I love yous with my son in a language other than English!