Showing posts with label Art. Show all posts

Friday, April 29, 2016

Turtle or Tortoise? Reading Comprehension + Art


My boys have both been fans of the Wild Kratts cartoon. It seems to ignite not only a fascination with animals, but a curiosity too - at least it has for my sons. 


Because of this and a love of art, I thought my son would enjoy this activity.

To gain some knowledge, I read him a great book about the differences (and similarities) between turtles and tortoises. Trisha Speed Shaskan's book contains simple explanations and beautiful illustrations that captivated our interest with the turn of each page.


When we were finished, I asked him if he wanted to make a turtle or tortoise. He answered the latter, so we traced a big bowl onto half of a piece of brown card stock.


We added feet and a head, and then some paper shapes in a contrasting color, laid out like a mosaic to form the pattern on our tortoises' shell. Lastly, we glued a googly eye on.

Now it was time to test his reading comprehension. 


I gave him a worksheet that I designed and asked him to cut out the slips of paper at the bottom and put each of the characteristics under the proper reptile. He got them all right!


Download the free Turtle vs. Tortoise PDF I made here.

Wednesday, April 13, 2016

Hungry Caterpillar Art Project


My youngest son's literacy skills are growing leaps and bounds. When I was volunteering in his kindergarten class last week, I noticed one of his classmate's reading Eric Carle's The Very Hungry Caterpillar. 

We have the board book at home, but I'd foolishly thought of it as a baby book. Not so! Most of the words are ones my son could read on his own.


To go with the book, we got out our art supplies.

Watercolor paper
Watercolor paints and brushes
scissors
paper punch
permanent black markers
pom-poms
googly eyes
pencil
low-temp glue gun (school glue could also be used)

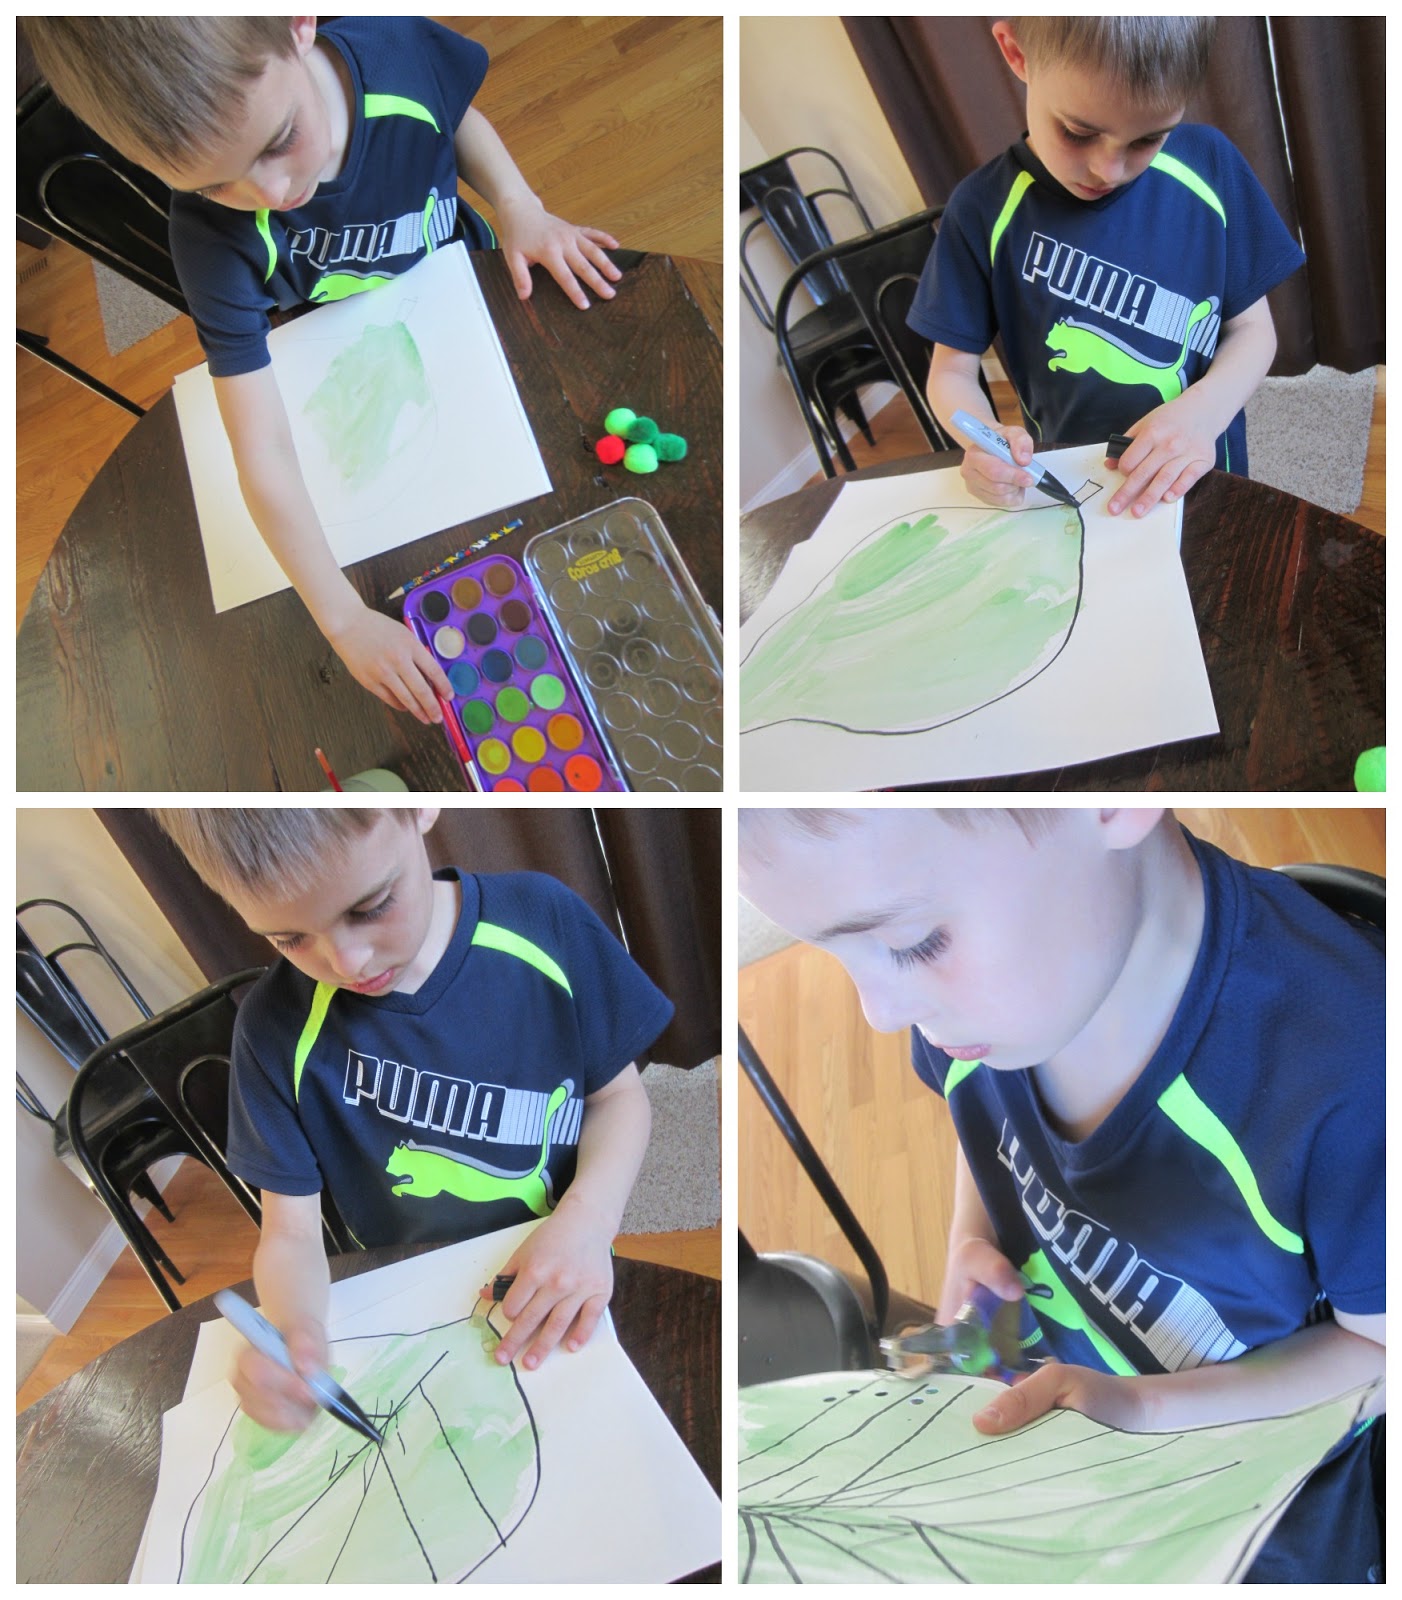
First we drew a big leaf on a large piece of art paper and used green watercolor paints to fill it in. When dried, we traced our lines and added veins to the leaf with a black permanent marker.

Once we cut the leaf out, we were able to use the paper punch to add the caterpillar's nibbles from the leaf.

I put a thick line of glue on the leaves with the low-temp glue gun and we added the pom-poms in a row to make a hungry caterpillar.


A dab of glue on the googly eyes made it possible to give our caterpillar sight.

This was a simple project that only took a few supplies and the results are positively charming. 


If you have never read the book to (or with) your child, do it!


Can't get to the library, watch this video of Eric Carle reading his book.


This great project was inspired by the Hudsonville Art Program.

Wednesday, February 3, 2016

Polymer Clay Penguins


Our six-year-old has had a fascination with penguins since ... well, like ... forever. We have so many penguin stuffed animals it's like a colony. To add to his collection, we made a few out of polymer clay.

This is a wonderful activity that exercises fine motor skills.


Supplies & Step-by-Step
Polymer clay (we used FIMO) in black, white, and orange
A stove or toaster oven
Scissors

  1. Roll the black clay into a medium sized ball; this is the head.
  2. Roll another larger ball for the body. Squish the ball into an egg shape and stand on one end to make it slightly flat on the bottom.
  3. Either set the head atop the body and apply pressure to affix the two or after doing so, using a finger smear the clay on the head down toward the body to make a smooth bowling pin shape.
  4. Roll a ball of white clay and then flatten to an flat egg shape. Add to the penguin body.
  5. Roll two tiny balls of white clay and flatten. Either use these as the outer eyes or place the circles side by side and gently press together, pull the bottom to form a heart. Affix as the face.
  6. Roll two teeny black balls. These are the eyes. Press gently onto the face.
  7. Roll two small tubes of black. Pinch the ends and flatten for flippers. Attach to either side of the body.
  8. Roll a small football shape out of orange clay. Clip one end horizontally with scissors to make the upper and lower parts of the beak. Clip to shorter, making a flat surface with which to attach the beak. Press onto the face.
  9. Roll two tiny orange balls. Flatten. Clip two tiny triangles out of each to make penguin flipper toes. Attach to the bottom of the body.
  10. Add a hat, scarf, eyebrows, etc. to accessorize your penguin!
  11. Bake in a 250 degree toaster oven for 60 minutes (roughly 15 minutes for every 1/4-inch thickness of clay).
  12. Let cool and then play with - maybe even write a story with your new penguin as the main character or make a stop motion video!


Read
To go along with our craft, we read two books, both which cleverly address how a penguin who wants to fly handles being a flightless bird. Both are utterly enjoyable. These sweet fiction books are beautiful and fun. Check them out!


Our penguins were inspired by the creations shared at How To Instructions and Bonnie Bakes.

Wednesday, January 13, 2016

How to Make Paper Flowers Bloom (Art + Science)


There are no flowers blooming here in the Midwest in January, unless you're at the florist. A thick blanket of crusty snow covers everything and temperatures are so frigid, only the very brave can be outside for more than 10 minutes.

To bring a little spring into our winter, I thought we'd try this fun experiment. It combines art and science in a truly awe-inspiring experiment.


Prep
I created a template of paper flowers for us to use. (Download it free from Google Drive here.)


Create
Once printed on heavyweight card stock and cut out, we used permanent markers to decorate our flowers.


When our buds were beautiful and bright, we put down the markers and folded each of the petals in to the center of the flower, making a nice neat little square.


Experiment
With a shallow bowl of water nearby, we carefully dropped our squares into the water (folded petals face up). Now, behold!


Within about 30 seconds, each of the paper flowers will open to display the beautiful colors added inside!


How Does It Work
As the paper begins to absorb the water, its fibers expand, forcing the paper petals to unfold.


This great activity came from 175 Science Experiments to Amuse and Amaze Your Friends by Brenda Walpole. It's loaded with fun and fascinating hands-on learning ideas! 

Wednesday, July 1, 2015

Walking Water (a Science and Art Experiment)


With three tumblers on the table, a measuring cup filled with water, paper towels, and food dye, I told my sons we were going to fill a cup with water without pouring a single drop in it.

"HOW?!?" they said.

"Let me show you!"

This experiment is simple. It did require patience, though. We prepared our cups in the afternoon and then watched throughout the evening and overnight.

How We Did It
Fill two identical drinking cups 2/3rds full of water. Put an empty cup of the same size between them. Squirt 8-10 drops of food coloring in the water-filled cups. We used yellow in one and blue in the other.

Now take a paper towel - we used a half sheet since we have the select-a-size rolls - and fold it the long way so the paper towel is about an inch wide. Do the same to another paper towel so you have two long flattened 1-inch wide rolls of paper towel. Fold them in the middle and put one end in the food dye, and the other in the empty cup.

Now observe what happens.


What Happens
The paper towel absorbs the water and in doing so, the colored water is transferred from one cup to another. When the two primary colors, yellow and blue combine, they make green.

Even more fascinating is how the water level ends up perfectly even among all three cups. The water has been evenly distributed! It took about 36 hours for our water to "walk" from each of the end cups to the middle and even distribute between the three cups. Have patience!

This great experiment came from Coffee Cups and Crayons. Stop there to see other color combinations!

Friday, June 19, 2015

DIY "Cave Paintings" (a Lesson on Lascaux)


I have been fascinated by the caves at Lascaux, France, since I learned about them in one of my very first college art history classes. I wanted to see if my sons would find them equally fascinating.

They did.


Before we made our own "cave paintings," we read a great book that familiarized my sons with the discovery of the caves. The story is so appealing to kids because it was, in fact, some young boys that stumbled on these historic caves and discovered their paintings and engravings, which were made by some of the earliest humans.


Art has a long rich history. Cave paintings show us its very origin.

Our Artist Recreation
Of course, we don't have a cave wall to use as our medium, so I grabbed a roll of brown packaging paper (like what you'd wrap a package in to mail) that was collecting dust in our basement. I cut a large piece.

I crinkled it to give it more of a stone effect and swiped on a few areas of brown and white acrylic paint in an attempt to replicate the look of cave walls.

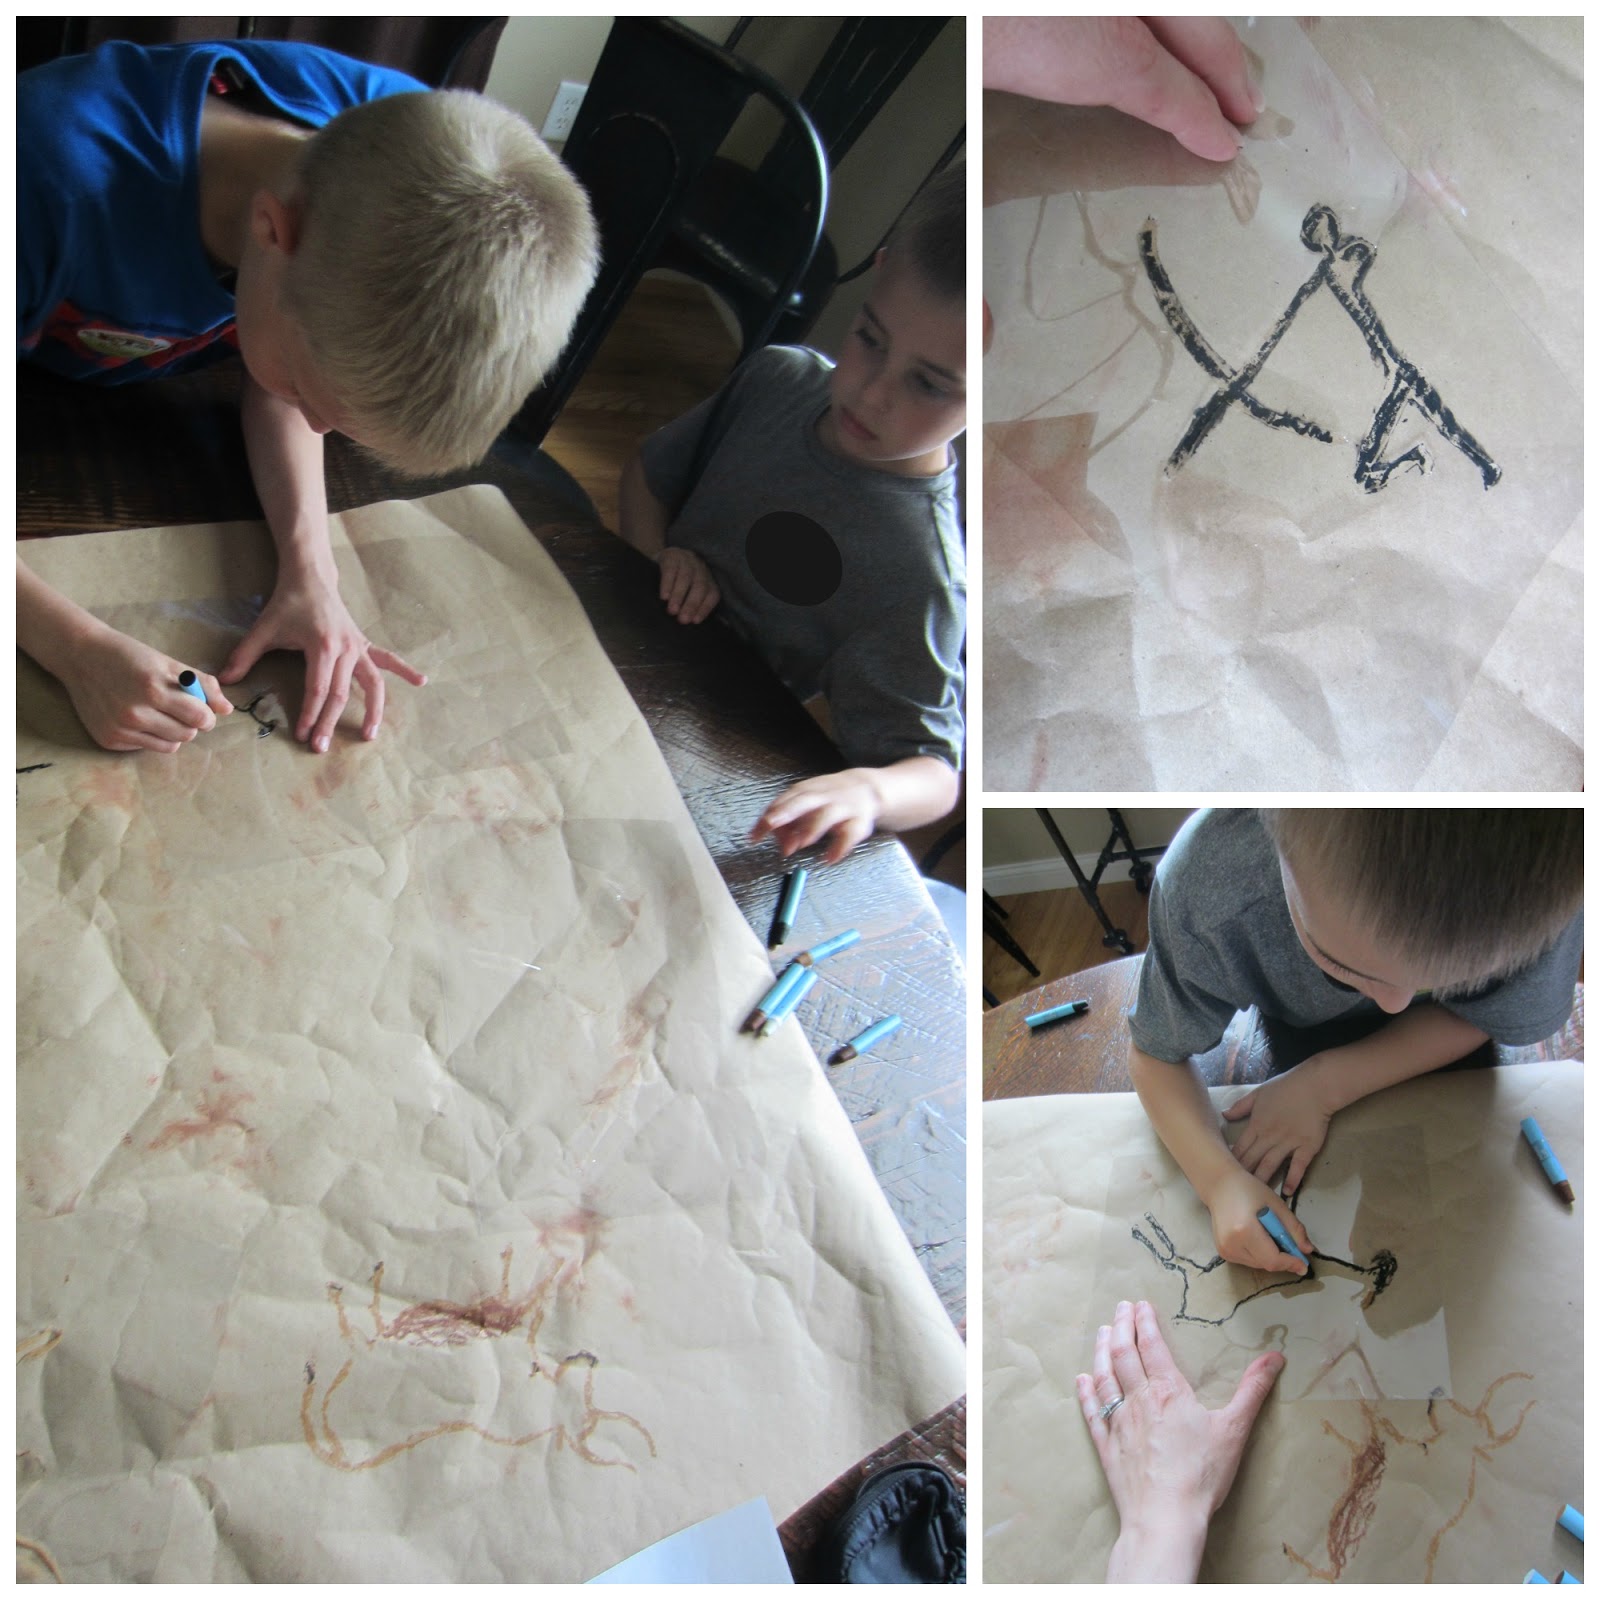
Then my sons used taupe, brown, black, and white oil pastels and some stencils I'd made. To make your own stencils, print my free template onto office paper, overlay sheets of transparency paper (think thick clear report covers), and using an exacto craft knife, carefully cut away the animals shapes.


The boys were able to position the stencils anywhere they chose and even flip them to make the mirror image for variety. Holding the stencil steady (and tightly), they ran the oil pastel along the inner edge of the stencil to make an outline of a bull, deer and her fawn, bird, and human hunter (complete with bow and arrow).


This required patience and determination for our 5-year-old, but since the real paintings didn't have crisp lines, even his wavering hand seemed to add to the authenticity.

When we were done, he told me all about what our "cave painting" was illustrating!


More Books
In the evening, the boys read two other great books to extend the learning even further. My husband read The First Drawing to our 5-year-old. It is a wildly imaginative tale of a child who invented art by drawing in caves. It starts "Imagine ... you were born before the invention of drawing, more than thirty thousand years ago." This makes the cave painters very relatable to kids!

My 9-year-old read Discovery in the Cave on his own. While the reading level was much lower than he's used to, he was fascinated by the small maps that detailed all of the different areas in the caves of Lascaux. It contained enough unique information from the book we read before our art activity to keep him interested. 

Friday, April 17, 2015

Jean Dubuffet-Inspired Sculpture


I have always been wildly interested in the later work of artist Jean Dubuffet. His l'Hourloupe series of works have a frenetic energy and simplicity that is unlike anything I've seen elsewhere.

They say that more than two decades of his work in this series all began with a simple doodle. For my oldest son who has the notion he's no good at art because he can't draw objects realistically, this activity proved that realism isn't the only form of great art.


It also played into my son's mathematical/engineering mindset when we got to the construction step.

Prep (FOR ADULTS)
1. Purchase some white foam core from your local craft or office supply store (presentation boards are frequently made of this).

2. Draw organic shapes with pencil on the foam core (think amoebas, paramecium, paisleys, and artist palette shapes).

3. Using a craft night, carefully cut the shapes from the foam core with a cutting board underneath to protect your work surface from damage. Don't worry if they're not perfect, you can trim excess once they're cut out.


Prep (WITH KIDS)
Google "Jean Dubuffet l'Hourloupe sculpture" and click images. Look through the examples of his work and study the shapes, colors, and patterns used.

Making Art
Invite kids to use the pre-cut foam shapes to color thick black borders around the edges and patterns and color blocks within.


If you're trying to closely mimic the style of Dubuffet, limit the color palette to black, red, and blue. We used SUPER thick black sharpie markers for the outline and started with fine tip red and blue sharpies, but quickly discovered that Crayola wide-tip traditional markers helped us get better coverage of large areas. While the colors are not as vibrant with the Crayola markers, it's a lot less frustrating to complete 2 to 3 shapes.


Once colored/designed as desired an adult will need to cut small tabs in the pieces so they can be arranged as a sculpture. Let kids try to visualize and manipulate how the pieces should fit, then grown-ups can use the craft knife to notch the pieces for assembly. Keep the tabs to the exact thickness of the foam core for a snug fit. If your cuts are too big, you'll need to reinforce the "joints" with hot glue.


The final result is stunning!


Friday, April 10, 2015

Shadow Portraits (an art project)

It's been awhile since my boys and I created art together. My oldest son isn't much of a fan, but needs the fine motor practice and my youngest has declared that he's going to be an artist when he grows up. This is a perfect example of how different my two sons are.

I was pleasantly surprised when BOTH boys enjoyed this project. It's simple and the final effect is really cool.


Here's how we made shadow portraits.

Step 1
Draw a picture of yourself (your whole body, not just your head). When my oldest son struggled with the "make your person thick" direction, having drawn only a stick figure, I gave him a new sheet of paper and better directions. 


(First draw an egg toward the top of your paper. Now draw two short parallel lines for it to sit on [the neck]. For your body, draw a rectangle. Then make a trapezoid shape below it and make a V in the bottom to separate your legs. Add ovals at the bottom of your legs for shoes. Now add arms, making them bend at the elbow, starting from the top of the rectangle [the shoulders]. Add facial features and hair and color clothes.)

Step 2
Once drawn and colored, we placed a piece of black construction paper under our drawing. Then, we picked up both papers and cut out our full-body portraits, being careful to keep the two papers together. For my 5 year old, I cut around some of the delicate parts, then added a few small paperclips to keep the papers together as he finished cutting.


Step 3
Once complete, we glued the black silhouette onto a piece of colored construction paper. We glued our colored portrait on the paper too, but this time just an inch or two away from the silhouette. Instantly, the portraits had shadows!


Step 4
Lastly, the boys glued some colored squares of paper around the edges to finish their masterpieces.


I think these turned out wonderfully!

Want to pair it with a book or two on shadows. I'd highly recommend these! They both help explain the science behind shadows.


This great activity came from An Art Room Filled with Fauves. Stop by to see the extraordinary examples made by this art teacher's 2nd graders!

Extension: Go outside on a sunny day and have kids take turns outlining each other's shadows with sidewalk chalk. It's a blast!

Wednesday, March 11, 2015

Black is black, right? Nope. (A Chromatography Experiment)


Because our color theory activity book was such a hit, I suspected a chromatography experiment would be as well. I was right.

My 9-year-old son and I both found this fascinating. 


I can think of loads of other adjectives to use to describe it too ... cheap, simple, fast, impressive ... heck, it was almost magical.

Supplies
Clear Drinking Glass
Pencil
Coffee Filter
Tape
Black Watercolor Marker
Rubbing Alcohol

Prep
1. Flatten and cut the coffee filter into a wide strip that's a little more than an inch across. Trim the ends to make a rectangle.

2. Tape one end around the middle of a pencil. Put the coffee filter pencil into your glass, so the top of the pencil ends rest on the rim of the glass and the filter hangs down into the bottom. Trim the coffee filter so it just touches the bottom of the glass. Remove.

3. Fill the glass with a 1/4-inch (or approximately 1 centimeter) of rubbing alcohol.

4. Draw a dot in the middle of the coffee filter strip about 2 centimeters (or a 1/2-inch) from the bottom. Your dot needs to be higher than the amount of alcohol in your cup.


Experiment
Place the pencil back on top of the cup so the bottom of the coffee filter touches the alcohol in the glass. 

Watch what happens as the coffee filter wicks up the moisture. How does it impact the dot? 

My son's hypothesis was that the dot would totally disappear. When he saw the dot appearing to move up the paper, he thought he might be on to something.

The more we watched, the more the dot changed. The pigments in the watercolor ink began to separate. First, we saw green, then pink and purple and even some blue too. I reminded my son about how we make black paint from other colors of paint. "Oh yeah!" he exclaimed.

The rubbing alcohol initiated chromatography, which (in layman's terms) is the process of a liquid or gas changing a mixture into its components, in this case through absorption.

By the end of the night, our black ink had moved all the way up the coffee filter strip. What a cool experiment!

This wonderful activity came from Science Experiments for Kids.