Friday, October 4, 2013

Cover it Up {5-in-a-Row Geometry Game}


This clever game is inspired by travel BINGO. I played it as a kid and absolutely loved it. Since my oldest son shares my love of games, I figured he'd feel the same.

I was right.

Supplies
Sticker paper (or office paper and a glue stick)
Plastic 8 1/2 x 11-inch sheet protector
Empty cereal box
Office paper
Cardstock
Stapler
Craft knife
Scissors
Straight Edge (i.e. ruler)
Die and game card templates (click here to download them free)

How I made the game
Print the game card onto sticker paper. Adhere to one of the large sides of an empty cereal box. Cut the card out, trimming off the excess paper and cardboard. Using a craft knife and a straight edge, carefully cut along the lines, so the flaps to each starred square can be opened like french doors. I put a cutting board underneath to prevent scratching my countertops or table.
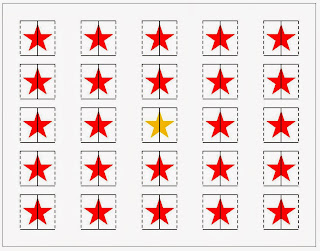

To make bending the flaps open easier, score the folds by using a straight edge to guide the back end of a butter knife along the dotted lines. Gentle pressure will form an indent that will make your creases look straight.

With all the flaps cut, grab your plastic sheet protector. Place the game card in one corner, so two of its sides align with the folded or seamed sides. Once aligned, use the card as a guide and drag your craft knife along two sides of the card to make the sheet protector smaller.

Now one of the long ends of the sheet protector has been cut open. Use a stapler to adhere the sheet protector envelope and the game card, effectively closing that open side. Staple along the bottom of the card as well to hold the sheet protector in place.


Make sure one side of the sheet protector remains open.

Now cut the shape card inserts. Depending on how far away from the top and bottom edges of your card that you stapled, you'll need to trim the shapes card inserts so they can be slid into the plastic sheet protector and lined up properly.


Lastly, print, cut, glue and fold the dice. It works best to print the die templates onto heavyweight cardstock. Once glued, use a rubberband to loosely hold the sides together until glue has dried.


There are two levels of play; the most basic shapes have a grey background both on the shape card insert and the die.

Two die should be rolled with every turn: the color die and the shapes die (make sure you're using the correct shapes die with the shape card insert you're playing on).


How to Play
The player rolls the shapes and colors die, locates the square on their game card that pictures the shape being described by the die, and closes the flaps to cover it up.

Once you've gotten five squares in a row (horizontal, vertical, or diagonal), you're done!


Both of my boys had a blast with this and I was especially surprised at how long our 4-year-old played before growing tired of it. This was a wonderful geometry review for my oldest son and a simple shapes and color review for our youngest boy!

NOTE: The PDF I've created includes a blank template so you can use the Cover it Up game board to practice any number of skills - letter recognition, division problems, Spanish vocabulary, etc. By using the plastic sheet protector sleeve, you can easily swap out the cards for different skills.

Sunday, September 29, 2013

After School Linky Party (9-30)

Welcome to the After School Linky!


Last week's party was full of fall-inspired activities. If you're looking for inspiration, look no further than the 9-23-13 linky! Here are just a few of the ideas I loved.


(This great DIY magnetic fishing pole really reels up and down. What a wonderful educational learning tool ... I mean toy!)


(This hands-on experiment answers the age-old question of how leaves change color in autumn using items you probably already own. SO cool!)


(Carly found a wonderful way to combine children's literature with service work: use books to form a shopping list of food bank items to donate!)


Pick the Apples at Playdough to Plato.
(This apple-inspired activity works on colors, sizes, following directions, sorting, etc.)


Bingo Reading Activity at Children's Books and Reading.
(This is SUCH a fun and engaging way to encourage kids to read. Whether you've got an avid or reluctant reader, this is sure to generate excitement!)


Cohosted By
Relentlessly Fun, Deceptively Educational

We would love to have you link up your School-Age Post (Ages 5 and up) about your learning week after school including Crafts, Activities, Playtime and Adventures that you are doing to enrich your children's lives after their day at school, homeschool, or on the weekend! When linking up, please take a moment to comment on at least one post linked up before yours and grab our after school button to include a link on your post or site! By linking up you're giving permission for us to share on our After School Pinterest Board or Feature on our After School Party next week! Don't forget to follow along and join our After School Enrichment Community.

Link up your After School Activities, Crafts and Adventures! We'd love to see them!

Friday, September 27, 2013

Egg Carton Mancala Game


Mancala may be the oldest game in the world, which begs the question of why I've never played it. I figured it was time, at the age of 37, that I give it a try. And I knew EXACTLY who would make a great opponent - my oldest son. 

In case you haven't noticed from all the DIY games I create and blog about, he is a total gamer.

To make our mancala board, I grabbed an empty egg carton. I cut the egg cup tray and lid apart. The egg cup tray with its 12 compartments is perfect for this game!

To make the two trays, called mancala, that sit at either end, cut the egg carton lid using the ends only (discard the middle). Use hot glue to attach the lid pieces to either end of the egg cup tray.

To help my son and I keep straight which side of the tray and which mancala was whose, I placed colored dot stickers in the bottom of the egg cups - yellow on one side, green on the other. Then I printed yellow and green mancala labels on sticker paper to adhere to the mancala trays.

Now I grabbed some blue glass babbles to use as our "stones."

We loaded three babbles in each cup, leaving the mancalas empty. Now we reviewed the game rules by watching this great YouTube video.


The objective is to hoard all of the babbles on your side of the board. If your cups are all empty, you've lost.

I was so close to losing that my son was practically doing a victory dance, when one or two plays put me back in the game. Call me the comeback kid, because I won our first round. My son isn't always thrilled to lose, but this time, he didn't even care.

This game is perfect for kids with a math brain and totally encourages strategic thinking.  I knew my son loved our mancala when he asked a friend to play it less than an hour later. Success!


This great idea came from ReMake It! by Tiffany Threadgould. This books is full of inspiring craft projects for kids, all made from recycled goods. It is one of the best craft ideas books I have ever come across.

Wednesday, September 25, 2013

Easy DIY Geoboard (and a Lesson in Polygons)


Polygons, quadrilaterals, and parallelograms, oh my!

Anybody else get it all confused?

To help my oldest son practice polygons, I grabbed a busted bulletin board my husband had tossed in the trash (not quite dumpster diving, but I wouldn't put it past me to do that either for the sake of my kiddo's education!).

The bulletin board was a thin layer of cork paper over corrugated cardboard. I cut it and glued two plies together, making two smaller, albeit thicker, bulletin boards.

Now I carefully glued pushpins in place in a grid pattern. Use the strongest glue you can find, like super glue or gorilla glue. I printed a grid and with a ballpoint pen, punched the location of the dots into the cork, then dabbed glue in the imprints I'd made, and inserted a pushpin.

Put a heavy book on top for pressure and let dry.


Now grab a handful of rubberbands, print the 1-page PDF of polygon cards, cut out, and go get your child.


Before my oldest son started made polygons, he watched a 10-minute video about what a polygon is (and isn't). This video was made by a classroom of kids and perhaps because of its child "actors," he was captivated.


When finished, he went through the eight shapes on the polygon cards and did his best to stretch the rubberbands around the pushpins to emulate the number of sides and angles pictured. Some shapes were easier than others!

When little brother wanted to give it a try, we stuck to simpler shapes - the triangle, square, and rectangle.


Both boys had fun and were excited to show off the shapes they made!


WORD OF WARNING: If the rubberbands are tugged on aggressively, the pins may come loose and pop out. Always play along and encourage kids to slowly and gently remove the rubberbands to prevent a potential safety hazard.

Monday, September 23, 2013

After School Linky Party (9/23)


Welcome to the After School Linky!


Last week was one of the largest (if not THE largest) linky we've had since I've become a co-host. The ideas continue to amaze and inspire.
Here is just a sampling of what you missed if you didn't stop by.


(This is great motor skills practice for kids big and small!)


(October is Fire Safety Month. Deb Chitwood has loads of helpful links to activities and printables to get you - and your child - ready.)


The Healthy Plate at Green Owl Art.
(Learning about portions and good eating habits with this art/health activity is fun AND delicious!)


Shadow Math at Highhill Education.
(JMommyMom's son measured his shadow throughout the day. What a great way to practice math!)


(This is just the jump-start reluctant writers need to draft a biographical poem about themselves!)


Cohosted By
Relentlessly Fun, Deceptively Educational

We would love to have you link up your School-Age Post (Ages 5 and up) about your learning week after school including Crafts, Activities, Playtime and Adventures that you are doing to enrich your children's lives after their day at school, homeschool, or on the weekend! When linking up, please take a moment to comment on at least one post linked up before yours and grab our after school button to include a link on your post or site! By linking up you're giving permission for us to share on our After School Pinterest Board or Feature on our After School Party next week! Don't forget to follow along and join our After School Enrichment Community.

Link up your After School Activities, Crafts and Adventures! We'd love to see them!