Monday, August 5, 2013

After School Linky Party (8/5)


Welcome to the After School Linky!


If you're new to the party (or my blog), check out the extraordinary ideas shared in the past by clicking here.

Some of my favorites from last week's party follow.


Kid Science: Homemade Bottle Thermometer by What Do We Do All Day?
(With a handful of household supplies, kids can make a DIY thermometer and watch as it reflects temperature changes. AWESOME!)


Umlauf Sculpture Garden at Keitha's Chaos.
(Kids can grow bored looking at art. Keitha kept the interest alive by giving her son taffy to sculpt with and asking him to mimic the poses.)


(The supply list is remarkably simple and the fun is too. I don't know a single kid that wouldn't have a blast with these water-powered DIY rockets.)


Gift of Curiosity.
(These FREE activity pages are perfect for practicing matching, sorting, sequencing, and colors!)
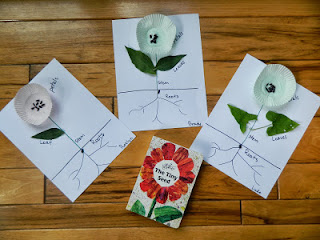

at Like Mama ~ Like Daughter.
(Inspired by Eric Carle's The Tiny Seed, Hannah cooked up some great fun exploring outdoors with plant rubbings and this plant diagram project.)


Chinese Toy: Tangram Puzzle at Marie's Pastiche.
(WOW. This blog post is packed with historical information, a tutorial, book recommendation, and a game about tangrams. Thanks, Marie-Claude!)


(Mary Catherine from Fun-A-Day shared these ingenious rocks. The possibilities to practice math skills is endless!)


Relentlessly Fun, Deceptively Educational

We would love to have you link up your School-Age Post (ages 5 and up) about your learning week after school including Crafts, Activities, Playtime and Adventures that you are doing to enrich your children's lives after their day at school, homeschool or on the weekend! When linking up, please take a moment to comment on at least one post linked up before yours and grab our after school button to include a link on your post or site! By linking up you're giving permission for us to share on our After School Pinterest Board or Feature on our After School Party next week! Don't forget to follow along and join our After School Enrichment Community.


Friday, August 2, 2013

Josef Albers-Inspired Color Science Art


Two of my favorite places are libraries and art museums. This activity was inspired by an artist biography I found at our local library. Score!

My son doesn't love making art. He groaned when he saw the supplies I'd laid out.

But this simple activity is just as much science as it is creativity. And since he was enamored with our color-blending spinning tops, he was quickly won over.

To help him understand how teacher and artist Josef Albers experimented with color interactions, we read An Eye for Color: The Story of Josef Albers by Natasha Wing.


The book explained that Albers discovered how one color looked different when adjacent to different colors, would recede or pop out depending on how they were layered, etc. My son was fascinated … and totally psyched to make his own layered square artwork. (Check out some of Albers' art here.)

The Art Project
Supplies are minimal. Simply grab some tissue paper in a bunch of colors and clear household contact paper.  Cut the tissue into squares in a variety of sizes.

Peel a piece of contact paper and lay it sticky side up on the table. Place a small square down in the middle and layer larger squares on top one by one.

Sandwich the tissue under another layer of contact paper. Trim it around the edges and hang in a window as a suncatcher.


Now, cut a larger piece of contact paper and let your child go nuts, layering smaller squares and then larger ones. Experiment with how the transparent paper changes colors.

When you put a larger yellow square over a smaller one, does the color look brighter?

Does a yellow square over a red one look orange now?


The discoveries are endless. I think we both know why Albers spent 27 years making squares-within-squares paintings. We were just as captivated by how exciting color can be!

Wednesday, July 31, 2013

Catapult Addition {a DIY Math Game}


My son can add numbers in his head better than I can, but this was still a great way to sneak in some playful math practice. 

His little brother got in on the action too (our oldest boy was kind enough to keep score for him).

This wonderful idea came from Spoonful.
The catapult DIY is from Do It And How.

I've been itching to make catapults with my boys for ages but most of the ones I've seen require a block of wood that you attach a clothespin to. 

The clothespin isn't the problem; it's buying a big piece of lumber so my husband can saw it into one tiny block. NOT PRACTICAL.

Make a Catapult
This catapult design is uber simple and requires no power tools (unless you consider a hot glue gun one).

You'll need 10 jumbo wooden craft sticks, hot glue, four rubber bands, and a recycled plastic cap.


1. Stack eight sticks and wrap a rubber band around each end. Then, stack the remaining two sticks and wrap another rubber band around one of the ends.

2. Separate the two sticks hinged together with one rubber band and slide the stack in-between.

3. Add the last rubber band by weaving it in and around the point where the sticks meet.

4. Apply a dot of hot glue and attach the plastic cap.


Make it a Math Game!
You'll need something to shoot in the catapult. We used pom pom balls.

Grab four disposal plates and label them with numbers. I used 5, 10, 15, and 20. Use your child's ability to gauge what numbers are appropriate. When playing this with my preschooler by himself, I will just use one plate so he can count by ones how many pom poms hit the target.


Now lay out the plates and load the catapult with a pom pom. Push down on the pom pom-filled cap, release, and watch it fly! Have kids add their scores together.

Monday, July 29, 2013

After School Linky Party (7/29)

Welcome to the After School Linky!


My, oh my, I spy great ideas with my eye.
Here are just some of the great learning ideas shared at last week's party.


Fruity Mummies, An Ancient Egypt Activity by Scattered Yet Together.
(Jesikah brought the science of ancient Egypt to life with this experiment. Her kids used a variety of materials and apple chunks to see which led to the best preservation.)


30 Fun Alphabet Songs for Children at Fun-A-Day!
(Music is such a powerful way to learn. I love this list of alphabet songs. Thanks, Mary Catherine!)


The Addition Box by Caminen Plegats. (Hit Translate.)
(Make addition fun by creating an addition box with using cardboard and tubes. This is SUCH a great way to make math visual.)


August Table Topics by Growing Book by Book.
(Jodie has taken all the work out of making conversation starters for family dinners! Awesome!)


Draw a Life-Sized Whale & More Under the Sea Activities at KC Edventures.
(Get out the measuring tape and some chalk. Kids will be amazed at the size of their favorite whale. This is a great way to help kids understand scale.)


DIY Addition Strip Board and Strip Board Presentations by Living Montessori Now.
(This is such a smart way to reinforce early addition. Watch the video to see how simple it is!)


Science Experiments for Kids: How to Grow Crystals by 123 Homeschool 4 Me.
(Not only are kids learning but the final result of this activity is beautiful. Check out Beth's tutorial!)


Relentlessly Fun, Deceptively Educational

We would love to have you link up your School-Age Post (ages 5 and up) about your learning week after school including Crafts, Activities, Playtime and Adventures that you are doing to enrich your children's lives after their day at school, homeschool or on the weekend! When linking up, please take a moment to comment on at least one post linked up before yours and grab our after school button to include a link on your post or site! By linking up you're giving permission for us to share on our After School Pinterest Board or Feature on our After School Party next week! Don't forget to follow along and join our After School Enrichment Community.


Friday, July 26, 2013

Straw-Blown Painted Neuron Diagram


My son discovered graphic novels this past year.

I'm not going to lie, I was less than thrilled.

But then his teacher reminded me that whenever kids are excited to read, it's a good thing. As time passed, our public library devoted a whole section to these kind of books and I was excited to see graphic novels with characters from history. I slowly warmed to the idea that graphic novels were good choices for kids.

When I found Molly Kolpin's First Graphics series on the body's systems, I was thrilled. Let's face it, understanding how the body works is confusing. Kolpin's books simplify the science of our anatomy in terms kids can understand and the graphic novel format makes it visually exciting to read.


Thanks to Kolpin and illustrator Chris B. Jones, we took a tour of the nervous system. As we read, I gave my son a worksheet I'd made. (Download a free PDF on Google Drive here.) 


He needed to complete the worksheet by filling in the blanks (the book contained the answers) and then make a diagram of a neuron.

For our diagram, I grabbed watercolor paints, dot sticker, a paint brush, some construction paper, and a plastic drinking straw. He colored a big watery blue dot and using the straw blew air near the excess paint out spraying it out from the edges in every direction. (These are the dendrites.)


Then, he used the brush to draw a line down from the dot (in hindsight, a skinnier brush would have been better) and once again blew through the straw to extend the drops of paint at the bottom of his line, which was the axon. These fine outreaching lines at the bottom were the nerve endings.

He added some small rectangular pieces of construction paper to the axon and a small dot sticker as the neuron's nucleus. He added a smiley face, just like Nelly Neuron in the book we read.

Lastly, he labeled the parts of his diagram.

I plan to check out more of Kolpin's books. We'll combine his worksheets into one book on all of the body's systems when we've gotten through each of them.