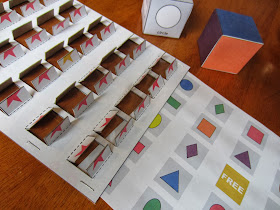
This clever game is inspired by travel BINGO. I played it
as a kid and absolutely loved it. Since my oldest son shares my love of games,
I figured he'd feel the same.
I was right.
Supplies
Sticker paper (or office paper and a glue stick)
Plastic 8 1/2 x 11-inch sheet protector
Empty cereal box
Office paper
Cardstock
Stapler
Craft knife
Scissors
Straight Edge (i.e. ruler)
Die and game card templates (click here to download them
free)
How I made the
game
Print the game card onto sticker paper. Adhere to one of
the large sides of an empty cereal box. Cut the card out, trimming off the
excess paper and cardboard. Using a craft knife and a straight edge, carefully cut
along the lines, so the flaps to each starred square can be opened like french
doors. I put a cutting board underneath to prevent scratching my countertops or
table.
To make bending the flaps open easier, score the folds by
using a straight edge to guide the back end of a butter knife along the dotted
lines. Gentle pressure will form an indent that will make your creases look
straight.
With all the flaps cut, grab your plastic sheet
protector. Place the game card in one corner, so two of its sides align with
the folded or seamed sides. Once aligned, use the card as a guide and drag your
craft knife along two sides of the card to make the sheet protector smaller.
Now one of the long ends of the sheet protector has been
cut open. Use a stapler to adhere the sheet protector envelope and the game
card, effectively closing that open side. Staple along the bottom of the card
as well to hold the sheet protector in place.
Make sure one side of the sheet protector remains open.
Now cut the shape card inserts. Depending on how far away
from the top and bottom edges of your card that you stapled, you'll need to
trim the shapes card inserts so they can be slid into the plastic sheet
protector and lined up properly.
Lastly, print, cut, glue and fold the dice. It works best
to print the die templates onto heavyweight cardstock. Once glued, use a
rubberband to loosely hold the sides together until glue has dried.
There are two levels of play; the most basic shapes
have a grey background both on the shape card insert and the die.
Two die should be rolled with every turn: the color die
and the shapes die (make sure you're using the correct shapes die with the shape
card insert you're playing on).
How to Play
The player rolls the shapes and colors die, locates the
square on their game card that pictures the shape being described by the die,
and closes the flaps to cover it up.
Once you've gotten five squares in a row (horizontal,
vertical, or diagonal), you're done!
Both of my boys had a blast with this and I was especially
surprised at how long our 4-year-old played before growing tired of it. This
was a wonderful geometry review for my oldest son and a simple shapes and color
review for our youngest boy!
NOTE: The PDF I've created includes a blank template so you can use the Cover it Up game board to practice any number of skills - letter recognition, division problems, Spanish vocabulary, etc. By using the plastic sheet protector sleeve, you can easily swap out the cards for different skills.


Isn't this a clever idea. I love that the game board can be used again and again for whatever skill you would like practiced. And the possibilities!
ReplyDelete