Pages

Monday, December 28, 2015

After School Linky (12-28)

Welcome to the party!


I'm taking some time off to spend with my family, not my blog.
Please forgive me for not sharing all the great ideas from last week's party.

I'll hope you'll find inspiration in this week's ideas!

The After School Linky is cohosted by
Relentlessly Fun, Deceptively Educational
We would love to have you link up your School-Age Post (Ages 5 and up) about your learning week after school including Crafts, Activities, Playtime and Adventures that you are doing to enrich your children's lives after their day at school, home school, or on the weekend!

When linking up, please take a moment to comment on at least one post linked up before yours and grab our after school button to include a link on your post or site! By linking up, you're giving permission for us to share on our After School Pinterest Board and feature an image on our After School Party in the upcoming weeks.


Wednesday, December 23, 2015

Free Sight Word Sequence Game

My 6-year-old son's kindergarten teacher has challenged kids to pass seven lists of sight words this year. While some have already passed all the lists, my son is at the halfway point.

While we are using flash cards each evening, I continue to search for fun ways to engage him in learning through play. Our sight word SEQUENCE game did just that.


Prep
Got a child in mind that needs a little sight word review? Download the game I made for free from Google Drive here. Print the game board and cards on heavy weight card stock. Trim the white edges from the game board pages, align, and tape together. 


Cut the cards apart and shuffle well. If your paper is too thin and is a little too see-through, hit the back of the card pages with spray glue, lay a piece of scrapbooking paper over top, and then cut apart.

Gather several like game pieces for each player; we use red, white, and blue poker chips.


The Objective
The first player to get four of their own game pieces on the game board in a row (horizontally or vertically) wins.

How to Play
Each player is dealt three cards and looks at their hand. The remaining card deck is the draw pile.

Players can place a game piece on any sight word they have a card for in their hand. One game piece is placed on the board per turn. 


The card played is placed in a discard pile and the player draws a new card. Players should always have three cards in their hand.


Special Cards There are two kinds of special cards in the deck: one where the player can place a game piece on ANY open space and another where the player can remove an opponent's game piece from anywhere.


The player discards the special card, and in the case of the "remove another player's game piece," they cannot place their own game piece in its place until their next turn.

Smiley Spaces The four corners of the game board are free spaces. A player can use one of these spaces as one of their four-in-a-row. These are the only four spaces on the board that more than one player can place a game piece on.

Monday, December 21, 2015

After School Linky (12-21-15)

Welcome to the party!


The great ideas just keep coming! Here are a few of my favorites from last week's party.


Borax Crystal Nature Ornaments at The Science Kiddo

 Crime Scene Investigation for Kids at Planet Smarty Pants


 Pipe Cleaner Snowflake Ornament for Kids at Living Life and Learning

Star Wars Stem Learning Activities for Kids from Left Brain Craft Brain

The After School Linky is cohosted by
Relentlessly Fun, Deceptively Educational
We would love to have you link up your School-Age Post (Ages 5 and up) about your learning week after school including Crafts, Activities, Playtime and Adventures that you are doing to enrich your children's lives after their day at school, home school, or on the weekend!

When linking up, please take a moment to comment on at least one post linked up before yours and grab our after school button to include a link on your post or site! By linking up, you're giving permission for us to share on our After School Pinterest Board and feature an image on our After School Party in the upcoming weeks.

Wednesday, December 16, 2015

Bs and Ds on Bumblebees (free printable worksheets)

Those darn lowercase Bs and Ds are SO tricky for kinders, my youngest included. This, of course, isn't a new problem. Our oldest boy mixed them up too when he was younger. 

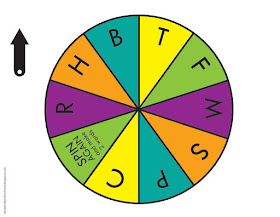
It might be time to break out our B, D, P, and Q spinner again (check that out here).

To get some more practice in, I created some fun worksheets to be used in a variety of ways. We used the first of the four yesterday. 


We started with the Bs and Ds on Bumblebees activity sheet. I handed my 6-year-old son the paper and two strips of yellow dot stickers; onto half of which I'd written upper case Bs and the other half had upper case Ds. 

It was my son's job to look at the lowercase letters on the bumblebees and cover each with its uppercase counterpart. 


This required a lot of thought and concentration, but my son did great! When he stumbled, I used the "bat before the ball" and "doorknob before the door" tricks to remind him.

Download the four worksheets I made for free from Google Drive here.


Aside from matching up dot stickers, kids can color all the Bs one color and the Ds another, or trace only the Bs or Ds, cover the Bs with flattened glass baubles, etc. These can be used in so many different ways. You can even laminate or insert them in plastic sheet protectors and use with dry-erase markers over and over.

Enjoy!

Monday, December 14, 2015

After School Linky Party (12-14)

Welcome to the party!


There's SO MUCH to do this time of year. Thanks for spending a little time at our link-up!

Here are just a handful of the great ideas shared at last week's party.


 A History Resource Guide at Year Round Homeschooling

 Christmas Science: Types of Evergreen Trees at The Educators' Spin on It


 Gender Bending Gifts for Kids at Pragmatic Mom

 8 Nights of Kids' Hanukkah Activities at Mini Monets and Mommies


The After School Linky is cohosted by
Relentlessly Fun, Deceptively Educational
We would love to have you link up your School-Age Post (Ages 5 and up) about your learning week after school including Crafts, Activities, Playtime and Adventures that you are doing to enrich your children's lives after their day at school, home school, or on the weekend!

When linking up, please take a moment to comment on at least one post linked up before yours and grab our after school button to include a link on your post or site! By linking up, you're giving permission for us to share on our After School Pinterest Board and feature an image on our After School Party in the upcoming weeks.

Friday, December 11, 2015

What a Drop of Water Can Teach Kids about Cohesion


The boys and I have been doing a lot of simple science lately and we're loving it. This experiment takes five minutes and four supplies. Don't let that convince you otherwise, it's surprisingly fun.


What You Need
Waxed paper
Cup of water
Plastic drinking straw
Toothpick

What to Do
Put the straw in the water and cover the top of the straw with your finger. Lift the straw out of the water and trap some water inside at the bottom of the straw. Move the straw over your sheet of waxed paper and release your finger from the end of the straw. You'll deposit a drop of water. Repeat these steps until you have a few water droplets on the paper.

Now grab the toothpick and dip one end in the water. Move that end of the toothpick near (but not touching) a water droplet. Watch as the drop of water moves toward your toothpick. 


Now drag the toothpick around. Your droplet moves too.

What's Happening
What you're seeing is cohesion, an attraction between molecules of the same type. The water molecules in the droplet are attracted to the water molecules on the toothpick and thus, move with a pull of force called cohesion.

This great experiment came from Q. L. Pearce's book Kitchen Science Experiments. Check it out!

Wednesday, December 9, 2015

Salty Science Experiment with Ice


My boys love a challenge, like "Lift this ice cube without touching it." When I handed them some lengths of embroidery thread and told them to pick up ice cubes hands free, they gave it their best try. But, of course, it was impossible. 

Or is it?

Next I had them lay the lengths of thread over each cube so that there were ends overhanging on each side. Then they added salt, completely covering the thread and cube.

And then we waited (about 3 to 4 minutes).

When three or four minutes had passed, I told them to pick up both ends of the thread. Much to their surprise, the ice cube came with it!

We talked about how it worked and my 10-year-old came REALLY close to figuring it out.


Why it Works
The salt melts the ice slightly but then it refreezes. Salt water has at a lower melting point than water. This process traps the thread on the surface of the ice cube, thus making it possible to lift it easily!

This wonderful idea came from The Everything Kids' Magical Science Experiments Book by Tom Robinson. It's filled with page after page of extraordinary science activities!

Monday, December 7, 2015

After School Linky Party (12-7)


Welcome to the party!


It looks like bloggers are feeling REALLY festive. I love all the holiday-themed ideas. Keep 'em coming.
Here are a few of my favorite activities and ideas shared at last week's link-up.


 Christmas Kindergarten Math Worksheets from Living Life and Learning


 Kid-made Ornament Filled with Sand from Gift of Curiosity


 Easy Christmas Tree Symmetry Craft from Math Geek Mama


The After School Linky is cohosted by
Relentlessly Fun, Deceptively Educational
We would love to have you link up your School-Age Post (Ages 5 and up) about your learning week after school including Crafts, Activities, Playtime and Adventures that you are doing to enrich your children's lives after their day at school, home school, or on the weekend!

When linking up, please take a moment to comment on at least one post linked up before yours and grab our after school button to include a link on your post or site! By linking up, you're giving permission for us to share on our After School Pinterest Board and feature an image on our After School Party in the upcoming weeks.

Friday, December 4, 2015

Hole in the Hand Experiment (Vision Science)

"Look at your hand. Can you see through it?"

"Uh ... no," was the reply I got from our 10-year-old (with a hint of attitude, mind you).

"What if I told you that you were going to look through a hole in your hand without us harming your hand in the least bit?"

(puzzled expression)

And thus our experiment began. It took barely any supplies and only a few minutes but the effect was something we were still talking about an hour later.


What You Need
An empty cardboard paper towel tube (or a rolled up piece of paper)
Two hands
Two eyes

What to Do
Place the tube over one eye and look down it. Bring the other hand (the one that isn't holding the tube), beside the end of the tube, palm toward your face, so it touches the tube. As you look down the tube, you'll suddenly see a hole in your palm! 

Don't see it? Try moving your palm forward and back, closer and further away from the tube.

How It Works
Your eyes see the same thing but from slightly different vantage points. In order to see dimension, your brain combines these images. With the tube in front of one eye, we are suddenly giving the brain two very different images. When it combines them, it appears that you hand suddenly has a hole through it.

Wednesday, December 2, 2015

Word Family Board Game (free printable -at, -ug, -op, & -ail practice)

Our kindergartner is starting to read. It's incredibly exciting. I cannot tell who's more proud: him or me. To introduce him to word families, I made a fun little board game.


Download your copy for free from Google Drive here. Print on heavyweight cardstock. Double the weight of the arrow spinner by folding the paper over and gluing two plies before cutting it out. Punch a hole with a nonconventional hole punch and attach the spinner with a brad. Find different game pieces for each player.


Playing is easy. The youngest player starts. They flick the spinner and land on a letter. They'll move their game piece from the START words to the first real word that can be made with the letter they spun and the word ending (e.g. if they spin t, they'll move to -op since that makes the word top). 

Kids will love trying out the combinations of letters and word endings and giggle at the nonsensical words they make in the process. 


Play alternates between opponents. If a player lands on the SPIN AGAIN, they'll do just that and spin again to get a letter. They'll then move their piece twice to form the first two words that can be formed with the letter spun and the word endings on the board.

The first player to reach the final square on the board is declared the winner. When we played, that was my 6 year old! 

Want a great book to pair with this game? We've been reading these flip-a-word books. They're great for beginning readers and a perfect introduction to word families!