Pages

Monday, June 29, 2015

After School Linky 6-29

Welcome to the party!


We're having SUCH a great summer. I hope y'all can say the same.

We're on vacation and I've unplugged while we're away. Unfortunately, that means no favorites from last week's party will be featured this week. I promise they'll be back next week, though!

The After School Linky is cohosted by
Relentlessly Fun, Deceptively Educational
We would love to have you link up your School-Age Post (Ages 5 and up) about your learning week after school including Crafts, Activities, Playtime and Adventures that you are doing to enrich your children's lives after their day at school, home school, or on the weekend!

When linking up, please take a moment to comment on at least one post linked up before yours and grab our after school button to include a link on your post or site! By linking up, you're giving permission for us to share on our After School Pinterest Board and feature an image on our After School Party in the upcoming weeks! 


Friday, June 26, 2015

Sight Word Hopscotch


It was a beautiful day so we took our sight word practice outside. All you need is some sidewalk chalk, a patch of driveway, and a rock. This activity has a short supply list but it's LOADS of fun.


I made a simple hopscotch and added a sight word to each square.

My son had to hop on each square (except the one where the rock landed) and read its word aloud as he jumped. 

Since we played this for quite awhile, I could tell the sight word work had helped when we settled down for before-bed reading. That night, he pointed out the word with in one of his books and didn't confuse it with the like usual.


We'll continue to work on sight words and when the weather allows (i.e. it's not scorching hot or pouring rain), make another hopscotch with new words.

Wednesday, June 24, 2015

Why You Need to Use Soap (a Germs Simulation Experiment)


I'm not sure my oldest son uses soap every time he showers. And I've seen our youngest son put soap on one hand and then instead of rubbing them together, stick the soapy hand immediately under the running water. Hopefully this simple, yet fun, experiment has convinced them of the merits of soap.

The experiment is meant to simulate how soap helps to get rid of germs.


What You Need
plate (or saucer) with a raised edge
water
ground black pepper
dishwashing liquid (we used Ms. Meyer's)

What to Do
Pour water onto the plate. You should use enough water to cover the whole bottom of the plate.

Sprinkle several pinches of ground black pepper onto the water. Explain that these specks of peppers represent germs.


Now squirt a dot of dishwashing liquid onto one of your index fingers. Rub it all around, completely covering the tip of the finger.

Lastly, put your soap-covered finger into the middle of the peppered water.


Be amazed. The soap seems to repel the pepper (aka the "germs").


Why it Works
This activity was discovered on Fantastic Fun and Learning. As explained by Shaunna, "When soap is added to the water it lowers the surface tension of the water causing the water molecules on the surface to scatter or pull away from the point where you added the soap."

What to Read
You can't go wrong with a Magic School Bus Book. We have rediscovered our love for all things Frizzle this summer. This book complemented the activity beautifully!


Monday, June 22, 2015

After School Linky 6-22


Welcome to the party!

How's your summer going? Are you relaxing the rules or aggressively warding off the summer slump? Whether you're having fun or learning while you're doing it, these great ideas are perfect.

Enjoy some of my favorites from last week's party.


 10 Fun Solar Experiments for Kids at Planet Smarty Pants


The After School Linky is cohosted by
Relentlessly Fun, Deceptively Educational

We would love to have you link up your School-Age Post (Ages 5 and up) about your learning week after school including Crafts, Activities, Playtime and Adventures that you are doing to enrich your children's lives after their day at school, home school, or on the weekend!

When linking up, please take a moment to comment on at least one post linked up before yours and grab our after school button to include a link on your post or site! By linking up, you're giving permission for us to share on our After School Pinterest Board and feature an image on our After School Party in the upcoming weeks! 


Friday, June 19, 2015

DIY "Cave Paintings" (a Lesson on Lascaux)


I have been fascinated by the caves at Lascaux, France, since I learned about them in one of my very first college art history classes. I wanted to see if my sons would find them equally fascinating.

They did.


Before we made our own "cave paintings," we read a great book that familiarized my sons with the discovery of the caves. The story is so appealing to kids because it was, in fact, some young boys that stumbled on these historic caves and discovered their paintings and engravings, which were made by some of the earliest humans.


Art has a long rich history. Cave paintings show us its very origin.

Our Artist Recreation
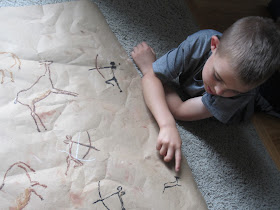
Of course, we don't have a cave wall to use as our medium, so I grabbed a roll of brown packaging paper (like what you'd wrap a package in to mail) that was collecting dust in our basement. I cut a large piece.

I crinkled it to give it more of a stone effect and swiped on a few areas of brown and white acrylic paint in an attempt to replicate the look of cave walls.

Then my sons used taupe, brown, black, and white oil pastels and some stencils I'd made. To make your own stencils, print my free template onto office paper, overlay sheets of transparency paper (think thick clear report covers), and using an exacto craft knife, carefully cut away the animals shapes.


The boys were able to position the stencils anywhere they chose and even flip them to make the mirror image for variety. Holding the stencil steady (and tightly), they ran the oil pastel along the inner edge of the stencil to make an outline of a bull, deer and her fawn, bird, and human hunter (complete with bow and arrow).


This required patience and determination for our 5-year-old, but since the real paintings didn't have crisp lines, even his wavering hand seemed to add to the authenticity.

When we were done, he told me all about what our "cave painting" was illustrating!


More Books
In the evening, the boys read two other great books to extend the learning even further. My husband read The First Drawing to our 5-year-old. It is a wildly imaginative tale of a child who invented art by drawing in caves. It starts "Imagine ... you were born before the invention of drawing, more than thirty thousand years ago." This makes the cave painters very relatable to kids!

My 9-year-old read Discovery in the Cave on his own. While the reading level was much lower than he's used to, he was fascinated by the small maps that detailed all of the different areas in the caves of Lascaux. It contained enough unique information from the book we read before our art activity to keep him interested. 

Wednesday, June 17, 2015

Elephant Toothpaste (a Chemical Reaction experiment)


I have seen this experiment all over Pinterest and while I do my best to try and bring my followers something relatively fresh and new, I decided that my boys should not miss out just because I blog. After all, why deprive them of one of the coolest chemical reactions ever?


This experiment doesn't REALLY make toothpaste, after all you wouldn't want to put it in your mouth. However, the look of the billowing foam definitely has the appearance of its moniker.

What You Need
1/2 cup clear 30-volume liquid developer (this is salon-grade hydrogen peroxide)
3 tbsp. water
Empty 20-oz clear plastic soda bottle (rinsed clean)
1 packet of yeast (or 1 tbsp.)
food coloring
1 tbsp. liquid dish soap
Cup
Funnel
Tray and or large plastic sheet (we used a plastic trash bag under a jelly roll pan)
Spoon
Safety googles

What to Do
1. ADULTS ONLY - Pour the liquid developer (aka hydrogen peroxide) into the empty bottle. Wear goggles to avoid damage from any splatter.


2. Add 8 drops of food coloring to the bottle.


3. In the cup, combine yeast and water. Stir to accelerate the dissolving process. Don't worry if it gets clumpy.

4. Add 1 tbsp. of dish soap to the bottle. Swirl gently to combine. Remember: kids should be wearing their safety googles!


5. Using a funnel, pour the yeast mixture into the bottle.

6. Watch as the yeast (your catalyst) combines with the soapy peroxide to create a fountain of foam.


It will spill out of the bottle so make sure to conduct this experiment in a place where messes are easily cleaned up.

My boys were amazed and even commented that the bottle felt warm to the touch. The chemical reaction created heat! The yeast removed oxygen from the hydrogen peroxide (developer); because of how quickly that took place, a LOT of bubbles are created.

Don't worry about the foam - it's not toxic. It's merely water, soap, and oxygen!

After we conducted this experiment we watched Bill Nye the Science Guy teach us about chemical reactions. All his DVDs are impressive, but this one was over the top!


The credit for this experiment goes entirely to Science Bob. Stop by to watch his video!

Monday, June 15, 2015

After School Linky (6-15)


Welcome to the party!


Today is the first day of our new summer routine. My boys are doing summer camps part-time and you know what that means ... this mama needs loads of ideas to fill those afternoon hours.

Thankfully, this linky always delivers.

Here are some of my favorite activities from last week's link-up.


 10 Fantastic Experiments with Water at Planet Smarty Pants.


 LEGO Beginning Sounds Activity at Growing Book by Book.

 Horsin' Around Toilet Paper Craft at A Cowboy's Life.

 How to Make a Summer Adventure Book from Enchanted Homeschooling Mom.

 Summer Math Camp: Week 1 from Math Geek Mama.


The After School Linky is cohosted by
Relentlessly Fun, Deceptively Educational

We would love to have you link up your School-Age Post (Ages 5 and up) about your learning week after school including Crafts, Activities, Playtime and Adventures that you are doing to enrich your children's lives after their day at school, home school, or on the weekend!

When linking up, please take a moment to comment on at least one post linked up before yours and grab our after school button to include a link on your post or site! By linking up, you're giving permission for us to share on our After School Pinterest Board and feature an image on our After School Party in the upcoming weeks! 


Friday, June 12, 2015

Bugs on Parade {Printable Game to Practice Color Words}

Before the summer began, I jotted down a number of themes to explore while the boys were off school. Bugs was at the top of the list.

This fun little game helps kids begin to associate actual colors with the color words, and can either help familiarize kids or practice color sight words for those that are already learning phonics and have some early reading skills.


Bugs on Parade was a blast to make and just as much fun to play.

What You Need
PDF of the game board and die (download it here)
4 pieces of heavyweight cardstock, onto which you'll print the game board and die
Scissors, tape, and glue for assembly
Game pieces (we used different colored buttons for each player)


Prep
Pages 1-3 are the game board and because your home printer won't print full bleed (to the edge of the paper), you'll need to trim a little white strip so the board's space touch. Tape the three pages together. (For storage, fold the board in a z-shape.)

Cut apart the die. Score the lines with a butter knife and fold. Glue with a low-temp glue gun.


Note: The printable provides two die - beginner and advanced. For young children who are not reading, exploring phonics, etc. it's best to use the colorful die. No reading is required to play. Simply seeing the sight words over and over again will help reinforce learning. The other die does not contain colored sides; players must use their color words familiarity or phonics knowledge to read the die.

Play
All players must put their game pieces on the START lettering. They'll take turns rolling the die, reading the color word, and moving their game piece to the first occurring bug on the board of that color. If the player rolls "Lose a Turn" then play continues for the next player. If the player rolls "roll and move 2" they will roll the die and whatever color word is on top of the die, they must move TWO of those colored bugs forward on the board.

The player to reach the final yellow bug first wins!


Read
Want a perfect book to pair with this activity? Check out Jerry Pallotta's Icky Bug Colors book. Not only did it teach us about bugs, but it showed bugs in each color!

Monday, June 8, 2015

After School Linky (6-8)

Welcome to the party!


Summer is well underway. Keep those kids busy with some great learning activities. This linky has loads of ideas and inspiration. Here are few of my favorites shared last week.

3 Air Pressure Activities for Kids at Gift of Curiosity.

Trap the Superhero at Science Sparks.


Free Printable: Summer Handwriting Paper at Superheroes and Teacups.

The After School Linky is cohosted by
Relentlessly Fun, Deceptively Educational

We would love to have you link up your School-Age Post (Ages 5 and up) about your learning week after school including Crafts, Activities, Playtime and Adventures that you are doing to enrich your children's lives after their day at school, home school, or on the weekend!

When linking up, please take a moment to comment on at least one post linked up before yours and grab our after school button to include a link on your post or site! By linking up, you're giving permission for us to share on our After School Pinterest Board and feature an image on our After School Party in the upcoming weeks! 


Friday, June 5, 2015

Swat the Sight Word Insects {free printable}


My 5-year-old son has come a long way this past year. When he started his alternative kindergarten class in the fall, he'd forget a huge chunk of letters in the alphabet song. Come May, though, he had mastered his letters, many of their sounds, and was even pointing out sight words in the books we read each evening.

It's my personal mission to see to it than when he begins kindergarten in the fall, he's not lost any of this knowledge. This little game is the first of what I hope to be many fun ways to continue practicing some of what he learned this year.


Want to make this too?
Download the free PDF of sight word bugs (4 pages with a total of 24 sight words) from Google Drive here


Want to practice other words or another skill? Download a free 2-page PDF of blank bugs for you to write on here.

Print on heavyweight cardstock. Cut out. If you anticipate heavy use, laminate to increase durability.

Grab your fly swatter and you're ready to play. (Note: I cleaned my fly swatter before we played this.)


How to Play
Spread the bugs out on the table. Make sure they are orientated properly for easy reading by your child. One by one, read a sight word from the following list:


Have you child find the bug with that word on its back and smack it! When smacked, remove that bug from the table and continue until either all the bugs have been smacked or your child's interest is waning.


Boy, oh boy, did my son love this activity. There was no light tapping; these insects truly took a beating!


Read
We read two great books along with this activity. The simple easy reader by Margaret Wise Brown (author of Goodnight Moon) was a great fiction book that points out just how diverse bugs and insects are. The other book we read was non-fiction and told us how to identify an insect (i.e. count its legs and body parts). It also taught us the three body parts of an insect and how to tell if an insect is a bug.