Pages

Wednesday, April 30, 2014

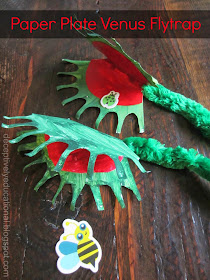
Paper Plate Venus Flytrap


The other day in the car, my eight-year-old son and I were talking and, for a reason which now escapes me, the conversation gravitated to the venus flytrap, that crazy carnivorous plant that eats bugs.


Having watched a Wild Kratts tv show episode on these mind-boggling plants, I knew we had to capitalize on my son's burgeoning interest.

This craft made hands-on learning possible.

All you need is a glue gun, scissors, two paper plates, green and red paint, paintbrushes, and a green giant (1.9m) chenille pipe cleaner. Markers and bug stickers are optional but highly recommended.

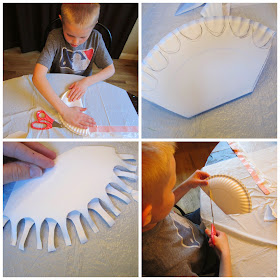
Here's how we did it (although you can probably just look at the pictures to figure out it).

Fold a paper plate in half. Trim the corners. Cut "u" shapes out of the edge of each side of the paper plate. Offset the fringe on the second side so they fit between each other when closed.


Cut the center out of the second plate. Fold the circle in half. Put it inside the fringed plate and cut the corners that overhang.


Paint the outside of the fringed plate green. We used acrylic craft paint. (Use a hair dryer to speed up drying time if necessary.) Paint the fringe on the other side of the plate (the middle of the plate will be covered with the clipped circle so you don't have to paint it).


Paint one side off the clipped circle red.


When the paint has dried, an adult should place a bead of glue from a glue gun in the center of the painted fringed plate along the fold. Place a giant green chenille stem there to glue it in place.


Glue the red clipped circle over the top of the chenille stem, on the inside of the fringed plate.

Ta-da! Now you can add trigger hairs to the inside of the flytrap with marker and/or add bug stickers.


Your venus flytrap is done!

Our boys both had a blast with this craft. The oldest was able to do all the steps himself (with the exception of using the glue gun). Our youngest (age 4 1/2) loved painting the cut out shapes. Both had a blast trapping our foamies bugs!

We read some great books to learn about carnivorous plants. All of these were a hit with us. 


After learning about pitcher plants in one of the books, my oldest boy is now begging me to help him craft one. We may end up with a whole bouquet of these meat-eating plants!

This craftivity was adapted from Teaching Little Learners.

Monday, April 28, 2014

After School Linky Party (4-28)


Welcome to the After School Linky Party!


Week after week, this linky delivers extraordinary ways to making learning fun for kids.
I am never disappointed.

Thanks for stopping by. Here are a few of the bloggers who shared some of my favorites from last week's link up.

Cardboard City at Lemon Lime Adventures.


Freedom to Fly at Life in the Unknown.


Eat a Rainbow at Play Dr. Mom.


 Kandinsky Circles - Spring Style at Rubberboots and Elf Shoes.


The After School Linky is cohosted by
Relentlessly Fun, Deceptively Educational

We would love to have you link up your School-Age Post (Ages 5 and up) about your learning week after school including Crafts, Activities, Playtime and Adventures that you are doing to enrich your children's lives after their day at school, home school, or on the weekend!
When linking up, please take a moment to comment on at least one post linked up before yours and grab our after school button to include a link on your post or site! By linking up, you're giving permission for us to share on our After School Pinterest Board and feature an image on our After School Party in the upcoming weeks!


Friday, April 25, 2014

How to Make a Water Clock


When I explained to my eight year old son that ancient peoples didn't have clocks like we do today, he was surprised. I don't think the thought had ever occurred to him that without batteries or electricity, the hands of a clock simply couldn't move.

In Ancient Greece, they used a water clock to time short events. It was called a clepsydra (KLEP-sye-druh). I thought it would be fun to make our own version of these ancient clocks.

What You Need
masking tape
fine-tip permanent marker
two of the same empty plastic beverage bottles
thumbtack
pitcher of water
timer (we used a stopwatch app on the iPad)
craft knife (to be used by an adult only)
funnel to make pouring easier

How to Make It
Remove the labels from the beverage bottles for clear viewing to the inside.

An adult should cut one of the tops off the bottle with a craft knife. Recycle the top; you won't need it. With the top cut off, the bottom of the other bottle should fit snuggly down into it. Label the bottles if you'd like (bottle A is the complete bottle and bottle B is the one you've cut).


Turn the complete bottle over (bottle A) and put a thumbtack through the center of the bottom of the bottle to make a small hole. (This is the hardest part of the whole project.)

Mark on this bottle where the full line is (figure this out by nesting bottle A inside the bottle B; the distance from the bottom of bottle B up to the bottom of bottle A or slightly below is where you should draw the line on bottle A). Note: We botched this up but it's important to know how full to fill your bottle each time. You'll want to be consistent.

Grab a length of masking tape and adhere it vertically to the side of the cut bottle (bottle B).


Now get your timer and the pitcher of water ready. Pour the water, using a funnel if desired, into the neck of bottle A (your bottles should be nested) and immediately start the timer. Pour up to the fill line on bottle A.


When one minute passes, make a small mark at the water line on the masking tape on bottle B. Continue to mark the minutes until the water has completely emptied from the top bottle into the bottom one. We only marked the first 10 minutes, but you can mark as many minutes as you'd like.


Now you can dump out the water and put the timer aside. Another pour of the pitcher and you can calculate how long something takes with just your water clock!

This great activity was adapted from instructions in the book Spend the Day in Ancient Greece.

Monday, April 21, 2014

After School Linky Party (4-21)


Welcome to the After School Linky Party!


There's no shortage of inspiration among bloggers sharing kids activities that's for sure.
Here are a few of my favorite activities shared during last week's linky.

Egg Drop Challenge at Buggy and Buddy.


 Crayon Batik at Sparkling Buds.


 How to Make a Needle Float at Learn Play Imagine.


 Telling Time Activity for Kids at Coffee Cups and Crayons.


 The Reason for the Seasons at Waddlee-ah-Chaa.


Time Bingo Games at Boy Mama Teacher Mama.


The After School Linky is cohosted by
Relentlessly Fun, Deceptively Educational

We would love to have you link up your School-Age Post (Ages 5 and up) about your learning week after school including Crafts, Activities, Playtime and Adventures that you are doing to enrich your children's lives after their day at school, home school, or on the weekend! 

When linking up, please take a moment to comment on at least one post linked up before yours and grab our after school button to include a link on your post or site! By linking up, you're giving permission for us to share on our After School Pinterest Board and feature an image on our After School Party in the upcoming weeks!

Friday, April 18, 2014

Ancient Greek Temple Building Game (printable)


Ancient civilizations are fascinating. To open my oldest son's eyes to this, I made a Greek temple building game. The objective is simple: See which player can race to build their ancient temple first.


Before we started, we read a little about Greek temples and the three types of columns (i.e. Doric, Ionic, and Corinthian) used.

We looked at pictures of temple ruins and my son immediately clued in to how the columns are supports for the roof. "Like the paper and book structure we built, right?" I responded. (See our recent engineering challenge.)

He was ready. I put a game board in front of each of us.


Between us was a plate of small game cards in a messy pile face down. (Rather than shuffle these tiny cards, I used a "go fish" mix method.)


Download the game here. I used three copies of the game cards for two players, which was overkill. Two copies for two players would be sufficient.

My son started, grabbing one card and placing the column part on his temple. Next it was my turn; I did the same.

The objective is to get a whole temple of columns before your opponent(s). The tricky part is that all the columns must be the same type (e.g. all Corinthian tops and bottoms).


In the beginning our columns were a mismatch. But as the board filled up, we gradually each selected the type of columns our finished temple would have. Once filled with mismatched columns, we replaced cards with our chosen type, putting cards of other types that we didn't need in a discard pile.

NOTE: Make sure your child understands what the tops of each column type look like, or they may be apt to confuse the tops and bottoms.


Watch out! The game contains cards that will have players removing some of their cards. While the temple is a mismatch of different columns, this is no big deal, but as players near building completion, it can be a real game changer.

When a player draws the "Lose a turn" card, they do not get to add a card to their temple. These special cards are added to the discard pile before the player's next turn.

My son had a lot more fun with this game than even I anticipated, asking to play again before the first game was through. It had him calling out,  "YES! I got a Corinthian!" and "Noooo. I don't need a Doric." Suffice it to say, he learned the different names for the columns playing this game.

Want a great book to accompany this game? We love the Magic Tree House Fact Trackers!

Wednesday, April 16, 2014

Building with Paper (Simple Engineering Challenge)


With a short stack of basic office paper and some scotch tape, I told my eight-year-old son we were going to do an engineering activity. "We're going to build with paper," I said.

He looked at me like I was nuts.

I asked him to describe paper. Words and phrases like flimsy, thin, and easily ripped rolled off his tongue.

I wasn't about to argue.

I had him retrieve a book from his bookshelf. He came back with a thin paperback chapter book. I gave him the basic instruction to build a support to set the book on using the paper.

We kicked around a few ideas and decided to roll the paper into tubes about an inch in diameter, taping the open flaps down to keep the tubes from unrolling.

He was excited to see if the tube would hold his book. Voila! It did!!


Rolling the paper had increased the strength of the paper. Now I told him to grab a BIG book from his room. He came back to the table with the Guinness Book of World Records. (Obviously, he was taking this engineering challenge seriously.)

We made four more identical tubes out of the office paper. I asked him how they should be positioned. "Should we group them all together to form one central support?"


He had a different idea. To make sure the book was steady, he spread the four tubes out so they were closer to the corners of the book, evenly distributing the weight.

I'm not going to lie. I was shocked myself that four pieces of flimsy office paper could hold up the heavy book.

My son was thrilled to conquer this simple engineering challenge!


Note: Next time we attempt this, I think we'll add a second story to our paper-book building!

Monday, April 14, 2014

After School Linky Party (4-14)


Welcome to the After School Linky Party!


Spring has sprung and if you're looking for great seasonal and holiday activities, this linky is the place to be. Last week was chock full of them. 

Here is just a sampling of the great ideas shared at the April 7th party.


 Fun Easter Science Experiments at Science Sparks.


Magic Love Notes for Kids at Happily Ever Mom.


The After School Linky is cohosted by
Relentlessly Fun, Deceptively Educational

We would love to have you link up your School-Age Post (Ages 5 and up) about your learning week after school including Crafts, Activities, Playtime and Adventures that you are doing to enrich your children's lives after their day at school, home school, or on the weekend! 

When linking up, please take a moment to comment on at least one post linked up before yours and grab our after school button to include a link on your post or site! By linking up, you're giving permission for us to share on our After School Pinterest Board and feature an image on our After School Party in the upcoming weeks!


Friday, April 11, 2014

Paper Plate Flying Eagle


Have you been following the Raptor Resource Center in Decorah, IA? Their bird cams have my sons enthralled. My 8-year-old has always loved birds of prey. 

We watched two eagle parents steadfastly perch on three eggs in -40 degree temps this winter and we waited nervously this spring to see if any of the three eggs would even hatch. Lo and behold, ALL of them hatched (way to go, Mama and Papa Eagle!!). The eaglets are positively "adorable," as my oldest son would say in a sing-song voice.

With his interest already sparked, I knew getting buy-in to create our own flying eagles wouldn't be tough.


Supply list for each eagle:
1 paper plate
1 marble
2 plastic spoons
masking tape
rubber band
markers
paint (optional)
scissors

How It's Made
Cut the paper plate in half (I bent ours to know where to cut). Cut one of the halves into three equal wedges (like pizza slices). Decorate the half circle to look like an eagle's brown feathers with paint and/or markers. Keep the wedge piece white since an adult eagle has white tail feathers, and tape the pointy end to the back of the half circle.


Now sandwich a marble between the bowls of two spoons and wrap the rubber band around the neck of the spoons to hold them together. Decorate the top of one of the spoons to look like an eagle's face (i.e. draw a triangle on the tip for a beak and two eyes). Now tape the spoons to the back of the eagle, so the rubberband and spoon bowl face stick out. Be liberal with the tape.


How to Make it Fly
Hold the eagle with your index and thumb around the neck of the bird and throw it gently forward like a paper airplane. It may take a few tries to figure out the right amount of force to get your eagle to glide gracefully.

My son was throwing his eagle pretty hard which caused it to loopty-loop and nose dive. Upon a few roof landings, the marble released from the spoons and had to be reinserted.


When we'd finished making our eagles (yes, I made one too), my son insisted that we make a fledgling, so the eagle mom and dad would have a son just like the Raptor Resource Center eagle family we've been following. We cut the paper plate a little smaller and was happy to see that it still flew just as well.


My son named our eagles Kevin, Debbie, and Thunder (the baby). I love the names he chose. To learn more about eagles, we read two great non-fiction books.


This craft came from a great book filled with kids crafts.

Wednesday, April 9, 2014

Fused Plastic Bag Placemats (Earth Day Craft)


I take my own cloth bags to the grocery store, but these plastic sacks still pile up, from trips to other stores or when the reusable bags are accidentally left at home. To teach my eight-year-old son about reuse, we made some new placemats to go with our new kitchen table.


And while we were at it, I thought we'd work in a "how to set the table" lesson. This is sort of like an Earth Day and life lesson all rolled into one!

Before the tutorial, let me remind you of something you already know. Irons are hot. Kids should NEVER use them without adult supervision. Respect your child's maturity when evaluating whether they can do this activity safely.

What You Need
Plastic Bags (4 for each placemat)
Colored Plastic for an accent
Scissors
Iron

Tutorial
Lay the plastic bags out flat and cut the handles and bottoms off.


Turn the bags inside out so the ink is inside each bag.

Smooth them out flat, one on top of each other in stacks of four.

Cut silverware shapes out of a contrasting color of plastic. I used an orange cheap plastic party tablecloth. Trace a plate and cup and cut these out as well.


Put the shapes under one layer of plastic (inside the top bag in your stack). As a tip for what goes where, think (left to right) of the word FORKS. The "f" is for fork. The "o" is the shape of the plate. (There's no R.) The "k" is for knife and the "s" is for spoon.


Carefully move your stack of placemats on top of a piece (or two) of parchment paper, placed atop a surface suitable for ironing.

Place more parchment paper (NOT waxed paper) over the stack of sacks, forming a plastic bag sandwich.

With the iron set on medium heat (my has settings 1-6, and I set it at 4), slowly move the iron over the parchment covered plastic bags. You'll see them shrink as they heat up and fuse. It'll take 15-20 seconds (or longer).


The plastic will be hot. Let it cool for a few seconds before removing the parchment to inspect the plastic. If there are bubbles or loose pieces, reapply the parchment and continue ironing.

If your placemat is rippled, iron it more to flatten.

You can trim the edges to make them straight or embrace the rugged nature of your recycled craft. The final result is a Tyvek-like plastic mat.


My son was stunned with the final result and eager to use the placements that evening for dinner. Setting the table was a snap!