Pages

Sunday, September 29, 2013

After School Linky Party (9-30)

Welcome to the After School Linky!


Last week's party was full of fall-inspired activities. If you're looking for inspiration, look no further than the 9-23-13 linky! Here are just a few of the ideas I loved.


(This great DIY magnetic fishing pole really reels up and down. What a wonderful educational learning tool ... I mean toy!)


(This hands-on experiment answers the age-old question of how leaves change color in autumn using items you probably already own. SO cool!)


(Carly found a wonderful way to combine children's literature with service work: use books to form a shopping list of food bank items to donate!)


Pick the Apples at Playdough to Plato.
(This apple-inspired activity works on colors, sizes, following directions, sorting, etc.)


Bingo Reading Activity at Children's Books and Reading.
(This is SUCH a fun and engaging way to encourage kids to read. Whether you've got an avid or reluctant reader, this is sure to generate excitement!)


Cohosted By
Relentlessly Fun, Deceptively Educational

We would love to have you link up your School-Age Post (Ages 5 and up) about your learning week after school including Crafts, Activities, Playtime and Adventures that you are doing to enrich your children's lives after their day at school, homeschool, or on the weekend! When linking up, please take a moment to comment on at least one post linked up before yours and grab our after school button to include a link on your post or site! By linking up you're giving permission for us to share on our After School Pinterest Board or Feature on our After School Party next week! Don't forget to follow along and join our After School Enrichment Community.

Link up your After School Activities, Crafts and Adventures! We'd love to see them!

Friday, September 27, 2013

Egg Carton Mancala Game


Mancala may be the oldest game in the world, which begs the question of why I've never played it. I figured it was time, at the age of 37, that I give it a try. And I knew EXACTLY who would make a great opponent - my oldest son. 

In case you haven't noticed from all the DIY games I create and blog about, he is a total gamer.

To make our mancala board, I grabbed an empty egg carton. I cut the egg cup tray and lid apart. The egg cup tray with its 12 compartments is perfect for this game!

To make the two trays, called mancala, that sit at either end, cut the egg carton lid using the ends only (discard the middle). Use hot glue to attach the lid pieces to either end of the egg cup tray.

To help my son and I keep straight which side of the tray and which mancala was whose, I placed colored dot stickers in the bottom of the egg cups - yellow on one side, green on the other. Then I printed yellow and green mancala labels on sticker paper to adhere to the mancala trays.

Now I grabbed some blue glass babbles to use as our "stones."

We loaded three babbles in each cup, leaving the mancalas empty. Now we reviewed the game rules by watching this great YouTube video.


The objective is to hoard all of the babbles on your side of the board. If your cups are all empty, you've lost.

I was so close to losing that my son was practically doing a victory dance, when one or two plays put me back in the game. Call me the comeback kid, because I won our first round. My son isn't always thrilled to lose, but this time, he didn't even care.

This game is perfect for kids with a math brain and totally encourages strategic thinking.  I knew my son loved our mancala when he asked a friend to play it less than an hour later. Success!


This great idea came from ReMake It! by Tiffany Threadgould. This books is full of inspiring craft projects for kids, all made from recycled goods. It is one of the best craft ideas books I have ever come across.

Wednesday, September 25, 2013

Easy DIY Geoboard (and a Lesson in Polygons)


Polygons, quadrilaterals, and parallelograms, oh my!

Anybody else get it all confused?

To help my oldest son practice polygons, I grabbed a busted bulletin board my husband had tossed in the trash (not quite dumpster diving, but I wouldn't put it past me to do that either for the sake of my kiddo's education!).

The bulletin board was a thin layer of cork paper over corrugated cardboard. I cut it and glued two plies together, making two smaller, albeit thicker, bulletin boards.

Now I carefully glued pushpins in place in a grid pattern. Use the strongest glue you can find, like super glue or gorilla glue. I printed a grid and with a ballpoint pen, punched the location of the dots into the cork, then dabbed glue in the imprints I'd made, and inserted a pushpin.

Put a heavy book on top for pressure and let dry.


Now grab a handful of rubberbands, print the 1-page PDF of polygon cards, cut out, and go get your child.


Before my oldest son started made polygons, he watched a 10-minute video about what a polygon is (and isn't). This video was made by a classroom of kids and perhaps because of its child "actors," he was captivated.


When finished, he went through the eight shapes on the polygon cards and did his best to stretch the rubberbands around the pushpins to emulate the number of sides and angles pictured. Some shapes were easier than others!

When little brother wanted to give it a try, we stuck to simpler shapes - the triangle, square, and rectangle.


Both boys had fun and were excited to show off the shapes they made!


WORD OF WARNING: If the rubberbands are tugged on aggressively, the pins may come loose and pop out. Always play along and encourage kids to slowly and gently remove the rubberbands to prevent a potential safety hazard.

Monday, September 23, 2013

After School Linky Party (9/23)


Welcome to the After School Linky!


Last week was one of the largest (if not THE largest) linky we've had since I've become a co-host. The ideas continue to amaze and inspire.
Here is just a sampling of what you missed if you didn't stop by.


(This is great motor skills practice for kids big and small!)


(October is Fire Safety Month. Deb Chitwood has loads of helpful links to activities and printables to get you - and your child - ready.)


The Healthy Plate at Green Owl Art.
(Learning about portions and good eating habits with this art/health activity is fun AND delicious!)


Shadow Math at Highhill Education.
(JMommyMom's son measured his shadow throughout the day. What a great way to practice math!)


(This is just the jump-start reluctant writers need to draft a biographical poem about themselves!)


Cohosted By
Relentlessly Fun, Deceptively Educational

We would love to have you link up your School-Age Post (Ages 5 and up) about your learning week after school including Crafts, Activities, Playtime and Adventures that you are doing to enrich your children's lives after their day at school, homeschool, or on the weekend! When linking up, please take a moment to comment on at least one post linked up before yours and grab our after school button to include a link on your post or site! By linking up you're giving permission for us to share on our After School Pinterest Board or Feature on our After School Party next week! Don't forget to follow along and join our After School Enrichment Community.

Link up your After School Activities, Crafts and Adventures! We'd love to see them!

Friday, September 20, 2013

Adjectives: A Touchy Subject (a sensory game)


It's been awhile since we played the Brown Bag Touch and Feel guessing game, but when my oldest son picked out a book at our library about touch recently, I wanted a way to revisit this particular sense. Given how much my son's writing lacks juicy details, a little adjective practice couldn't hurt either.

This game was easily played by both of our boys (a 3rd grader and preschooler). It's hard to tell which one of them enjoyed it more!


To prepare, I traced my oldest son's hand on heavyweight cardstock and cut out a series of hand shapes. To this I glued a variety of textures. I also used a clear plastic disposable dessert plate, and drew the hand on the bottom with permanent marker.

With my sensory hands made, I wrote adjectives to describe each on an index card.

Fluffy = quilt batting
Rough = burlap fabric
Feathery = feathers
Bumpy = created with paper-punched craft foam dots
Wet = water on the clear "hand" plate
Noisy = bubble wrap
Soft = polar fleece fabric
Leathery = faux leather left over from a DIY Halloween costume
Sticky = clear contact paper
Scratchy = sandpaper

When my oldest son came home from school, I wrapped a handkerchief around his eyes. (Yes, I made him wear my breast cancer survivor "think pink" bandanna!)

I put the sensory hands in front of him and asked that he touch each one and describe it to me. This was more challenging than we both originally thought. "It's rough," he said of both the sandpaper and burlap hands. I put them both back in front of him and asked, "Do they feel the same? If I couldn't feel them, I would think those two had the same texture based on your description."

Hm.

After working harder to describe each uniquely, the blindfold was removed. Now I gave him the index cards I had made earlier and asked him to match the adjectives with the correct sensory hand.

Later when our four-year old played the game, he didn't use the bandanna; we just let him look, feel, and describe what he was touching. His big brother was thrilled to read the cards to him so he could match the descriptive words with the correct textures. I was astounded to see how well he did!


My oldest son read two great children's books as part of this activity. Touch by James De Medeiros focused on texture and pressure, as well as demonstrating our feelings for someone through touch.

Soft and Smooth, Rough and Bumpy by Dana Meachen Rau explained how our skin and nervous system is responsible for our sense of touch.


Want to extend this lesson and learn more about the nervous system? Check out our Straw-Blown Neuron Diagram activity and book recommendation!

Wednesday, September 18, 2013

Missing Sign Math Game


My oldest son's mastery of most of his multiplication facts and his understanding of division make it the perfect time to mix all types of math sentences together for a fun game.

To download the game I made, click here. The 6-page PDF includes a 2-page game board and four pages of missing sign math problem cards.

Print, trim the game board, and tape together. Cut and shuffle the cards.

Find a few game pieces to use. My son chose his mini football players. Anything will work such as two different coins, buttons, or poker chips.

As I was shuffling the cards, a neighbor boy rang the doorbell to play. I explained we were playing a math game and his eyes lit up. I invited him in and my son and his buddy played on a team against me. 

(I have a pretty strict policy against posting pictures of other children on my blog without a parent's permission, so you'll just have to trust me that this was a riot!)


Our two game pieces were placed on the board before the first square (in the upper left corner). The boys drew a card from the deck and determined which math sign was missing (plus, minus, division, or times sign). If their answer was right, they moved their game piece to that sign on the board. The game card was placed in a discard pile.


Now it was my turn to do the same.  The boys and I took turns until we both neared the finish.


In order to win, I had to draw an addition problem (the last sign on the board). As soon as I did, I was the victor. The boys had so much fun playing, they didn't even care that they'd lost.

Nothing like practicing good sportsmanship AND your math skills at the same time! 

Monday, September 16, 2013

After School Linky Party (9/16)


Welcome to the After School Linky!


Last week's party was full of creativity and fun!
If you missed it, here are just a few highlights.


(Science and play combine with this hands-on activity.)


(Paired with Alison McGhee's book Countdown to Kindergarten, Deirdre invented this great way to practice math [and letters] while lacing!)


Measurement Man at Playdough to Plato.
(Measurement conversions for gallon, quarts, pints, and cups are a mystery no more. Have kids make a measurement man to keep the equivalents straight!)


"A" is for Ambulance at There's Just One Mommy.
(Write letters on post-it notes and have your child drive an ambulance through every letter "a" to get to the hospital. Great kinesthetic activity and easily adaptable for older kids practicing any number of skills!)


(JMommyMom's hands-on way to learn the digestive system is so clever! A pair of pantyhose forms the esophagus and stomach. Kids will have fun squishing the food through!)


(This hunt uses kids' observation skills to find rotational and reflection symmetry. This takes a nature hike to a whole new level!) 


Cohosted By
Relentlessly Fun, Deceptively Educational

We would love to have you link up your School-Age Post (Ages 5 and up) about your learning week after school including Crafts, Activities, Playtime and Adventures that you are doing to enrich your children's lives after their day at school, homeschool, or on the weekend! When linking up, please take a moment to comment on at least one post linked up before yours and grab our after school button to include a link on your post or site! By linking up you're giving permission for us to share on our After School Pinterest Board or Feature on our After School Party next week! Don't forget to follow along and join our After School Enrichment Community.

Link up your After School Activities, Crafts and Adventures! We'd love to see them!

Friday, September 13, 2013

Fill the Bushel Spelling (or Sight Word) Game


This week was my first time volunteering in my son's 3rd grade class. The teacher had me work one-on-one with a few students helping them learn their spelling words. It reminded me of just how boring studying spelling words can be. In brainstorming new ways to practice with my own oldest son, I came up with this idea.

This little game focuses on learning five words.

Quiz your child or look at their pretest to see which words on the list they are struggling with. Those are the five.

For this game you need to print five bushels and a special die. Download the 6-page PDF I made here. Print onto heavyweight cardstock. Cut, fold, and glue the die together.

Either laminate the five bushel pages or slip them into plastic sheet protectors. Label each on the line at the top of the page with one challenging spelling word (or use sight words if that's what you're working on). Use a fine tip-dry erase marker.


Now grab your kiddo and tell them it's time to "Fill the Bushel."

How to Play
The player rolls the die. If they roll a four, for example, they find the page with that number on it, look at the word at the top of the page, and copy it onto one of the apples in the bushel with the dry-erase marker.


If the player rolls the worm, they roll again until the die shows a number. That number tells them what bushel to erase a word from; that was a bad apple and it must be thrown out. If they roll the number that has no words yet, he/she moves on without any erasing (rolling again to see what bushel to add a word to).


Kids can either stop rolling when one of the bushels is full or keep going until ALL the bushels are full, keeping track of which were filled 1st, 2nd, 3rd, etc.

The repetition of writing the five words again and again is sure to help him remember them when it's test time.

My son got caught up in the game and forgot we were practicing spelling. That totally fills MY bucket.

UPDATE: A blog follower came up with a great adaptation for her kiddo. She plans to use this little game to help her kindergartener practice writing certain letters. (What a good idea!!) I modified the PDF so the apples have ruled guidelines to help kids. Download this variation here.

Wednesday, September 11, 2013

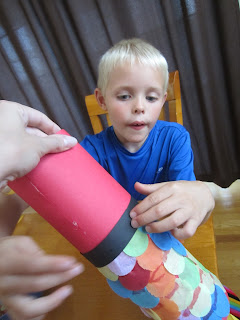
Rainbow Fish Paper Windsock


It is scorching hot here. Summer's hanging on with all her might and we're praying for rain and cooler temps. And a breeze. Oh, how amazing a cool breeze would feel on these 90+ degree days!

Thankfully, this weather won't hold and we're bound to get the crisp mornings and leaf-shaking breezes that are inevitable with fall. Hopefully our windsocks usher them in.

This simple paper craft is easy enough for preschoolers and yet still enjoyable for elementary-school-aged kiddos. My boys were surprised by how easy it was to turn a bunch of paper rectangles and circles into a phenomenal fish!

Supply List
1 piece of colored 12- x 18-inch construction paper, cut down to roughly 12 x 14
black construction paper
Assortment of ribbons
Stapler
White school glue
Circle punch
Tissue paper, heavy duty aluminum foil, tissue paper, etc. punched into small circles
Hot glue gun (optional)

Instructions
Trust me when I say that the hardest part of this project is step one.

Step 1
Roll your large piece of construction paper into a tube and glue it. Let me assure you, this is trickier than one would think. For my oldest son's windsock, we used the glue gun. For my youngest son's, I used school glue, holding it in place while it dried by gently-applied clear tape and at the ends, paperclips. When it was dry, we moved on to Step 2.

Step 2
Cut lengths of ribbon (ours were roughly 16 inches long) and staple along the bottom of the tube. Cut a shorter length of ribbon (approximately 8 inches long) and staple each side to the opposite end of the construction paper tube to create a handle.


Step 3
Punch lots of circles out of your decorative papers. My oldest son used tissue paper, while my youngest opted for brightly colored office papers and heavy duty kitchen foil (to make shiny scales).


Step 4
Run a bead of school glue around the tube (at the end where the ribbons dangle) about an inch up from the bottom. Begin adding the brightly colored circles. This first layer will cover the staples. Repeat this step until you have five or six layers of circles, overlapping each row slightly.


Step 5
Cut a 1-inch-wide strip of black construction paper and glue it around the windsock slightly overlapping the top of the last row of scales applied. If necessary, use a piece of clear tape to hold it in place while the glue dries.


Step 6
Punch (or cut) two circles from black paper for eyes. Add these to the fish on opposite sides of the windsock toward the top.


Step 7
Let it dry and hang it inside near a window. When the temperature cools down and the windows are open, you'll be able to see the beautiful tail (aka ribbons) of the fish blowing in the breeze.


Want a book to pair with this? Why not read The Rainbow Fish, the delightful tale of a fish with brightly colored scales.

Monday, September 9, 2013

After School Linky Party (9/9)


Welcome to the After School Linky!


We had LOADS of new bloggers linking up last week. The number of phenomenal ideas shared just keeps on growing!

Here are a few of my favorites posted at the 9/2 linky party.


Junior Engineer from Doodles and Jots.
(This is a great STEM activity and the printable is free! I love the idea of sending kids on an I Spy hunt to search for items based on how they're made!)


(Increase a child's confidence in their drawing abilities by making a grid on a photograph to reference.)


Children's Books about Autism from Growing Book by Book.
(This is a phenomenal list of books to help children understand autism!)


(If you have stick-collecting kids like me, this is a must read ... and a must DO! Mia shows how to make a bow and arrow from a stick, rubber bands, and duct tape.)


(Fine tip markers, thread, and popsicle sticks are transformed into an ancient chinese scroll with this extraordinary craft.)


(This is everyday math at its best. Kids solve all kinds of math problems using their closet and its contents!)


Cohosted By
Relentlessly Fun, Deceptively Educational

We would love to have you link up your School-Age Post (Ages 5 and up) about your learning week after school including Crafts, Activities, Playtime and Adventures that you are doing to enrich your children's lives after their day at school, homeschool, or on the weekend! When linking up, please take a moment to comment on at least one post linked up before yours and grab our after school button to include a link on your post or site! By linking up you're giving permission for us to share on our After School Pinterest Board or Feature on our After School Party next week! Don't forget to follow along and join our After School Enrichment Community.

Link up your After School Activities, Crafts and Adventures! We'd love to see them!