Pages

Thursday, January 31, 2013

Chinese New Year Lantern Craft


The 2013 celebration of Chinese New Year starts on February 10. To make learning about this traditional Chinese holiday hands-on, I dreamed up a fun craft to make with my son.

Before we started it, though, my son read a great story that taught him LOADS about Chinese New Year, like:
  • The holiday uses a different calendar based on the moon.
  • Tangerines are considered good luck.
  • To disguise themselves from bad spirits, the Chinese wear new clothes during the celebration.
  • There's a big parade with dragons, and fireworks to scare off the bad spirits for the coming year.
This book was perfect for my son. It's fiction chocked full of great non-fiction facts about Chinese culture and beliefs. And it's by Marc Brown, beloved author of the Arthur books. This one just so happens to feature the lovable character Buster!


Since the 15-day Chinese New Year celebration ends with the lantern festival, I thought it'd be fun to make our own version of the amazing red lanterns that are so popular.

Supplies
2 pieces of bright red cardstock (Marc Brown's book taught us that red brings good luck.)
2 plastic red disposable cups
gold ribbon
gold fringe
paper punch
low-temp glue gun

How We Made It
1. Cut 10 strips (1 1/2- by 8 1/2-inches) of red paper. Punch holes in the ends of the strips about a 1/2 inch up from the ends with a hole punch. Make sure the holes are in the same places on all the strips.


2. Trim the cups down to 1/2-inch tall. You need two shallow cup to serve as the top and bottom of the lantern.


3. Poke a small hole in the center of both cups (I did this for my son and used a small Exacto knife).


4. Cut a long strip of gold ribbon. Tie a knot close to one end. Thread the cup onto the ribbon, with the sides of the cup pointing away from the knot.


5. Now thread one end of the stack of strips onto the ribbon.


6. Then thread the other end of the strips onto the ribbon. It will form a natural arch.

7. Add the other cup to the ribbon. Make sure it is inverted opposite of the other cup. Make a loop and tie and knot at the top.


8. Now separate the strips of paper so they form a red globe shape. (My son loved the transformation from flat paper to a spherical shape!)


9. Glue fringe to the bottom cup with a low-temp glue gun. Add a ring of gold ribbon around the top cup.


10. Enjoy your lantern! We hope it brings you good luck.


For more great books about China and Chinese New Year, check out a great reading list featured on No Time for Flashcards.

Monday, January 28, 2013

Food Chain War [printable card game]


I've seen loads of great food chain activities online. What possessed me to make my own? Well, truthfully, I've been itching to make some sort of war card game for ages. This seemed like the perfect opportunity.


To set the stage for our activity, we read a few books.

The Magic School Bus book provides great detail (and who doesn't love Ms. Frizzle?!?). Snap! is a wonderfully simple picture book that reminded me of "The Old Lady Who Swallowed a Fly." It would be perfect for younger kids.


When we were finished, it was time to play. (Download a 5-page PDF with the game cards here.)

I dealt the entire deck of cards to my son and I. Then we each turned over one of the cards in our deck. The player with higher card in the food chain takes both cards. When the whole deck has been gone through, the player with the most number of cards wins.


There are four types of cards in the deck: herbivore, omnivore, carnivore, and plant. Of course, remind your child that many of these animals live in different habitats, so this is just pretend. When players turn over the same type of card, a duel may be necessary, whereby additional cards are turned over. See all the scenarios below.

Either decide which animal is more fierce or draw two more cards to break the "tie."

Turn over two more cards to see which player wins the round.

The player with the herbivore card wins the round and takes both cards.

The player with the carnivore/omnivore card wins the round and takes both cards.

Want a great chapter book to pair with this activity? Why not get another dose of Ms. Frizzle? (My son's reading this now.)


Thursday, January 24, 2013

Missing Punctuation Board Game [printable]


It's not exactly a secret; the English language is confusing. If I'm saying this after spending the last 12 years writing professionally, I can only imagine what it's like for a second grader! To help my son understand what punctuation to use when, I grabbed an amazing book and created a fun board game for us to play and practice.

Before we got our game faces on, we read Elsa Knight Bruno's book Punctuation Celebration. This book is to kids what the AP style guide is to grown-up journalists (only WAY more whimsical). This is the most interesting reference book I've ever read!


The book explains in rhyming text how 12 pieces of punctuation are used. The explanations are simple and examples are included. Illustrations are playful (Is there anything more cute than a smiling semicolon jumping rope?), making the weighty topic less intimidating. Whether your child is showing a natural talent or interest in writing or not, this book is worthy of checking out from the public library or adding it to your own shelves at home!

Once we were done reading, I got out the Missing Punctuation board game I'd made.


You can download a PDF of the 2-page game board and game cards here. You'll need to tape the game board together and cut out the cards. Find a few buttons, magnets, LEGO minifigures, or anything else that's small to use as game pieces (each player needs one to mark their progress moving around the board). NOTE: I created the game for two players. If there are more, you may need to make additional game cards.

The game cards each contain a sentence or two with missing punctuation. It's up to the player to figure out which one is missing among the following:
Period.
Exclamation Point.
Question Mark.
Comma.
Apostrophe.
Quotation Marks.
Colon.
Semicolon
Parentheses.
Hyphen.

Once they have figured out what punctuation is absent, they move their game piece to the space where that punctuation occurs on the game board. NOTE: You may need to remind players of the difference between an apostrophe and a comma. Play alternates between players.


I gave my son loads of hints (e.g. for quotation marks, I asked, "Is someone talking?" and for parentheses, I posed the question, "Is there any information in the sentence that could be removed and it would still make sense?"). We referred to Bruno's book a lot and it was slow-going but my son had lots of fun and when he got a card with the final answer of exclamation point and won the game, he was elated!

"Can we play again sometime?" I asked.

"You bet!" he answered enthusiastically.


Here are the answers:
"I would like a turn," said John.   Quotation Marks
"Pass the ball," yelled the coach.   Quotation Marks
"Thirty-six," answered Julie.   Quotation Marks
"Write your name on the paper," said the teacher.   Quotation Marks
Are you okay?   Question Mark
Do you want a cookie?   Question Mark
Dogs are furry.    Period
Ethan is sad.   Period
His t-shirt was red.   Hyphen
I am very thirsty; I need a drink of water.   Semicolon (or Period)
I can't find my hat, coat, or mittens.   Commas
I can't swim.   Apostrophe
I don't care.   Apostrophe
I have a dog, cat, and hamster.   Commas
I like blue.   Period
I went to sleep at 8:35.   Colon
If I was older, I could drive.   Comma
I'm allergic to nuts; they make me sick.   Semicolon (or Period)
In my bag are three things: a pen, pencil, and eraser.   Colon
It is cold outside; I'm shivering.   Semicolon (or Period)
It was a part-time job.   Hyphen
Katie's nose is running.   Apostrophe
My cousins are leaving; I am sad.   Semicolon (or Period)
My sister wants four things: a doll, book, crayons, and a dress.   Colon
My umbrella is broken.   Period (or Exclamation Point)
One-fourth of the pie is gone.   Hyphen
OUCH!   Exclamation Point
Pickles (that I hate) are too sour.   Parentheses
Somebody help me!   Exclamation Point
The doctor took x-rays of my finger.   Hyphen
The milk (that was sour) spilled all over.   Parentheses
The radio (that was too loud) was playing my favorite song.   Parentheses
The school is on fire!   Exclamation Point
These cupcakes (from the bakery) are yummy!   Parentheses
This is my dad's hammer.   Apostrophe
Watch out!   Exclamation Point
We didn't eat lunch until 1:00 p.m.   Colon
What's your favorite color?   Question Mark
Where were you?   Question Mark
While I was sleeping, the tooth fairy came.   Comma

Monday, January 21, 2013

Everyday Arrays Multiplication Hunt


My son has been bringing home loads of math worksheets quizzing him on arrays. <<YAWN>> After about the third one with a matrix of dots, I thought, "There has got to be a more fun way to practice these."

The epiphany struck when I was folding laundry; The holes on the basket were an array!! Suddenly an idea was born.


I grabbed the camera and walked the house in search of everyday arrays. Turns out, they're everywhere! I snapped 26 pictures, which I printed out wallet-sized.

Need help finding some arrays? Look at your windows, in the kitchen, anything with buttons and knobs,
and check your child's toys (many board games have an array-like grid).

Once I cut them out, I calculated the multiplication problem associated with each, stuck a sticky note with the answer to the picture and when they were all "solved," ran around and affixed the sticky notes to the objects throughout the house.


When my son came home from school, he saw the notes everywhere and immediately thought we were doing our math post-it note scavenger hunt. When I told him it was a new kind of hunt, he was bubbling over with excitement.

I handed him a pencil and the stack of pictures. I was stunned when he immediately said, "Arrays!"

I asked him to write the answer to these multiplication problems on the back of each picture. He whipped through all the cards with relative ease, only needing help on 7 x 6 and 8 x 8. For those, I gave him a multiplication chart for help.

With the cards in hand, he darted through the house finding the objects in the pictures and comparing the number on the sticky note with his answer. His excitement with each right answer grew, and it wasn't long before his hoots and howls of pride turned into various touchdown dances and even the "Tim Tebow!"


This activity proved that arrays really CAN be fun!

Thursday, January 17, 2013

Racin' Across the United States [a Geography game]


Want a clever way to help your child learn the 50 states and their whereabouts? This game is perfect!

Before my son and I started playing though, we did some reading. Lynne Cheney's book accompanied this activity perfectly. The book was inspired by the author imagining what a family trip across the United States would be like and even features a fold-out map charting the course for anyone adventuresome enough to travel all 50 states in one big road trip. The pages that follow have details about each of the states' history, fun facts, famous former inhabitants, state flowers/bird, etc.


Robin Preiss Glasser's illustrations in Our 50 States: A Family Adventure Across America are playful and the pages are littered with tons of interesting nuggets of information. Since we didn't have time to read the whole book, my son choose a few of his favorite states to read up on. You could spend hours with this book!

Once we put the book away, I got out two maps I'd printed off the internet (I got ours from Make and Takes here). NOTE: To make the game more challenging, find a map without the states' names.

With a map in front of each of us, I grabbed two bowls that contained slips of paper printed with each state's name. Each of us would draw a slip of paper from our bowl and color the state it identified. (Download a 2-page PDF of the state names here. Remember to print a copy for EACH player.)


The winner of our "Racin' Across the United States" game was the first player to get states colored in a path from one coast to the other or from the Atlantic to Pacific Ocean (or vice versa). It doesn't matter which states you "visited" along the way or in what order, so long as the states touched one another. Unfortunately, drawing Hawaii and Alaska from the bowl isn't much help.

NOTE: Make sure all players are drawing the states out of their bowls at the same time, so that each is "visiting" the same number of states during the game.


My son narrowly beat me (all I needed was Arkansas!). He enthusiastically shared the states he'd traveled on his virtually coast-to-coast vacation, while I drew a line from one to the next. Geography CAN be so fun!

Monday, January 14, 2013

Viking Shield [upcycled history craft]


Cheap fun. I love it. And when I tally the expenses for this history craft, they're nominal. But the amount of fun that has resulted is priceless.

When my oldest son and I read our second book in the "Your Life as ..." series by Thomas Kingsley Troupe, I immediately thought of a great craft extension to our lesson on Vikings. But enough about me. 

Let me tell you about this amazing book: Your Life as an Explorer on a Viking Ship. Just like our last experience with one of Troupe's storytelling adventures (see the book recommendation and Colonial crafts we made here), we were transported back in time as we imagined the life of 11-year old Leif Grimmson, son of Grimr the Grouch, in the year 812, as he left his family farm in Denmark to explore with the Vikings.


The book intertwines the story of Leif's adventure with loads of interesting historical facts. A few of the things we learned included:

  • Most Vikings were farmers.
  • The parts of a boat: stern, oars, oar ports, hull, prow, sail, and mast.
  • Vikings played a game that is believed to be similar to chess, called Hnefatafl.
  • Shields kept Vikings safe in battle. Most were made of pinewood.

Now it was time to make our own version of a Viking shield!!

Supply List (for one shield)
Large piece of cardboard
Empty, clean plastic gallon-size milk jug
Duck tape (the original grey stuff)
Paint (optional)
Nailhead-looking apparel findings (we got ours in the button aisle) (optional)
Glue gun

Thanks to all the packaging from holiday gifts, we had a surplus of corrugated cardboard. I snagged a few pieces before it went out to the curb with the week's recyclables. We used a round pizza pan to trace the circle and then I used an Exacto craft knife to cut the circle out.

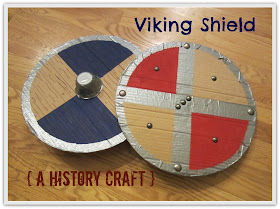
Now I queried "Viking Shield" on Google images. My son and I looked at all the pictures on my computer and he decided on a design. With a large cross made with duck tape, the shield instantly had a wood-and-metal look. 


At the time, he had no interest in painting the shield so, we ran another length of duck tape along the shield's edge, clipping it every inch or so to enable it to fold around the circular shape of the shield easily. Don't worry if you don't get the tape to lay flat; that adds to the rustic look!


Next, he used the low-temp glue gun to attach some apparel findings that resembled nail heads.


Now all that was left to do was add a handle. 


I used the Exacto craft knife to cut out the handle of a plastic milk jug. He used the low-temp glue gun to attach it to the back of the shield.

When little brother came home from preschool, he immediately asked if I'd make him a shield. For his, I masked off two areas with blue painters tape and brushed on acrylic craft paint. Then I added woodgrain with a brown fine point Sharpie. Lastly, I glued on a clean, empty single-serve applesauce cup covered in duck tape to the center.

Now, of course, our oldest saw this and suddenly wanted his shield painted, so out came the paints again! The red paint looks great. I love the final result!


And, while our boys certainly aren't pillaging any villages with their new "armor," the shields have worked wonders blocking the fire of Nerf gun darts!

Thursday, January 10, 2013

SHARK bingo game [free printable]


Totally coincidentally, my son has been reading a lot about sharks. I seized the opportunity to explore different species of these toothy swimmers, with a little MORE reading (I love an excuse to go to the library) and a fun game.


Before we played our game, we read a perfect book to teach us about some of the 350 different kinds of sharks. Gail Gibbons' book taught us about some of the biggest and smallest sharks, what they eat (including whether they're likely to eat us), and the anatomy of a shark.

Download six SHARK bingo game cards and calling cards free here.
When we'd finished the book, I had my son select one of six SHARK bingo game cards I'd made; I picked another one. Then, I shuffled the call cards and opened a bag of Swedish Fish gummy candies (our bingo markers).


One at a time we drew the call cards and placed a fish over the shark on the card (and the FREE space, of course!). My son got five in a row before I did and was declared the winner. Our prize? He got to eat some of the gummies!


Two of my son's favorite chapter book series have featured some of these amazing fish. The Ready Freddy book taught us about the prehistoric Megalodon. The Magic School Bus book taught us loads of shark facts. My son (and I) recommend both books for able readers interested in learning more.

Monday, January 7, 2013

Me and Magritte [an Art Project]


The art movement of surrealism can be tough for adults to understand (what's with those melting clocks anyway?). Kids are much more open-minded. To expose my son to the art of Rene Magritte, we read a few great books and then made our own Magritte-esque masterpiece.

Since my son is only seven years old, I let our artist study be self-guided, and didn't try to overwhelm him with a grown-up definition of surrealism. A few great authors brought the movement to life, and helped my son observe the oddities of this art movement.


Dinner at Magritte's is a wonderful story that any child can relate to. Young Pierre is bored so he visits the neighbor's house. He's invited in by the Magrittes and asked to share dinner there with another painter, Salvador Dali. The illustrations in this book imitate the art; my son loved discovering all of the oddities.

The other piece of children's fiction that we read, Magritte's Marvelous Hat, tells the tale of the painter (depicted as a loveable dog) whose new hat unlocks his imagination and gets his creativity flowing. Some of the book is see-through pages, which add to the enjoyment of the story.

When we were done reading, I grabbed a photograph that I'd snapped of my son.


I told him it was time to make a personalized version of one of Magritte's paintings (click here to see the one we mimicked). This is a great activity to talk about positive and negative space.


Once my son's body was carefully cut out of the picture, we glued the empty silhouette to the right side of a piece of cloud-printed scrapbooking paper. To the left of it, we glued his body.


The result is just as curious as the original painting! 

Thursday, January 3, 2013

Imagining Life as a Settler


Some books beg to be paired with an activity. Such is the case with this activity, which was inspired by some new books our library just shelved. What a treasure Thomas Kingsley Troupe's Your Life as a Settler in Colonial America is.

The "Your Life as a ..." series of books each ask children to pretend they are playing the role of a character that lived during another time - in this case, Colin Smalley, the 11-year-old son of a blacksmith living in colonial Williamsburg, Virginia.


The tale Troupe weaves imaginatively explains what life was like for Colin - where he slept, went to school, and used "the restroom"; when he ate; the games he played; and what he wore. When we were done reading, my son recorded a few of the things he learned from the book on a paper version of a hornbook (a paddle-shaped piece of wood where lesson sheets were attached for children to string around their necks and study).

Download a 2-page PDF of this hornbook
and writing paper template here.

To make your own hornbook, print the paddle shape onto a piece of brown cardstock. Cut the lined paper and glue or tape to the front.


When he was done writing, we fashioned our own three-cornered hat, mimicking the fashion of male colonists.

We used two sheets of 3mm (approximately 12 x 18-inch) brown foam. Cut two hat shapes and two 1 1/2-inch strips. Use the strips to make a headband, fitting it to your child's head (I used a stapler). Trim the excess.


Use school glue and binder clips (to hold while it dries) or a low-temp glue gun to affix the two hat shapes to the headband, gluing each on either side of the headband and attaching the hat's corners together. NOTE: We used glue dots at first but after loads of wear, they refused to hold and we resorted to traditional glue.


My son LOVED his new Colonist-style hat and thought it fitting to wear it in the evenings while he read his way through the Magic Tree House chapter book on the Revolutionary War. Little brother even asked if we could make a hat for him!