Pages

Friday, December 30, 2011

Blog Post Recap: Favorite 11 from 2011


I can’t believe that I’ve been blogging consistently since April (thank you for tagging along, blog followers!) and that 2011 is nearly over. This year was a phenomenal one. My son has advanced tremendously in school, which is proof positive that a wonderful teacher and the right kind of encouragement at home equal a more successful learning experience.

Before the year closes, I wanted to recap some of the activities near and dear to my heart (and faves of my son) that may have gone unnoticed.


#11
Get outside and search high and low for the wonders that nature has waiting for you! This free download has been one of my most popular printables.


#10
Teach kids about where U.S. currency is minted; then grab some coins and have them graph where the coins are from. Will there be more minted in Philadelphia or Denver?


#9
Art from other cultures can be so hard to relate to. This printable book draws comparisons between the masks of Africa and many western activities and traditions. Art projects don’t always hold my son’s attention for long periods; however, that wasn’t the case when he made a milk jug ‘African’ mask!


#8
Read about the planets and then practice right and left with a winding word puzzle. As kids follow the directions, moving around the word grid, the words they land on form clues. The answer to each clue is one of the planets in our solar system.


#7
Make several paper airplanes and then see which flies the farthest. This activity is a fun way to practice measuring and ordering the planes to see which one got first, second, third, etc. place.

#6
Grab a can of mixed nuts; they are an amazing math manipulative – not to mention they taste so darn good too! Kids sort, tally and skip count each variety, then rank them yummiest to yuckiest after doing a taste test.


#5
Make a stunning art project by alternating rectangles made from strips of colored cardstock with yarn-block stamped rectangles. This Kente cloth-inspired paper project provides the perfect opportunity to practice AB, AAB, ABC, and ABB patterns!


#4
My son LOVES this. It’s quite possibly his favorite math activity. Doing a worksheet of math problems is a bore. Make the answers a code and WHAM!, your child feels like a secret agent on a math mission.


#3
A DIY castanet-style snapping turtle is perfect to click words’ syllables. We made a game of it! Kids draw a card, click the syllables with “Snappy,” and move their game piece the number of syllables in the word. The player to get Snappy back home to the lake first wins.


#2
Got LEGOs? Then simply print these downloads and get ready for some fun greater-than/less-than practice. Kids put the blocks in two piles, determine which is greater than the other, then use those to build with.


#1
Months after making his organs shirt, my son can still identify many of the organs he painted and what they do!


My son is growing into a very curious boy. I hope to continue to encourage his inquisitiveness in 2012. Stay tuned for more fun activities that sneak in science, history, math, art, and language arts in the new year!

Wednesday, December 28, 2011

Build a Bug


Boys like bugs. This I know is true. When my oldest son was in preschool, I discovered the book Bugtown Boogie at our local library. After renewing it that first time, and checking it multiple times thereafter, I finally broke down and bought it. (I was starting to feel guilty that we were denying other kids the joy of reading this amazing book!)

The story is about a boy who stumbles on a bug’s dance club. It describes a myriad of insects and how they shake it to the buggy-wuggy beat. The book’s rhyming text is lyrical and after a few readings, we started to sing the “chorus.” The book starts:

I was strollin’ on home through the woods the other night,
When I saw something a-flashin’ – it was shinin’ mighty bright!
It was blinkin’ and a-winkin’ near the bottom of the tree,
So I scurried on over just to see what I could see.


To say that Warren Hanson’s masterpiece is one my most favorite children’s books is an understatement. It’s the kind of book you give as a gift, you are glad your child asks you to read over and over, and reminds you how magical the world seemed when you were young.

When I pulled it out to read with this activity, my son was thrilled (he hasn't tired of this book even after two years)! We also read a great non-fiction book from The Cat in the Hat Learning Library – On Beyond Bugs by Tish Rabe. It’s cleverly written and filled with fun facts about all kinds of insects.


After we’d finished reading, I gave my son a die and two pages of bug body parts.

Download a 2-page PDF of bug bodies and parts here.
First I had him pick the bug body of his choice, cut it out, and glue it to another piece of paper. Then he rolled the die to determine what he’d add to the picture. If he rolled a three, he could add a leg. I left it up to him whether his creation was an insect or spider (i.e. 6 or 8 legs).


Every time he rolled a four, he added more spots, a two meant he had to keep building his bug’s habitat (first, he added clouds, then a tree – his bug was flying!). He used examples from the sheet I made to help him know what to draw and how many of each (the number of body parts is noted above the die on the ‘parts’ page).

My son’s buggy creation may be the very first winged spider! I love his creativity!


Monday, December 26, 2011

Baking Up Some Math Fun!


I love being in the kitchen with my two cookie monsters. My boys never hesitate to volunteer to help make a mess. My toddler loves to dump pre-measured ingredients into the bowl; my first-grader is a master at driving the Kitchen-aid mixer.

When grandma and grandpa were coming for lunch and we needed cookies to go with our ice cream dessert, I recruited my oldest son to help. We whipped up one of my favorite kinds – cowboy cookies. YUM. They have a zillion ingredients, everything delicious (with the exception of peanut butter and m&ms) in one cookie.

To sneak in some math practice I made some general ingredient cards. Each has a value; for instance, oats are worth six, sugar has a value of two, etc.

Download a 2-page PDF of these cards here.
While we waited for the cookies to bake, I told my son to pick three ingredient cards and add the values together.


It was so fun to see the combinations of ingredients he came up with (of course, he picked m&ms + chocolate chips + frosting as his first cookie problem; HA!).

His reward for a job well done? A cookie, of course!

Friday, December 23, 2011

Easy Reader Puzzle

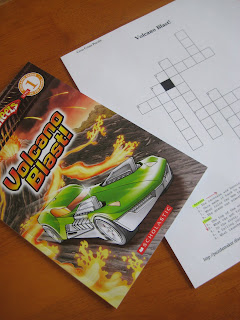
When my son used to read aloud, he sort of sounded like a robot. It always left me wondering, “Does he really comprehend the story or is he just reading the words?” To satisfy my curiosity awhile back, I got him a new Level 1 easy reader Hot Wheels book called Volcano Blast!


Then I created a crossword puzzle whose hints and answers all related to the story. To do this, I used Discovery Education’s free online Criss Cross puzzlemaker. I kept the clues to a minimum (only 9), left the default settings for the number of squares as is (Width 50; Height 50), and made the puzzle squares large enough for his giant handwriting (square size = 50).

After he read the book, I gave him the puzzle and explained how the answers to the clues would either be written across or down with one letter in each box. I answered the first question as an example.

To my surprise, he did a great job remembering the story details! In order to spell the words correctly, though, he had to turn back to the pages of the book and locate the answer words.


Although the crossword squares were larger than what you’d find in the local newspaper, they still challenged my son’s fine motor skills. Not only that, but now he knows how to spell the word ‘lava.’

Wednesday, December 21, 2011

Exploring (and Making) a Coral Reef


My son can’t get enough of Amanda Lumry’s Adventures of Riley books. I love them, too. 

These books talk about wildlife preservation and conservation of natural resources in a way that kids can connect to. Nine-year-old Riley takes excursions all over the world with his Uncle Max and Aunt Martha, who are scientists, with their daughter Alice (Riley’s cousin) in tow.

When our local library had a new one of Lumry’s Adventures, I nearly got tennis elbow grabbing it off the shelf.

Riddle of the Reef
provided an awesome lesson in the coral life cycle, how fragile their ecosystem is, and the dangers that threaten the Great Barrier Reef.


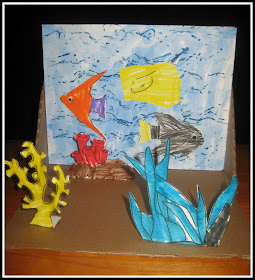
Once we’d read all about Riley’s adventure to the world’s largest reef, we made our own 3-D coral reef.

I cut some cardboard to build a standing frame. Then, my son painted a piece of cardstock ocean blue. Afterwards, I gave him a DIY rolling pin covered in a paper towel tube. (Once done with the project, I tore off the tube; now the rolling pin is ready for our next project!)


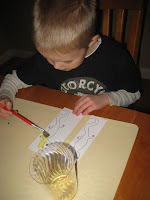
He used a Sharpie marker to draw undulating waves and bubbles on the cardboard tube. When done, I traced over his lines with a low-temp glue gun. Afterwards, we smeared some acrylic paint around on top of a piece of clingwrap and rolled the rolling pin through it. This became a giant rolling stamp that when rolled over the blue-painted paper, looked like the undulation of the water. We LOVED the effect it created!


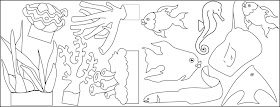
While that dried, I gave my son some cut-outs I’d created. 

Download a 2-page PDF of these shapes here.
The marine life were printed on sticker paper. The coral was printed on heavyweight cardstock. He set about the task of coloring three of each.

When done, I glued his ocean background to the cardboard structure and we cut out what he’d colored. After peeling off the backing from the fish and ray, they were added to the water backdrop.


Next, we folded the bottoms of the coral cut-outs and using the low-temp glue, attached them to our sea floor. This project was so much fun and the 3-D effect is truly magical!

Monday, December 19, 2011

Count, Stamp, and Graph Vehicle Wheels


When I used up all of my tan thread, I found it difficult to throw the little plastic spool away. The ends looked like a wheel. I tucked it away and figured I’d find a way to recycle it into an activity someday.

That day came when I read Margaret Mayo’s Dig Dig Digging to my toddler. The book provides page-by-page descriptions and graphics of all different kinds of vehicles.


With the book, a big piece of paper, a few empty spools, a stamp pad, and some vehicle labels, I was ready for my son when he got home from school.

First we read Mayo’s book. Then he added the labels, which I'd made and printed on sticker paper, onto a big piece of lined paper. Now all that was left to do was have him count the tires.
Download the labels I made here.

Since most of the graphics on the labels and in the book only show one side of the vehicle, my son had to count or multiply (e.g. 4+4 or 4x2) to determine how many TOTAL wheels there were on each vehicle.


Once he’d done that, he pressed the spool into an ink pad and stamped the number of wheels onto the graph. When he was done stamping the wheels for each vehicle, he counted the wheels in each row of the chart, circled the vehicle with the largest number of wheels, and wrote "winner" beside it on his chart.

Then, all on his own he explained to me which vehicles had the same number of wheels and asked if he could keep using "these cool stamps."

Wednesday, December 14, 2011

Reptiles: Book and Bookmark Craft


My son’s teacher is sending home books that are long enough for him to read sections of each night (yahoo!). Bookmarks are a must now. Funny thing, though, they keep disappearing!

I came up with a fun way to learn about reptiles and make some scaly long-tongued bookmarks too. To learn about cold-blooded creatures, we read Miles and Miles of Reptiles by Tish Rabe. Have I ever mentioned how much I love the books in The Cat in the Hat Learning Library? They combine information about non-fiction topics with lively cartoon-like characters and rhyming text (I have a weakness for books that rhyme). My son LOVES these and I do too.


After we finished reading, I gave him some lizard and snake templates I made and cut apart. 
Download this 1-page PDF here.
Then I cut apart a shower poof and placed a piece of 7 ¼-inch wide cardboard inside the netting tube I cut. My son picked the colors of acrylic paint to use on each snake.


We placed the paper under the netting and over the cardboard. I taught my son to stencil, pouncing the brush until it was mostly dry and then pouncing again over netting. The netting created the perfect “stencil” to make scaly snake skin! Next, my son painted his lizards – one with spots, the other with stripes.


I used a hairdryer to speed up the dry time. Once dry, he added eyes with a black crayola marker. After I’d cut them out, we took them to the store to be laminated.


Once laminated, I cut around each bookmark, used a punch to add a hole in the mouth of each animal and my son threaded pink or red ribbon through for a tongue.

Of course, I added his name to the backs of each in the hope that his new super cool cold-blooded long-tongued bookmarks never slither away.


Monday, December 12, 2011

It’s All the Same (a Math Puzzle Game)


I wanted a fun way for my son to see how that the same math problem can be written in different ways. And I wanted him to be able check his work independently, similar to the Lock and Key Math game I made.

So I created a series of 12 puzzles for my son to play. 

Each puzzle has three pieces: 1) a multiplication problem, 2) an addition problem, and 3) groupings of dots.
Download 12 puzzles and the game board here.

To keep the pieces from slipping around, I spray glued sheets of felt to the back of the puzzles (printed on cardstock) before cutting them out and used another felt sheet as the game board. It worked perfectly!


I wish you could have heard the “YEESSSSSS” my son shouted after each puzzle was assembled. It was thrilling to see him catch on and enjoy this so much. 

These puzzles would be great for preschoolers and kindergarteners working on numbers. One piece could have the numeral, another with the number spelled out, and the last piece could display the equivalent number of dots. To make these, download the blank puzzles here.

Friday, December 9, 2011

Jumbo Stamp Art


My son really enjoyed our Postage Paid coin-counting activity. To capitalize on his interest in the stamps, I thought I'd help him design a jumbo one.

Before he started the craft, I reminded him what stamps were – that they are like receipts to prove we’ve paid to mail our letter or package. Then we read a fun fiction book about delivering the mail: Tortoise Brings the Mail by Dee Lillegard.

In this book, Tortoise loves delivering the mail but many other animals think they can do it just as well but faster. After several take a turn at it, they discover that there is no one better for the job than Tortoise. The illustrations are beautiful and the story is heartfelt. As usual when I check out books from the library that my son loves, he asked, “Do we have to return this to the library?”

After we finished the story, we read Mir Tamim Ansary’s book about collecting stamps. The book shows lots of real stamps from all over the world and gives suggestions for different types of stamp collections kids can start. My son was excited to see a stamp with a familiar face on it – Abraham Lincoln’s!


When we were done reading, I handed my son a piece of cardstock with a rectangle in the center. I told him it was time for him to design his own stamp and determine its value. He settled on 88 cents, and added the number and a Christmas scene depicting Ziggy, our Elf on the Shelf, inside the rectangle.


After his drawing was complete, he used my Martha Stewart Punch All Over the Page™ 1 ½-inch circle punch. I helped him line it up to punch half circles all around the sides to make the stamp’s perforated edges. I love the final result. Don’t you?


Wednesday, December 7, 2011

Replicating Monet’s Water Lilies (in 3-D)


My son’s art teacher exposed him to the mastery of Claude Monet. To piggyback on what he was learning at school, I thought we’d make our own impressionism replica of his gardens at Giverny, specifically the ponds with their spectacular water lilies.


First we read about Claude’s life, learned about what impressionism was, and discovered the artist’s infatuation with the way light reflected off of all the things in nature.


Then I gave my son some watered-down acrylic paints and a big sheet of art paper. He painted it blue with hints of lavender. He was discouraged that he didn’t get the whole paper covered. I reminded him that the lighter (or white) spots would just look like light reflecting on the water. Suddenly the very thing that he found frustrating was a source of pride!

I sped up the drying time with my hair dryer. Then he traced some lily pad shapes onto sticky-backed sheets of green foam. When they were cut out, he peeled off the paper backing and attached the pads to the water.

Next, I cut apart a cardboard egg carton. Then, with scissors he cut lots of V shapes out of their edges to look like the lily pad flowers.

All that was left to do was paint each, blow them dry, and glue them atop the lily pads.


This idea came from Judy Press’ book Around-the-World Art & Activities.

Monday, December 5, 2011

Postage Paid (a Coin Counting Activity)


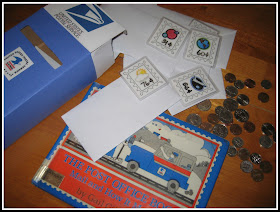
For a little coin-counting practice, I created this fun activity for my son; not only did it work on money and numbers, but it taught him about the postal system too!

You should have seen his eyes light up when he saw our homemade post office box. He was SO curious to see how we’d be using it in our activity, he barely suffered through the book we read.

I have lost count of the number of books we’ve read by Gail Gibbons. Her book The Post Office Book: Mail and How it Moves didn’t disappoint. Like the other non-fiction gems she’s penned, this book simplified a complex subject in a way my son could grasp. He loved seeing all the ways the mail moves from its origination to its destination – including the historical references to the Pony Express.


When we were done with Gibbons’ book, I gave him:
  • A dozen oversized and laminated stamps I had made (truthfully, I made twice this many but we only used half)
  • 12 envelopes filled with coins.
  • The DIY post office box.

Download a 2-page PDF of the oversized stamps I made here.
His task was simple: open each envelope, empty the coins, count them, and find the stamp with the same amount of cents written on it (I used a fine-tip dry-erase marker to write the amounts on each). After he’d bought his stamp, he set the coins aside. He stuck the stamp to the envelope (there were Velcro dots on each) and “mailed” the envelope.


Because the stamps are laminated, I can easily wipe away the old amounts and write new ones on. Using the velcro dots is another way to make this activity reusable.

This was GREAT practice counting money and my son loved it. Once all 12 envelopes were mailed, he even counted the number of each type of coin he had “spent” on stamps.

Friday, December 2, 2011

Spelling with Cheez-Its


I love the Scrabble Junior Cheez-Its. Whenever it’s my son’s turn to take a snack to school and I’m too busy (or lazy) to whip up muffins or trail mix, these are my go-to purchase.


Since my son often does his afterschool activities while eating a snack, using Cheez-Its for our activity was perfect! I created a worksheet with some blanks and a grid. 

Download the Cheez-It Spelling worksheet here.
Then I added the snack crackers to the grid, being careful not to include any letter more than once.

Next I told my son to look and see what words he could make with the letters. For now, I let him move the crackers to try-out different combinations but eventually, we’ll play this like Boggle, where he’ll have to find the words in the grid, without moving the letters.

 
This may be one of the simplest activities we’ve done, but it was deliciously fun and can easily be repeated over and over again without getting boring.

My son came up with some great words – including the name of his new LEGO Ninjago figure Zane.

Sometimes it’s fun to play with your food.

Just ask my son!