Pages

Monday, May 30, 2011

Scrambled States Memory Game

My son kind of digs geography, which I want to encourage. (We have a National Geographic World Map hanging above his bed.) Learning all the states in the U.S. can seem like an impossible task to a five year old – okay, who am I kidding, I don’t even think I could remember all 50?! [blushing with embarrassment]

To make it fun, I created a memory game for him. Since every state has to be represented twice to form a match, I thought it best to divide the game (and states) up by regions.
  • West and Southwest: Washington, Oregon, California, Nevada, Idaho, Wyoming, Utah, Colorado, Montana, Arizona, New Mexico, Texas, Oklahoma, Alaska, Hawaii
  • Plains: North Dakota, South Dakota, Nebraska, Kansas, Iowa, Minnesota, Missouri, Wisconsin, Illinois, Indiana, Michigan, Ohio
  • Southeast: Arkansas, Louisiana, Mississippi, Alabama, Georgia, Florida, Tennessee, South Carolina, North Carolina, Virginia, West Virginia, Kentucky
  • Northeast: Maine, Vermont, New Hampshire, Maryland, Massachusetts, Connecticut, Rhode Island, Delaware, Pennsylvania, New York, New Jersey
I made four sets of cards featuring states in each region. Coloring them was a necessity because Wyoming and Colorado are a similar (if not the same) shape. Then, I printed two of each region’s states on cardstock, glued various colors of heavy-duty construction paper to the back of each page (yellow = Plains states, Blue = Northeast, etc.), and cut them out.

When it came time to start our activity, we read Laurie Keller’s book (which I absolutely love), “The Scrambled States of America.” Next we turned the Plains states cards I’d made state-side down, scrambled them up and then arranged them in a nice grid. Each time he turned over two cards to try and find a match, I read the names of the states on the card to him. After awhile, he began to remember their names. I played with him and when one of us got a match, we took an extra turn.


After all the Plains states were matched, he asked to play again. … Of course, I happily obliged.

To make your own scrambled states memory game, click on the regions above to download the states game pieces; remember to print two!

Friday, May 27, 2011

Sticker Story

When I found several pages of LEGO® City brand stickers on a shopping trip to Wal-Mart, I didn't hesitate to buy them. LEGOs are one of my son’s favorite toys and he loves the LEGO City easy-reader books, too. Since we already had the book “Calling All Cars,” I figured this was an opportunity to use the book and the cops-and-robbers themed stickers.

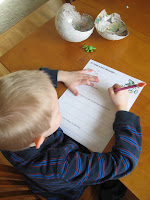
We started this activity by reading the book. It’s longer than what my son is used to, so we took turns. I read one line; he read the next. When the book was finished, I gave my son the stickers, a pencil, and a blank piece of paper with large rules (check out donnayoung.com for free downloadable papers).

I told him to write a story using the stickers. At the top of the paper, I wrote “One day in LEGO City …”. He loved this activity and worked hard to sound out words as he wrote his short story. He filled the whole page. No nagging required. [YAHOO!]

This is a simple activity that could be recreated easily. There are SO many character-themed (Disney Fairies, Cars, Transformers, etc.) stickers for sale and books available at your local library.

Wednesday, May 25, 2011

Skip Counting by 5s and 10s

My son is great at counting by 10s, but when it comes to counting by 5s, he needed a little lot of practice. I wanted to help him understand skip counting (i.e., the practice of skipping over every fifth or tenth number) as well as help him begin to memorize the sequences.

When he got home from school, first we listened to the “Exercise and Count by 5s” song by Jack Hartmann on YouTube. Before you listen, I must warn you that it is extremely catchy and should you listen more than once, you will have the tune stuck in your head for hours, possibly even days. My son loved it! The more we listened to it, the more he wanted to replay it.


After we listened to the song a zillion times, he circled every fifth number on a worksheet printed with the numbers one through 100. Then, he drew a square around every tenth number.


When he was done:
  1. I gave him 10 dimes and 20 nickels, which he sorted.
  2. I explained that each dime was worth 10 cents and each nickel was worth 5 cents.
  3. I gave him 3 nickels and explained that if he counted the first three circled numbers on his page, he’d know how many cents he had. After he said “15 cents,” we counted together, “5, 10, 15.”
  4. I continued to give him more nickels (e.g. “If I give you three more nickels, how many nickels do you have now? How many cents is that?” Then we counted, “5, 10, 15, 20, 25, 30.”)
  5. I repeated this with the dimes.
  6. Then I asked him how many cents he had of each. “100 cents of each! 200 cents together!”
  7. I told him that 100 cents was equal to one dollar and asked him how many dollars’ worth he had. “Two dollars!” he exclaimed excitedly. He felt rich!
Afterwards, he fed the coins to his piggy bank.

A PDF of this worksheet is available to anyone that wants it. Just click here to download.

Monday, May 23, 2011

Learning about Lightning

The forecast last week called for five consecutive days of rain (ugh!). What better time to learn about lightning, eh? I checked out a few books from our local library to help explain how lightning is made (electricity in the clouds) and what to do to stay safe during a storm.


Most of the books I found explained the science behind storms with more detail and advanced vocabulary than a kindergartener can understand. To solve this problem, I edited the stories a bit, carefully selecting which pages to read to my son. Franklyn M. Branley’s book “Flash, Crash, Rumble, and Roll” did a great job of explaining lightning and providing safety tips.


After we read up on the topic, I gave my son some story paper that had space for a picture at the top and lines for writing below. I told him to draw a neighborhood at the bottom of the picture window. When he was done drawing houses and trees and a postal drop box (don’t ask me why he added this, we have a mailbox), I paper-clipped a piece of paper behind his drawing, on which I had used a hot glue gun to draw 3-D lightning strikes.


With blue and black crayons stripped of their paper, he held them sideways and rubbed them over his drawing to make lightning magically appear in the dark sky. When his stormy scene was complete, I wrote “When it storms, you should …” at the top of the page and let him finish the sentence on his own.


Friday, May 20, 2011

Alphabetize Surprise

The supply list for this activity is pretty short: index cards, two different colored markers, a lollipop, and a print-out of the entire alphabet. My son knows the alphabet, but I wasn’t sure how he’d do alphabetizing; I decided to find out. On 14, 3- by 5-inch index cards, I wrote a series of simple words, each starting with a different letter, in black marker. I underlined the first letter of each word.

Then, I put them in alphabetical order and on the back of each card, wrote one word of the following sentence using a colored marker: “Red, orange, or blue – which lollipop will you choose? I have one for you.” (I wrote the words in two different colors so he wouldn’t get confused about which words to alphabetize.) Then I shuffled the cards.


When my son got home from school, I gave him a printed page with all the letters of the alphabet and two of the shuffled index cards. He read the words on each of the two cards and then I asked him which letter at the start of the words came first in the alphabet. After finding the letters on our ‘cheat sheet’ and putting the words in alphabetical order, I gave him another card … and another … and another. (I think you get the picture.)

Pretty soon, he had index cards stretching from one side of the kitchen table to the other. When he had them all alphabetized, I asked him to flip the cards over and read the surprise message on the back. He was thrilled! The tootsie pops were inexpensive and definitely worth every penny to have my son read 28 words without argument.

My son's reward was a lollipop, but mine was when he asked if we could do “Alphabetize Surprise” again tomorrow. Success!

Wednesday, May 18, 2011

If I Had a Pet Dinosaur

If your child likes dinosaurs, making a mess, and has a wild imagination, this is a great activity! Working after school for three days, my son made a dinosaur egg, painted it, “hatched” it, and wrote about what it would be like to have a pet dinosaur. Here’s how he … um, I mean we … accomplished all that:

Day 1
PREP: Put a small plastic dinosaur toy inside a balloon and blow it up when your son/daughter isn’t around. Cut up strips of newspaper and mix white glue and water in a 2 to 1 ratio (i.e., twice as much glue as water).


After school, we read about dinosaur eggs and nests in Kate Petty's book "I Didn't Know That Dinosaurs Laid Eggs." Then we paper machéd two layers of newspaper onto the balloon. For directions on how to do this, check out instructions online. Notice I said we not he; it turns out not all boys like to make such a big mess. With a half complete balloon, I had to step in and help. (Be prepared to have glue under your fingernails.) I hung the balloon with a chip clip on a clothing rack to dry. NOTE: My son had no idea there was a dinosaur inside because our red balloon wasn’t very translucent; avoid using a white or yellow balloon to keep the secret.


Day 2
Twenty-four hours later when the paper maché was dry, he painted the papered balloon white. Once this was done, I had him go on a dinosaur hunt.


Day 3
PREP: Before my son came home from school I popped the balloon and pulled it out of the "egg," leaving the dinosaur inside. I drew lines radiating out from the hole and added small cuts to make it look like the egg was cracking.

When school was out, my son cut open the egg and discovered the baby dinosaur inside. WHAT A SURPRISE!! Then we read the book “Have You Seen My Dinosaur?”  by Jon Surgal (this rhyming tale reminded me of “Green Eggs and Ham” and had many sentences easy enough for my son to read on his own). Afterwards, he completed a worksheet by writing about his new “pet” dinosaur.


We’re so glad that Cody the Triceratops has joined our family! (I just hope he doesn’t drink all of my soda pop.)

Download a PDF of the "If I had a pet dinosaur ..." worksheet here.

Monday, May 16, 2011

Counting with Coins

Money is still a bit of a foreign concept to my son (not how to spend it, just how to count it). He often forgets how much each coin is worth and what they’re called.

To help him with this, I created an activity that he can do again and again. It’s similar to Dice Roll Math but uses a homemade spinner. Using Print Shop software, a glue stick, clear contact paper (for added durability), scissors, a hole punch, recycled cereal box for sturdiness, and a brad, I made a spinner picturing the four most common coins (who uses a half-dollar coin anymore?).
Before my son started spinning the thing like mad, though, we read a few books that I checked out from our local library by Rozanne Lanczak Williams. My favorite was “Learning About Coins.” It was simple enough and helped him understand the values of each coin.

Afterwards, he spun the spinner and wrote the value of the coin that the arrow pointed to on a worksheet I made for him. One more spin and he had a math problem to add the two coins’ values together. He completed six problems and by the end of the activity wasn’t even using the key I’d created at the top of the worksheet (i.e., quarter = 25 cents; dime = 10 cents, etc.)!

When this becomes 'easy peasy' (as he would say), I'll modify the problems to add more than two coins' values.

If you want to make a spinner of your own, download the template here. The worksheet is available as well; click here

Friday, May 13, 2011

Sight Word Bingo

I don’t know why this wasn’t the first afterschool educational activity I blogged about. It’s definitely my son’s favorite. When he was just starting to read, his kindergarten teacher sent home a list of the sight words each child should know by the end of the school year. I did exactly what was suggested. Yep, you got it. I made flash cards. Getting through the cards was a struggle for my son and every time thereafter that I pulled them out, high-pitched whining ensued. What was a mother to do?!?

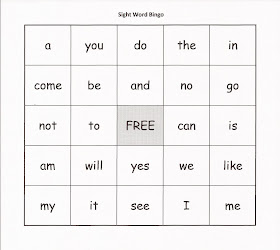
That’s when I read this idea online: turn the sight words into a bingo game. Using Microsoft Excel® I created a grid of 5 by 5 squares, and typed the sight words into each square, making sure to label the middle one FREE. I printed two copies of the game card on cardstock, and laminated one with clear household contact paper. I cut the squares from the other card out and put them in an envelope.


When my son got home from school, I gave him the game card and a bag of fruit snacks, which I told him NOT to eat until the game was over. As I pulled each word from the envelope and said it aloud, I watched astonished as his eyes coursed back and forth over the card until he placed the fruit snack on the correct word. When he had 5 in a row, he yelled “Bingo!” excitedly and gobbled down his edible bingo markers.

After mastering this list of words, I made a second card with color words and additional sight words I found online. While he knows all these words by heart now, when given a choice for our afterschool activity, I can almost always count on him to choose Sight Word Bingo.
If your son/daughter doesn’t like fruit snacks, consider using Cheerios, Reese's Pieces, Goldfish crackers, or for a non-edible alternative, buttons.

Download a PDF of both of these game cards today!

Tuesday, May 10, 2011

Dinosaur Hunt

While my son’s infatuation has matured from dinosaurs to Star Wars, he still finds the prehistoric reptiles interesting. To teach him a little about these creatures, I developed this dinosaur game. I hid five of my son’s plastic dinosaur toys in our living room and gave him a worksheet with this little rhyme to instruct him on what to do.


Look in the living room.
Look all around –
up high and down on the ground.

You’re looking for dinosaurs,
so get going!
It’s time to start exploring.

When you have found all five,
bring them to me.
We’ll figure out what their names must be.

After he read this, he set out on the task of finding five hidden dinosaurs. After he’d found a few, I tested his subtraction skills by asking, “You found two. There were five hidden. How many do you have left to find?”

Once all five dinosaurs had been found, he cut out short descriptions I’d typed up about each (I found the information I needed in the World Book's Learning Ladders "World of Dinosaurs" book). I helped him read each description and then he matched them to the corresponding dinosaur.


Friday, May 6, 2011

Missing Letters Mystery

Everyone loves solving a mystery, right? This activity is proof that my son is among the masses that enjoys a little sleuthing now and then.

I typed up 8 short clues in Microsoft Word® that would help my son answer the ultimate question of “What am I?” I looked at the words in my clues and deleted some letters and phonic blends, inserting blanks instead. It was up to my son to read the clues (with help) and fill in the missing letters. When all the clues were complete, he looked out the window and realized that the mystery object was our mailbox.

I found some alphabet stamps in the dollar bin at our local craft store and snapped them up. While the stamps and ink aren’t necessary for this project, they added to the fun of the activity. If you decide to have your son or daughter stamp the answer, invest in some washable ink. When you see his/her hands and your table, you’ll be glad you did.


Wednesday, May 4, 2011

Flip It Word Game

Learning to read is hard. I figured that if my son could recognize patterns and similarities in words, reading would be easier. After all, if he knows how to read and spell “mast,” then spelling “last” should be a breeze, right?

Since I wanted to reuse this game again, I laminated it using some packing tape we had lying around the house. Hand your child a tissue and a fine-tip dry-erase marker and this game becomes reusable and portable (because doesn’t getting food at a restaurant and driving to grandma’s house take FOREVER for a 5 year old?!).

Supplies:
6 ruled 3x5 (or larger) index cards
Stapler
Packing tape
Scissors or a cutting tool
Pencil
Fine-tip dry-erase marker
tissue/paper towel
small clipboard (optional)
2 rubberbands (optional)


Instructions:
On one card, draw four vertical lines down the ruled side of the card, dividing it into 4 equal rectangles. Put two strips of packing tape over the top, completely covering the card. Cut the remaining 5 cards into the same equal-sized rectangles (you’ll have 20 strips). Cover each with packing tape and trim the excess. Stack each of the strips into four piles of 5. Staple each stack (above the red horizontal rule) on top of the full-size card you’ve already laminated. Now bend each stack of cards back where the red rule is.

Write your first word (one letter per box) on the bottom card. Instruct your child to pull down one or two flaps and write a new letter (or phonic blend, such as “sh” or “ch”) to transform that word into the next word on the list.

Tips: Use ruled index cards to encourage good handwriting. Don’t use tissues with lotion to wipe the letters off with (it’ll smear the dry-erase ink and leave a film on your cards). A small clipboard (approximately $1.50 at an office supply store) and two rubberbands can be used to secure the cards and tabs for your child so it’s easier for him/her to see which tabs have been flipped down.

Like the idea but don’t want to go to all the work? Take the easy route and buy a small whiteboard instead.


Below are some Flip It word lists. Click on the lists to enlarge the image.

Monday, May 2, 2011

Where is My Money Made?

My son is lucky to have a grandmother who collects coins. She got him started young with a collection of all the state quarters. A week ago, my son pulled out his collector’s book and we began to read the introductory pages that discussed where the coins are made – at a mint (which I explained was NOT the same as candy) in either Philadelphia or Denver.

The book went on to explain that you can tell which mint the coins were made at by looking at the “heads” side of the coin. Either a small “P” or “D” will be stamped on the coin to indicate either Philadelphia or Denver.

A few days later, I printed a blank U.S. map from ColoringCastle.com and had him look for and color the states where these two mints were located. Then I gave him 10 of each type of coin (quarters, dimes, nickels, and pennies). First he sorted the coins into four piles. Then, he looked at each to find the “P” or “D” and charted where each was made on a worksheet I’d created. The question we were trying to answer was where most of our money was made. (I have to admit, even I was intrigued.)

When it was all done, he counted the boxes on the chart and discovered that an overwhelming majority of our coins were made out west. To finish the activity, I had him circle Colorado on the U.S. map. This was a fun activity that we both enjoyed; it taught him a little about geography and a lot about money and counting.

If you want a copy of this worksheet, download it here.